B1CB1FK1 - 406D9 XU INJECTION
DATA - IDENTIFICATION HALF SHELLS
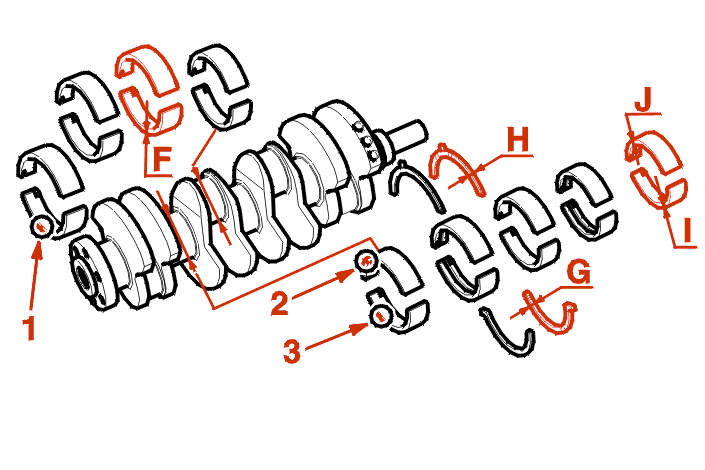
1 - NOMINAL DIMENSION : CONNECTING ROD HALF SHELLS
XU5JP ENGINE
| legislation type | BFZ | BFZ |
|---|---|---|
| distance (mm) | nominal | mark (1) |
| F | 1.820 + 0 - 0.006 |
green |
XU7JP ENGINE XU7JP4 ENGINE
| legislation type | LFW - LFY - LFZ L6A - L6B |
LFW - LFY - LFZ L6A - L6B |
|---|---|---|
| distance (mm) | nominal | mark (1) |
| F | 1.822 ± 0.003 | - |
XU10J4R ENGINE
| legislation type | RFV - R6E | RFV - R6E |
|---|---|---|
| distance (mm) | nominal | mark (1) |
| F | 1.834 ± 0.003 | green |
ALL MODELS
2 - REPAIR SIZE : CONNECTING ROD HALF SHELLS
XU5JP ENGINE
| legislation type | BFZ | BFZ |
|---|---|---|
| distance (mm) | repair 1/reference (1) | repair 2/reference (2) |
| F | 1.962/white | 2.067 ± 0.003/blue |
XU7JP ENGINE XU7JP4 ENGINE
| legislation type | LFW - LFY - LFZ L6A - L6B |
LFW - LFY - LFZ L6A - L6B |
|---|---|---|
| distance (mm) | repair 1/reference (1) | repair 2/reference (2) |
| F | 1.972 ± 0.003/white | 2.072 ± 0.003/blue |
XU10J4R ENGINE
| legislation type | RFV - R6E | RFV - R6E |
|---|---|---|
| distance (mm) | repair | reference |
| F | 1.984 ± 0.003 | - |
WARNING : the lubrication circuit of the RFV engine has been modified to optimise lubrication of the piston skirts ; for connecting rod/bearing shell interchangeability, refer to the Connecting rods Identification - Data section .
ALL MODELS
3 - NOMINAL DIMENSION : THRUST WASHERS
The end float must be between 0.07 and 0.27, it is adjusted by 4 thrust washers .
XU5JP ENGINE XU7JP ENGINE XU7JP4 ENGINE
| legislation type | BFZ LFW LFY - LFZ - L6A L6B |
|---|---|
| distance (mm) | nominal |
| G | 2.28 + 0.05 + 0 |
| H |
4 - REPAIR DIMENSIONS : THRUST WASHERS
XU5JP ENGINE XU7JP ENGINE XU7JP4 ENGINE
| legislation type | BFZ LFW LFY - LFZ - L6A L6B |
BFZ LFW LFY - LFZ - L6A L6B |
BFZ LFW LFY - LFZ - L6A L6B |
|---|---|---|---|
| distance (mm) | repair 1 | repair 2 | repair 3 |
| G | 2.38 + 0.05 + 0 |
2.43 + 0.05 + 0 |
2.48 + 0.05 + 0 |
| H |
XU10J4R ENGINE
| legislation type | RFU - RFV - RFX RGX - R6D R6E - RFT RFY - RFS |
RFU - RFV - RFX RGX - R6D R6E - RFT RFY - RFS |
RFU - RFV - RFX RGX - R6D R6E - RFT RFY - RFS |
|---|---|---|---|
| distance (mm) | repair 1 | repair 2 | repair 3 |
| G | 1.93 + 0.05 + 0 |
1.98 + 0.05 + 0 |
2.03 + 0.05 + 0 |
| H |
ALL MODELS
5 - MAIN BEARING HALF SHELLS
XU5 INJECTION XU7 INJECTION
The operating clearance of the crankshaft main bearings, between 0.025 and 0.062 mm, is obtained by the creation of 4 categories of lower smooth half shells (I) (cap side) .
XU10 INJECTION
The operating clearance of the crankshaft main bearings, between 0.038 and 0.069 mm, is obtained by the creation of 4 categories of lower smooth half shells (I) (cap side) .
ALL MODELS
5 - 1 - TOP HALF SHELLS
There is only one category for the upper grooved half shells (Cylinder block side) .
5 - 2 - BOTTOM HALF SHELLS
The categories of bearing shells are determined by the measurement of each main bearing .
6 - MAIN BEARING HALF SHELLS (CONTINUED)
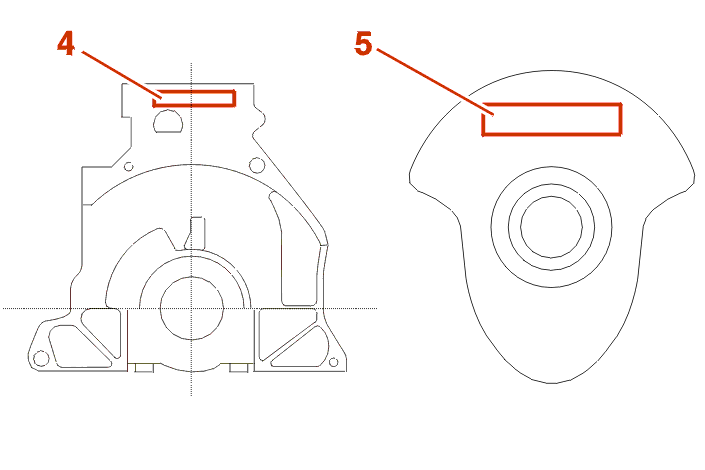
The categories of bearing shells are given on the engine block (4), flywheel side, and on the crankshaft (5), timing side, in the form of codes .
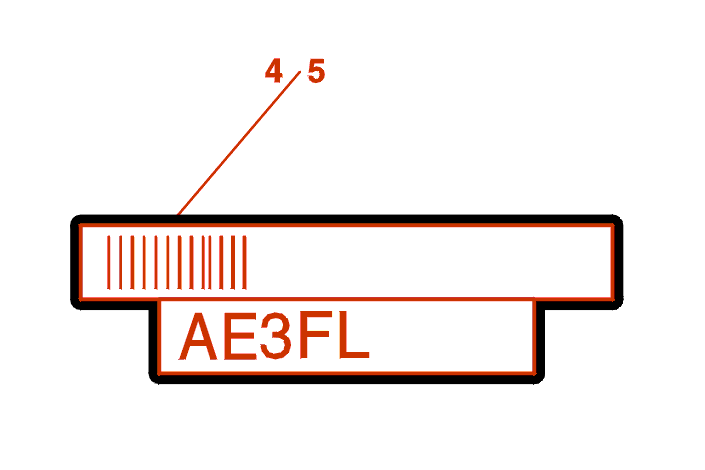
Bar code used in plant .
Alphanumeric code, used in Service :
NOTE : the main bearings are numbered from 1 to 5, with no. 1 at the flywheel end .
Example :
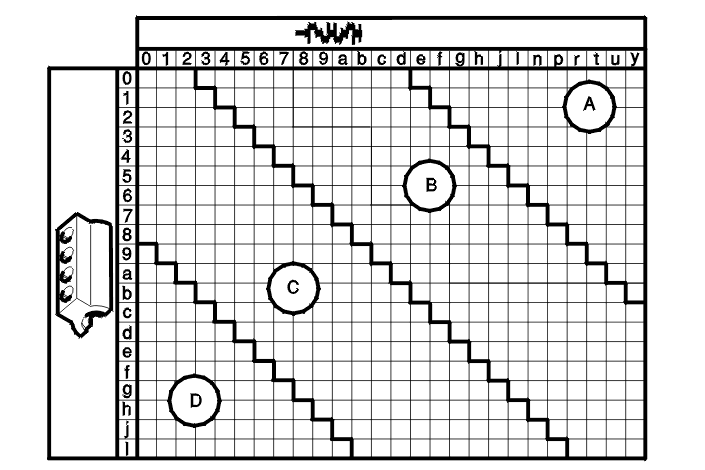
For bearing no. 1 (A3) : The lower half shell to be fitted is category B .
For bearing no. 2 (EF) : The lower half shell to be fitted is category C .
Proceed in the same way for the other three assemblies .
6 - 1 - NOMINAL DIMENSION : HALF SHELLS
WARNING : illegible alphanumeric code : determine the categories of the lower half shells using a PLASTIGAGE type plastic gauge .
XU5JP ENGINE XU7JP ENGINE XU7JP4 ENGINE
| legislation type | BFZ LFW LFY - LFZ - L6A L6B |
BFZ LFW LFY - LFZ - L6A L6B |
|---|---|---|
| half shells | thickness (I), (J) (mm) |
reference (2)/(3) |
| grooved upper half-shell | 1.856 | yellow |
| lower half-shell/category A | 1.836 | blue |
| lower half-shell/category B | 1.848 | black |
| lower half-shell/category C | 1.859 | green |
| lower half-shell/category D | 1.870 | red |
XU10J4R ENGINE
| legislation type | RFU - RFV - RFX RGX - R6D R6E - RFT RFY |
RFU - RFV - RFX RGX - R6D R6E - RFT RFY |
|---|---|---|
| half shells | thickness (I), (J) (mm) |
reference (2)/(3) |
| grooved upper half-shell | 1.847 | black |
| lower half-shell/category A | 1.844 | blue/yellow |
| lower half-shell/category B | 1.857 | black/orange |
| lower half-shell/category C | 1.866 | green/white |
| lower half-shell/category D | 1.877 | red/brown |
ALL MODELS
IMPERATIVE : for the replacement of the half shells of XU10 engines except XU10J4TE and XU10J2TE, it is necessary to refer to the special feature of XU10 engines below .
XU10J4R ENGINE
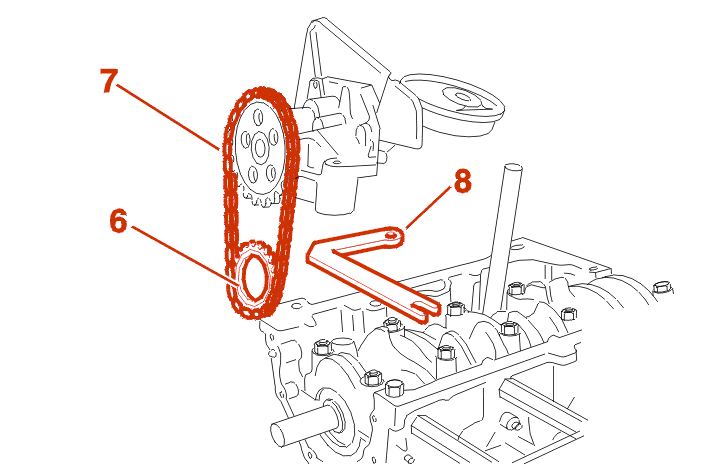
When the crankshaft main bearing half shells are replaced, carry out the following checks :
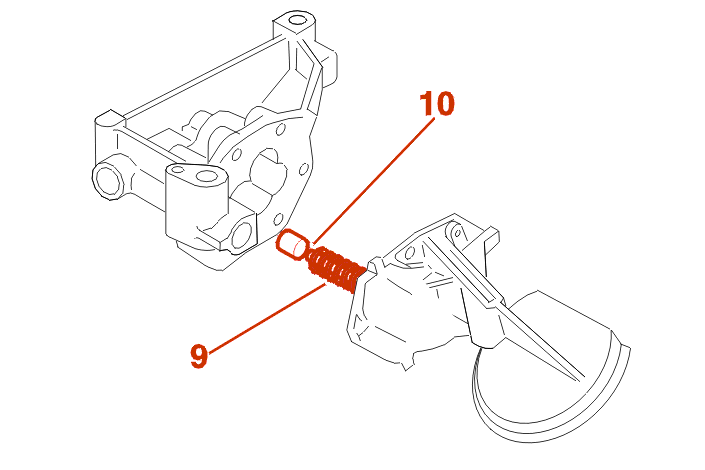
IMPERATIVE : if this is not the case, replace : the pinion (6), the chain (7), the spacer (8), the spring (9), the discharge valve spring guide pin (10) .
WARNING : in the case of non or partial replacement of these units, fit category A lower half-shells (blue paint mark) .
ALL MODELS
6 - 2 - REPAIR DIMENSIONS : MAIN BEARING HALF SHELLS
Determine the categories of the lower half shells using a PLASTIGAGE type plastic gauge .
XU5JP ENGINE XU7JP ENGINE XU7JP4 ENGINE
| legislation type | BFZ LFW LFY - LFZ - L6A L6B |
BFZ LFW LFY - LFZ - L6A L6B |
|---|---|---|
| half shells | thickness (mm) | reference |
| grooved upper half-shell | 2.006 | yellow |
| lower half-shell/category A | 1.986 | blue |
| lower half-shell/category B | 1.998 | black |
| lower half-shell/category C | 2.009 | green |
| lower half-shell/category D | 2.020 | red |
XU10J4R ENGINE
| legislation type | RGX RFT - RFU - RFV - R6D RFX - RFY - R6E |
RGX RFT - RFU - RFV - R6D RFX - RFY - R6E |
|---|---|---|
| half shells | thickness (mm) | reference |
| grooved upper half-shell | 1.997 | black |
| lower half-shell/category A | 1.994 | blue |
| lower half-shell/category B | 2.007 | black |
| lower half-shell/category C | 2.016 | green |
| lower half-shell/category D | 2.027 | red |
6 - 3 - USING THE PLASTIC GAUGE
The use of category A (blue) half shells allows the measurement to be taken .
Fit 5 upper bearing shells (grooved) on the cylinder block side .
NOTE : re-ground crankshaft : the use of category A (blue) half shells allows the measurement to be taken; fit 5 upper half shells (grooved) of repair dimensions, cylinder block side .
Fit the crankshaft .
Remove all traces of oil .
Fit 5 lower half shells (smooth) inside the main bearing caps .
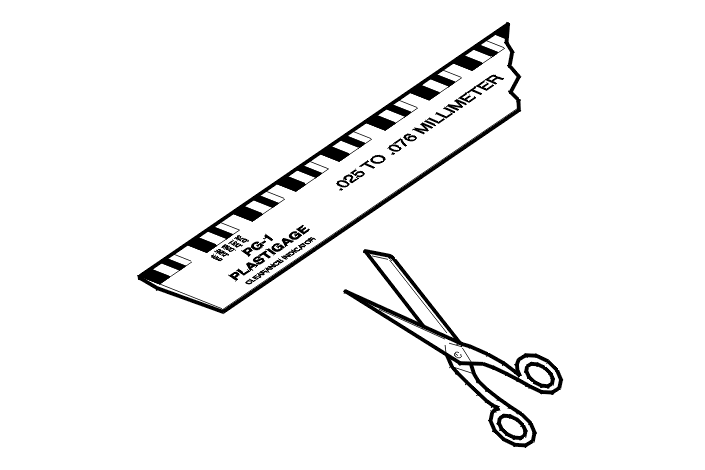
Cut 5 pieces of plastic gauge to the width of the half shells .
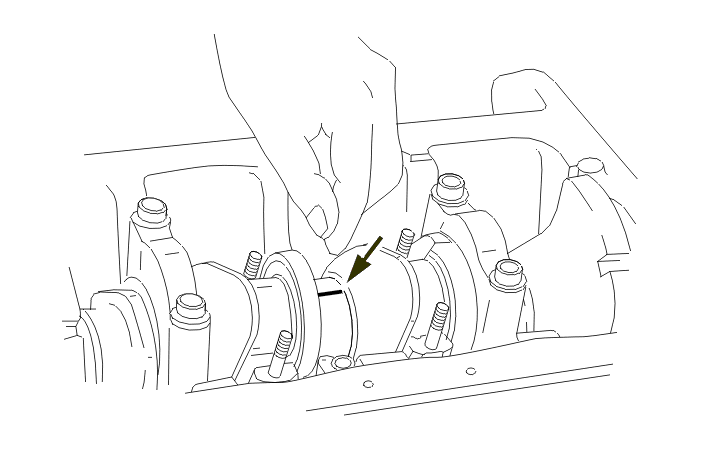
Open the paper envelopes and extract the wires .
Fit the plastic wires on each of the crankshaft journals or on the main bearing cap half shell .
Fit the bearing caps .
Tighten the main bearing bolts to the recommended torque for the engine .
WARNING : during this operation, the crankshaft must not rotate .
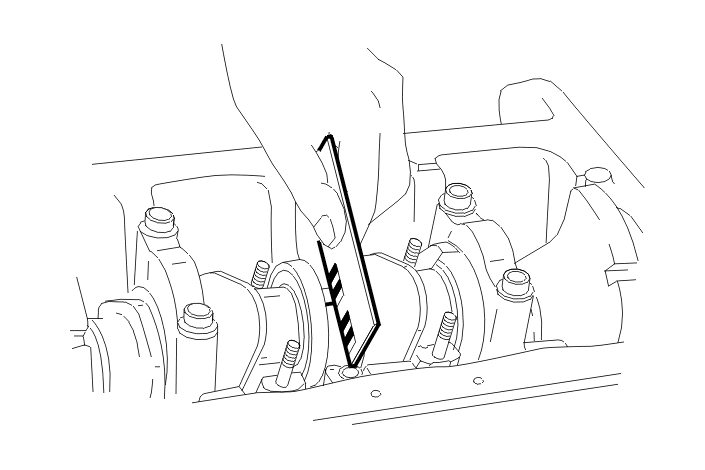
Remove the main bearing caps .
Compare each width (in mm) of flattened plastic wire at its widest point with the graduations on the paper envelopes .
NOTE : the measurement can be taken on the crankshaft or the bearing shell without moving the wire; the value measured determines the category of the half shell .
If the crankshaft is ground : Follow the indications in the table below using repair dimension half shells .
XU5 INJECTION XU7 INJECTION
| XU5 - XU7 engine | ||
|---|---|---|
| value recorded | half shells | operating clearance |
| less than 0.025 | the value recorded is less than the minimum operating clearance check the condition of the half-shells, the journals and main bearings |
0.062 to |
| 0.038 to | category A blue |
|
| 0.050 to | category B black |
|
| 0.062 to | category C green |
|
| 0.072 to | category D red |
|
XU10 INJECTION
| XU10 engine | ||
|---|---|---|
| value recorded | half shells | operating clearance |
| less than 0.038 | the value recorded is less than the minimum operating clearance check the condition of the half-shells, the journals and main bearings |
0.069 to |
| 0.052 to | category A blue |
|
| 0.062 to | category B black |
|
| 0.074 to | category C green |
|
| 0.080 to | category D red |
|
ALL MODELS
Check the clearances after replacing the half-shells by applying the above-mentioned method but using half-shells of the definitive thickness .
WARNING : when refitting the big end caps, do not reuse the original nuts, use new ones .
NOTE : if no means of measurement is available, fit category lower half-shells A (blue); this must only occur in EXCEPTIONAL circumstances, as the engine may become noisy .