1 Operation Manual for EWA net "Local"
Daimler
2 Table of Contents
1 Operation Manual for EWA net "Local"
2 Table of Contents
3 Introduction
3.1 “EWA net Central” vs. “EWA net local”
3.2 Target audience
3.3 Definitions
3.4 Terms
4 System Software
4.1 Automatically installed system software
4.2 System software to be installed manually
5 System Overview
5.1 Application modules
5.1.1 EWA net core framework
5.1.2 EWA net application components(Client software)
5.2 Workflow
5.3 Clustering and loadbalancing
5.4 Database replication
6 Requirements
6.1 Delivery Media
6.2 Software
6.2.1 Application server / Database server machine
6.2.2 Client machines
6.3 Hardware
6.4 Network
7 Installation
7.1 EWA net “local”
7.1.1 Run the installer
7.1.2 Check the services
7.1.3 Register the access authorization(s)
7.1.4 Add a first Group and first User
7.2 Install database content from DVDs
7.3 Manual modifications
7.4 Quick check of the installation
7.4.1 Check on the server
7.4.2 Check on the client
8 EWA net Configuration
8.1 EWA net Application Server Settings
8.1.1 core_cfg.xml
8.1.2 license.xml
8.1.3 um_cfg.xml (and um_batch_cfg.xml)
8.1.4 additional_downloads_cfg.xml
8.2 Feedback
8.2.1 Introduction
8.2.2 Technical decision tree
8.2.2.1 Feedback Channel: Fax
8.2.2.1.1 Preconditions
8.2.2.1.2 Configuration
8.2.2.2 Feedback Channel: Email
8.2.2.2.1 Preconditions
8.2.2.2.2 Configuration
8.2.2.3 Feedback Channel: Email-or-Fax
8.2.2.3.1 Preconditions
8.2.2.3.2 Configuration
8.2.2.4 Feedback Channel: XSF-email
8.2.2.4.1 Preconditions
8.2.2.4.2 Configuration
8.2.2.5 Feedback Channel: XSF-fax
8.2.2.5.1 Preconditions
8.2.2.5.2 Configuration
8.2.2.6 Feedback Channel: xml-post
8.2.2.6.1 Preconditions
8.2.2.6.2 Configuration
8.2.2.7 Advanced features of the feedbackRecipients.xml
8.3 Configuration of WIS net
8.3.1 wis_cfg.xml
8.4 Configuration of EPC net
8.4.1 epc_cfg.xml
8.5 Advanced configuration of EPC net
8.5.1 EPC Shopping lists
9 Advanced Configuration
9.1 Switching EWA net to default HTTP Port 80
9.2 Logging
9.2.1 EWA net system log
9.2.1.1 File names and location of logfiles
9.2.1.2 Log level
9.2.2 Application Server logging
9.2.3 Client Side Logging
9.3 Security
9.3.1 Secure Socket Layer (SSL, HTTPS) Support – Optional
9.3.2 Protection against unsolicited access
9.4 User Management Configuration
9.4.1 HP User Management
9.4.2 LDAP
9.4.2.1 General Setup of LDAP
9.4.2.2 Using LDAP Authentication (Simple mode)
9.4.2.3 Using LDAP Fetch Mode
9.4.2.4 Using LDAP Search Mode
9.4.2.5 Using LDAP Search and Authentication Mode (most valuable for accessing an MS ActiveDirectory)
9.4.3 Corporate Directory
9.4.4 StarTekInfo
10 Single Sign On with EWA net
10.1 Single Sign On
10.1.1 Windows NTLM Authentication
10.1.1.1 Setting up SSO on Tomcat and Internet Information Server (IIS)
10.1.1.1.1 Setup Internet Information Server
10.1.1.1.2 Configure and restart the EWA net server
10.1.1.1.3 Install files from the EWA net media
10.1.1.1.4 Configure and restart the IIS
10.1.1.2 Check the Environment
10.1.1.3 Client Setup for SSO
10.1.1.3.1 Ensure the correct Java Runtime
10.1.1.3.2 EWANAPI Update
10.1.2 SiteMinder Authentication
10.1.2.1 Configuration of SiteMinder
10.1.2.2 Working with SiteMinder SSO integration activated
11 Clustering of an EWA net Server
11.1 Clustering
11.2 Clustering EWA net using Tomcat application server
11.2.1 NAT Request distributors / Load Balancers
11.2.2 Using mod2jk and Apache httpd for Load Balacing
11.2.3 Distributed Java Servlet Containers
11.2.3.1 Servlet Sessions
11.2.3.2 Session Affinity (or Sticky Sessions)
11.2.3.3 Replicated Sessions
11.2.3.3.1 Session Replication in Tomcat 5
11.3 Steps to Cluster EWA net with Tomcat as Application Server
11.3.1 Installing Apache Web Server
11.3.2 Install and Configure mod_jk Connector
11.3.2.1 Changes in all EWA net Servers
11.3.2.2 Configuring Session Replication
12 De-Installation
12.1 "Hardcore" de-installation
13 Update / Migration
13.1 Regular updates
14 Additional software installation
14.1 Spooler
14.1.1 General
14.1.2 Configuration
14.1.2.1 Spool file location
14.1.2.2 Access rights for spool out files
14.1.3 Interactively running the spoolers
14.1.3.1 ASRA Spooler (AWAT data spooler)
14.1.3.2 Damagecode Spooler (SSL data spooler)
14.1.4 Scheduled process of spooling / Spooling multiple "packages"
14.1.4.1 ASRA spooler
14.1.4.1.1 Sample spoolout
14.1.4.2 Damagecode spooler
14.1.4.2.1 Sample spoolout
15 Client software installation
15.1 Java Runtime Environment
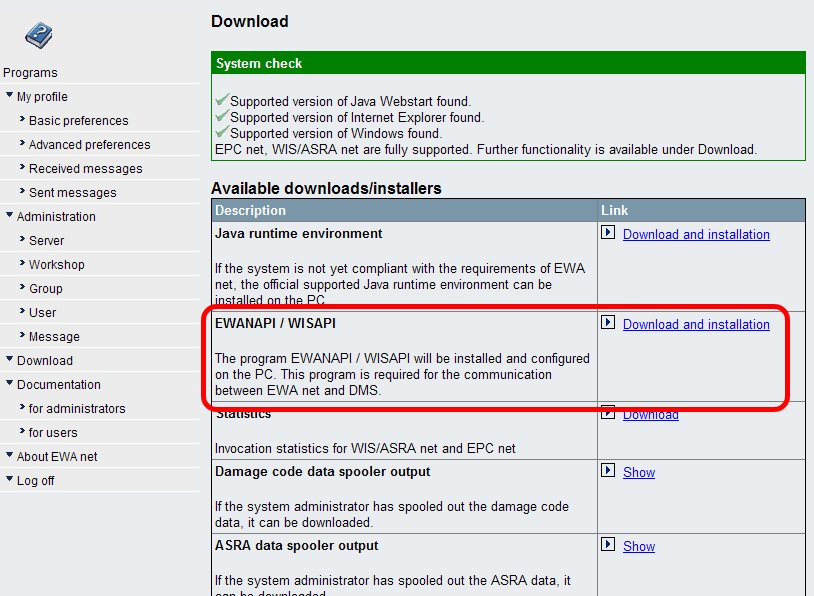
15.2 EWANAPI (External API to call EWA net clients for DMS calls and/or Xentry integration) (ewanapi.exe / wisapi.exe)
15.2.1 Automatic Installation via the integrated EWANAPI Installer
15.2.1.1 Server side preparation (System administrators tasks):
15.2.1.1.1 Automatic property replacement within ewanapi.ini
15.2.1.1.2 Influence target installation directory on the client PC
15.2.1.1.3 Prefer SSO authentication before provided credentials
15.2.1.1.4 Address Proxy settings / problems
15.2.1.1.5 Preparation for Autoline 8.30 / 8.35 integration
15.2.1.1.6 Preparation for Autoline 8.2 Emulation layer
15.2.2 Automatic Deployment of EWANAPI
15.2.3 Manual Installation
15.2.4 Configuration
15.2.5 Proxy Server Configuration for EWANAPI
15.2.6 Example of an ewanapi.ini file
16 Server Monitoring and Management
16.1 Introduction
16.2 Management Interface Architecture
16.3 Management Configuration Options
16.4 Management Interface Usage and Options
16.4.1 Web Server Interface
16.4.2 EWA net Core Components Interface
16.4.3 EPC net Interface
16.4.4 WIS net Interface
16.4.5 Retrieving Management Information
16.4.6 Retrieving XML Information of Management Information
17 Performance optimization & fine tuning
17.1 Introduction
17.2 Operating System
17.2.1 Socket Timeout (Windows)
17.3 Application Server Settings
17.3.1 Memory consumption the application server Java Runtime
17.4 Tomcat Settings
17.5 Application Settings
17.5.1 Logging (AccessGateway)
17.6 Database Settings
17.6.1 Shared Memory Configuration for Transbase
17.6.2 Increasing WIS net Transbase Cache Settings
17.6.3 Connection pool (WIS net)
18 General Information
18.1 Filesystem structure
18.1.1 Delivery media (DVD)
18.1.2 Filesystem layout on the target system
19 Backup and Migration Tool
19.1 Purpose of the Back up and Migration Tool
19.1.1
19.1.2 Configuration of the Backup and Migration Tool
19.1.3 1.1 Task Type configuration options
19.1.4 1.2 Defining source and target
19.1.5 1.3 Defining an database
19.1.6 1.4 Defining an Filter
19.1.7 1.4.1 Filtering administrator-users
19.1.8 1.5 Sample Configuration Files
19.1.9 2 Logging
19.1.10 3 Running the tool
20 Single Sign On with EWA net
20.1 Single Sign On
20.1.1 Windows NTLM Authentication
20.1.1.1 Setting up SSO on Tomcat and Internet Information Server (IIS)
20.1.1.1.1 Setup Internet Information Server
20.1.1.1.2 Configure and restart the EWA net server
20.1.1.1.3 Install files from the EWA net media
20.1.1.1.4 Configure and restart the IIS
20.1.1.2 Check the Environment
20.1.1.3 Client Setup for SSO
20.1.1.3.1 Ensure the correct Java Runtime
20.1.1.3.2 EWANAPI Update
20.1.2 SiteMinder Authentication
20.1.2.1 Configuration of SiteMinder
20.1.2.2 Working with SiteMinder SSO integration activated
21 Clustering of an EWA net Server
21.1 Clustering
21.2 Clustering EWA net using Tomcat application server
21.2.1 NAT Request distributors / Load Balancers
21.2.2 Using mod2jk and Apache httpd for Load Balacing
21.2.3 Distributed Java Servlet Containers
21.2.3.1 Servlet Sessions
21.2.3.2 Session Affinity (or Sticky Sessions)
21.2.3.3 Replicated Sessions
21.2.3.3.1 Session Replication in Tomcat 5
21.3 Steps to Cluster EWA net with Tomcat as Application Server
21.3.1 Installing Apache Web Server
21.3.2 Install and Configure mod_jk Connector
21.3.2.1 Changes in all EWA net Servers
21.3.2.2 Configuring Session Replication
22 FAQ - Frequently Asked Questions
22.1 ASRA Panel not available
22.2 Slow working EWA net applications
22.3 WIS net and EPC net application are not starting when Single Sign On with NTLM is used
22.4 Start of EWA net applications not possible when server is using HTTPS for authentication
22.5 Corrupted JARs error message in Java WebStart
22.6 WIS net does not show any documents
22.7 WIS net starts with a blank screen
22.8 ArrayIndexOutOfBoundException on server start
22.9 EPC net icons will not be displayed
22.10 SSL secured pages don’t show up
22.11 SSL certificate not accepted
22.12 Manually remove illegal entries from the FINCache
22.13 Enter users with windows domain information
22.14 Reconfigure the time until a session timeout occurs
22.15 Add user interface languages for the Access Gateway User Interface
22.16 Change the minimum Password and Username lengths?
22.17 How to Extract Accounting Information from WIS Usage
22.18 System is not working properly
23 References
23.0.1 Admin Tool Guide
23.0.2 User Administration document
23.0.3 EWANAPI description document
23.0.4 WIS net Release Notes
23.0.5 EPC net Release Notes
3 Introduction
The intention of this operation manual is to provide system administrators sufficient background knowledge to install EWA net, configure it and handle usual problems and errors that may occur during EWA net setup, configuration and in daily operation. In order to do this an overview over the system architecture of EWA net and its core framework is given. The next sections describe general setup and configuration tasks. Additionally, details of some specific topics (like e.g. log information) are provided. A “Frequently Asked Questions” (FAQ) section completes this document.
However, it is not (and cannot be) the aim of this document to provide guidelines to resolve problems originating from third party components like problems setting up an application server or a database system on several Windows OS environments, configuring firewalls to allow user access, integrating EWA net in other environments (Web- or Application Servers other than the ones supported), running several versions of programs (e.g. several versions of the Java Runtime Environment) at the same time etc.
3.1 “EWA net Central” vs. “EWA net local”
EWA net is a server based, distributed application. There are two main differences in the application deployment which will be called “central” and “local” – you will notice these terms often within this document.
Central: this installation type means a centrally hosted server environment which is typically used not only for a single workshop but i.e. for a whole market as Internet based application. Installation and Updates will be performed by experienced system administrators. The server and database software is somehow more advanced (and typically needs separate licensing) then the software from the “local” environment.
Local: this type of installation typically refers to an installation within a local workshop. It has other needs for installation, maintenance and performance. Installation and Updates will be supported by automatic processes. And the software requirements are not as “challenging” as the ones for the “central” environment.
3.2 Target audience
This document has been written for system administrators with at least basic knowledge of
- Windows (incl. Server) operating systems
- Java and Java Runtime Environments. You should know what an exception is and how to follow a stack trace
- XML concepts and editing XML files
- SQL language in general
3.3 Definitions
Following definitions shall help to describe the installation from a more generic view. These definitions or properties do not have to be available as operating system variables. They shall just provide some kind of abstraction throughout this documentation.
The following text will refer to these definitions as [property].
Example:
A “[EWA_HOME]\config” path will have to be expanded by you for your local settings to i.e. “C:\EWA_net\config”.
|
Property
|
Description
|
| DVD-DRIVE |
The drive letter in which you have mounted the delivery DVD
|
| EWA_HOME |
Installation location of the EWA net installation.
Example:
C:\EWA_net
|
| EWA_SERVER_PORT |
Port of the EWA net services to listen to.
Example:
9000
|
3.4 Terms
This section lists some terms that are being used within this document.
|
Term
|
Description
|
| DBMS | Database Management System |
| DB | Shortcut for Database / Database System |
| Core | This is the "heart" of EWA net on the server side. Basically it is the AccessGateway, the EWA net system framework and some other components.
Or: everything apart of EPC net and WIS net that runs on the server. |
User Management DB
Core database | The runtime database running in Read/Write mode.
This database stores user and runtime information.
See the system software chapter for supported products.
|
| WIS database | Runtime, readonly database containing service information for WIS net.
This database is based on the DBMS Transbase. |
| EPC database | Runtime, readonly database containing service information for WIS net.
This database is based on the DBMS Transbase. |
4.1 Automatically installed system software
Following table gives more details about the system software that will be automatically installed and used by EWA net:
|
Type of Software
|
Product
|
Comment
|
|
Application Server
|
Tomcat 5.5.17 (Apache Group)
|
This application server is aimed for the local and central installations. It will nevertheless be installed whenever the automatic installation process will be performed. This out-of-the box installation and configuration should serve 90% of your requirements. Manual modifications for HTTPS, Clustering or different User Management Databases is manually possible.
|
|
DBMS
|
Transaction's Transbase 6.6.2
|
Used by WIS net, EPC net, DamageCode Standalone and (for local systems) for the Core database.
|
|
Java (Server)
|
Java Runtime Environment 1.4.2_02 together with a cryptographic classloader
|
Will be installed automatically by the installers.
Note:
You will NOT be able to run EWA net through a standard Java Runtime from Sun. The JRE, that comes with EWA net will also not be published in the registry and thus not be used for other Java software that might be installed on the server.
Thus it is a “private” JRE only for EWA net.
|
4.2 System software to be installed manually
|
Type of Software
|
Product
|
Comment
|
| WebServer | Apache HTTPd 2.0.49
(Apache Group) | Optional:
This WebServer can be installed and configured manually to allow a 3-Tier Server architecture. The description about clustering and loadbalancing is based on the use of this software. |
|
|
|
Java (Client)
|
Java Runtime Environment JRE 5.0 Update 11 (Sun Microsystems)
|
This Java Runtime is needed to execute Client software (like WIS net or EPC net or even EWANAPI).
You will typically install it on the client operating system, but feel free to install it (manually) on the server system, too. So you will be able to check the client functionality on the server machine itself if you want do so.
Find the appropriate installer after installation within the folder:
[EWA-HOME]\client_apps\jre\jre.exe
|
The applications “EPC net, WIS net and ASRA net (EWA net)” consist of several components rather than of a monolithic program block. Most of these components are located on a server but there are also program modules needed on the client. All of these components base on Java technology.
The EWA net core framework consists of several services and components and runs on the J2EE application server. These components will be described in detail in the following sections. This framework is often simply refered as “EWA net Core”.
-
Access Gateway
The Access Gateway forms the central part of the EWA net Server. It receives all requests from web clients, checks their validity and communicates the request to the according application or component.
-
access authorization Manager
The access authorization Manager verifies current access authorizations. It receives requests from the Access Gateway servlet and sends a result object back to the servlet. Depending on your license that you got from Daimler this engine also controls your set of licenses in a “license pool” which allows sharing a restricted set of licenses between different users.
-
HP Services
The HP Services provide different functions, which can be accessed by all applications. It consists of one file based service - the Configuration service - and some other mainly database based services.
-
Configuration Service
The Configuration Service receives requests from any component or application. It provides a mechanism to read corresponding configuration files on disk and to return information back to the receiver, so that the applications can configure themselves.
-
Access Gateway Service
The Access Gateway Service gets requests from the Access Gateway servlet. It is able to read, store and delete user and session information into a database.
-
Accounting Service
The Accounting Service gets requests from the EPC- and WIS net applications. It stores the current time and accessed documents for a certain user. This data could for example be used for billing.
-
Log Service
The Log Service receives data from any application or component. Depending on the debug level different information is logged into the filesystem (or other data sinks), like error messages, warnings or debug information. The Log Service is also available in the clients to unify logs on the server side.
-
Profile Service
The Profile Service reads, writes or overwrites sender specific data into a database. Using this service, applications are able to store certain objects, e.g. like a shopping basket.
-
HP User Management Service
This special user management service runs standalone and is one of several options of an authentication and authorization method. For that it does not need any other external component such as StarTek-Info. It can be configured to run instead of using the StarTek-Info user management or any other external user management. Users and user related information are stored in a local database .
The following applications and components are integrated into the application server and form the EWA net application together with the EWA net core framework. These components are only explained in brief here. If more information is required, please refer to the according documentation.
-
WIS net
The WISnet system stands for ‘Workshop Information System’ and consists of a server application, client applications and a TransBase database. In general it is a retrieval system to extract all kind of service literature from Daimler vehicles.
-
EPC net
The Electronic Parts Catalogue for provides information on all possible parts of all kinds of Daimler vehicles. The architecture is similar to WISnet.
-
EWANAPI (formerly called WISAPI)
This application is a downwards compatible replacement of the WISAPI.exe program allowing interaction to the WIS net and EPC net client applications from i.e. Dealer Management Systems.
Some components (Access Gateway, User Management, Accounting Service, etc.) are used by both applications (EPC net and WISnet). The configuration of these components has to be done only once.
In the following picture a normal workflow for EWA net is shown:
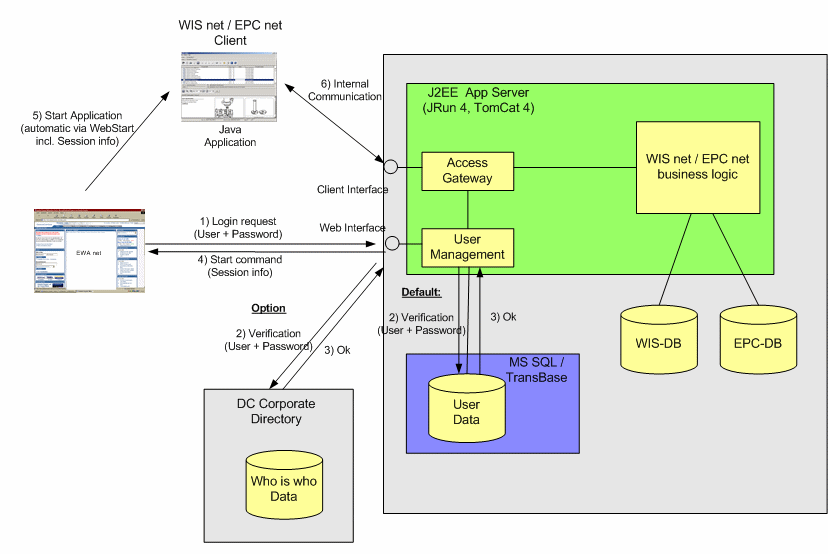
Figure: Workflow for EWA net
The data flow within EWA net is as follows:
- The user normally logs in to the system via a Web interface. This interface communicates with the server (User Management) to validate the user data. Depending on the configuration the user data is checked against the own database ( default after installation).
- If the user data are accepted a ticket (valid session info) is generated and the (Java-) Client-Application is started where this ticket is passed as a startup parameter.
- The Client-Application does not communicate directly to the server-side business logic of the application. Instead the requests are pre-processed by the Access Gateway, which checks the ticket (Session information) and passes the request to the server logic of EPC or WISnet if the ticket is valid.
- The Access Gateway gets information about several user data (as user specific application configuration, information access rights etc.) from the User management and also sends this information to the server logic. Therefore, it is necessary to always set up the User management database even if user authentication is handled by another directory service (e.g. Corporate directory).
Apart from User profiles and User configuration this database is also used to store log entries for error detection (if configured) and user specific access information for billing purposes.
In order to manage User information, a Web user interface is offered. It provides an easy way to add and delete users and licence information in the database. This interface is described in a separate document.
5.3 Clustering and loadbalancing
See the chapter about advanced system configuration for clustering and loadbalancing information.
5.4 Database replication
Different DBMS options are being used within the EWA net environment. The Transbase DBMS is typically being used as read-only database (for WIS net and EPC net) where there should be no need for database replication. The Transbase DBMS currently does not support replication mechanisms.
For the user management database storing user related information, a third instance of Transbase DBMS is being used. As the "local" EWA net is mainly aimed for small workshop environments it should be sufficient to run this database without clustering.
C-JDBC might be a helpful tool allowing at least read-only clustering even of the not-clustering-aware Transbase DBMS. Testing C-JDBC together with EWA net was however not part of the scope. See http://c-jdbc.objectweb.org
[ASRA net] You will not see any further references to an application called “ASRA net” within the documentation as this is part of the WIS net application.
6 Requirements
6.1 Delivery Media
For the installation to take place, you need at least following items:
- A set of DVDs containing EWA net and the EPC net database files (typically 2 DVDs (9) for an official set of DVDs, or 3 DVDs (4.7) for pilot versions)
- A set of DVDs containing EWA net (typically 1 DVD (9) for an official release, or 2 DVDs (4.7) for a pilot version)
- The correct access authorization key(s) for the software from Daimler AG. You will be able to install the software components before you’ve got the access authorization keys, but you will be enforced to enter the access authorization keys before setting up the databases. And the system will not run without the databases being set up.
6.2 Software
As mentioned in the previous chapter the EWA net server and client components are completely based on Java.
The components on the client side are started by means of “Java Web Start”. Starting with Java 2 (jre-packages 1.4 and above) “Java Web Start” is part of the “Java Runtime Environment” installation.
Apart from a Web-Browser (like Internet Explorer) and a working JRE (which in turn includes Java WebStart) there are no other software requirements on the client side. Installation of the EWA net client components is done automatically via “Java Web Start”.
On the server side a Web-Server, a Servlet Container (or J2EE Application Server), an installed user database, the EWA net core framework and the applications including the according application databases need to be installed.
For EWA net “central” Tomcat or Websphere serves as Web- and Application server. MS SQL is used as the database for user information. Web-Archives (.war) files contain the program logic for the Access Gateway, User management, WIS net and EPC net. Program modules within these Web-Archives are being executed by the servlet container (Webspere) each time a request is sent by a user.
For EWA net “local” TomCat serves as Web- and Application server. TransBase is used as the database for user information. Web-Archives (.war) files contain the program logic for the Access Gateway, User management, WIS net and EPC net. Program modules within these Web-Archives are being executed by the servlet container each time a request is sent by a user.
Additionally, two Transbase databases are being used, one for WIS net and another one for EPC net.
Other services and programs used for instance by EPC FP and WIS classic (like the access authorization Service, Program Manager etc.) are not required for EWA net.
Since some of the mentioned server components do only run on a Windows environment, it is necessary to use Windows as the server side operating system.
Following software components are expected to be installed correctly on the server and client machines BEFORE starting with the installation of EWA net.
6.2.1 Application server / Database server machine
| Type of Software | Server 1000 < 1000 registered user
| Server 2000 < 2000 registered user
| Server 4000
2 clustered servers
with separate DB server
< 4.000
registered user | Server 8000
4 clustered servers
with separate DB server
< 8.000
registered user | Stand-alone PC | Comment |
| Operating System | Windows 2003
Server SP2,
Deutsch/Englisch | Windows 2003
Server SP2,
Deutsch/Englisch | Windows 2003
Server SP2,
Deutsch/Englisch | Windows 2003
Server SP2,
Deutsch/Englisch | Windows XP SP2, Windows Vista
Deutsch/Englisch | Windows XP Professional SP1 is not part of the integration tests anymore.
The 64-Bit version of Vista has been tested as client operating system already, but needs to use the 32-Bit version of the JRE to be able to run the EWA net clients.
Software tests on 64-Bit versions of Windows are currently not part of the integration tests. |
| Web Browser | Internet Explorer 6/7 | Internet Explorer 6/7 | Internet Explorer 6/7 | Internet Explorer 6/7 | Internet Explorer 6/7 | Part of the operating systems listed here. Internet Explorer 5.5 has been removed from the list of officially supported browsers now as support of IE 7.0 has been added.
Nevertheless no real problems with IE 5.5 are expected.
|
| Java 2 Runtime | JRE 1.4 and above | JRE 1.4 and above | JRE 1.4 and above | JRE 1.4 and above | JRE 1.4 and above | http://java.sun.com, or install the Java Runtime Environment provided from the installation DVD:[EWA-HOME]\client-apps\jre\jre.exe
|
Windows 2000 Server operating systems per default have Internet Information Server running on the default Web port 80. Thus EWA net will be installed by default on the HTTP port 9000. You can change this later to port 80 if you like to. But then do not forget to shutdown IIS permanently.
6.2.2 Client machines
The client machines will not be covered by the installation process. But in order to allow execution of the client software, following software must be installed on the client systems:
|
Type of Software
| Minimum requirements | Optimal requirements |
Comment
|
|
Operating System
| Windows XP, Windows 2000, Windows Vista | Windows XP, Windows 2000, Windows Vista |
Windows XP Professional SP1 is not part of the integration tests anymore.
The 64-Bit version of Vista has been tested as client operating system already, but needs to use the 32-Bit version of the JRE to be able to run the EWA net clients.
Software tests on 64-Bit versions of Windows are currently not part of the integration tests.
|
|
Web Browser
| Internet Explorer 5.5 | Internet Explorer 6/7 |
Part of the operating systems listed here.
Internet Explorer 5.5 has been removed from the list of officially supported browsers now as support of IE 7.0 has been added.
Nevertheless no real problems with IE 5.5 are expected.
|
|
Java 2 Runtime
| J.R.E. 1.4.2_07 | J.R.E. 1.5/1.6 |
http://java.sun.com, or install the Java Runtime Environment provided from the installation DVD:
[EWA-HOME]\client-apps\jre\jre.exe
|
6.3 Hardware
The hardware requirements for the EWA net servers have to take two things into account.
- The above mentioned software requirements.
- The number of users accessing EWA net.
This section is intended to give a general reference that has to be adjusted individually for the environment the individual setup is intended to run in. For detailed and more recent requirements please check the Rollout Plan provided by Daimler AG.
|
|
Server 1000
< 1000 registered user
|
Server 2000
< 2000 registered user
| Server 4000
2 clustered servers
with separate DB server
< 4.000
registered user | Server 8000
4 clustered servers
with separate DB server
< 8.000
registered user | Stand-alone PC |
|
CPU
|
Dual Core CPU 2GHz
| Quad Core 2 GHz | Quad Core 2 GHz | Quad Core 2 GHz | Celeron D 1,8 GHz |
|
Memory
|
2GB
| 4GB | 4GB | 4GB | 1GB |
|
Free disk space
| 100GB | 100GB | 100GB | 100GB | 50GB |
|
Network
|
Ethernet 100 MBit
(TCP/IP)
| Ethernet 100 MBit
(TCP/IP) | Ethernet 100 MBit
(TCP/IP) | Ethernet 100 MBit
(TCP/IP) | Ethernet 100 MBit
(TCP/IP) |
| HDD Controller | SCSI / IDE / S-ATA | SCSI / IDE / S-ATA | SCSI / IDE / S-ATA | SCSI / IDE / S-ATA | IDE / S-ATA |
|
Operating System
|
As specified above
| | | | |
| DVD Drive | DVD 16/48 | DVD 16/48 | DVD 16/48 | DVD 16/48 | DVD 16/48 |
Table: EWA net Server Hardware
| | Minimum requirements | Optimum requirements |
| CPU | P III 750 Mhz | Celeron D 1,8 GHz |
| Memory | 512MB | 1GB |
| Network | Ethernet 100 MBit
(TCP/IP) | Ethernet 100 MBit
(TCP/IP) |
| Display resolution | 1024x769 | 1280x1024 |
| Accessories | 17“ TFT Monitor, 19“ CRT Monitor,
Tastatur, Maus | 17“ TFT Monitor, 19“ CRT Monitor,
Tastatur, Maus |
| DVD Drive | - | - |
Table: EWA net Client Hardware
Five default configuration types have been defined:
-
Central/Big, EDC approved:
Limited PAI 3.0 platform compliance; central installation at the EDC/ADC for large number of users with a network connection to the EDC/ADC; PAI-compliant application server and write database
-
Central/Big, non-EDC installation:
Central installation for large number of users connected via Internet, Intranet, Extranet, VPN; custom application server and write database
-
Central/Small:
Central installation for limited number of users connected via Internet, Intranet, Extranet, VPN; modified standard EWA net server installation (extended database)
-
Local/Big:
Workshop-central server for local LAN clients and workshop subsidiaries; standard EWA net server installation, modifications for failure safety possible; no Internet connection
-
Local/Medium-Small:
Standard EWA net installation on single PC or Workshop server (PC); no Internet connection
| Operation scenario | Central | Local |
| Configuration Type | Big
Limited PAI 3.0 platform compliance - EDC approved | Big
without PAI-infrastructure | Small | Big | Medium/Small |
| Recommended for |
- EDC/ADC installations
- large number of users
- and/or high service levels needed
|
- non-EDC/ADC installations
- large number of users
- and/or high service levels needed
|
- limited number of users via Internet
- and/or limited service levels needed
|
- if no centralized scenario is possible/available
- regular workshop with LAN-connected subsidiaries
|
- regular workshop location (no subsidiaries)
|
| Technology | Individual setup of application servers and database servers | Individual setup of application servers and database servers | (Modified) EWA net standard installation | (Modified) EWA net standard installation; for failure safety a fast restore mechanism or a second EWA net server is recommended | EWA net standard installation on a standard PC server |
| OS | Application Servers and Database Servers:
Windows 2003 Server, SP2
for Write Database Servers - alternatively UNIX | Windows 2003 Server, SP2 |
| Application Server |
|
- Tomcat 5.5.17 (Apache Group)
or
- IBM WebSphere 6.1.0.13
| EWA net standard installation
(Tomcat 5.5.17 (Apache Group)) | EWA net standard installation
(Tomcat 5.5.17 (Apache Group)) | EWA net standard installation (Tomcat 5.5.17 (Apache Group)) |
| Write Database |
|
- IBM DB2 8.2 (UDB)
or
- MS SQL-Server 2005 Service Pack 2 or MS SQL-Server 2000 Service Pack 3a
|
- EWA net standard installation (Transbase)
or
- IBM DB2 8.2 (UDB)
or
- MS SQL-Server 2005 Service Pack 2 or MS SQL-Server 2000 Service Pack 3a
|
- EWA net standard installation (Transbase)
or
- MS SQL-Server 2005 Service Pack 2 or MS SQL-Server 2000 Service Pack 3a
|
- EWA net standard installation (Transbase)
|
| Required Bandwidth | Independent of operational model, depending on number of users, usage of the application and if Citrix is used or not.
Bandwidth minimum for "central" application: 256 kbit downstream ; recommended: 2 Mbit. See document "Bandwidth Usage". |
| Service Location / Operation / Administration |
- EDC (for Daimler internal users and plants only)
- ADC
- TSS Automotive Retail Extranet (Retailfactory)
- EWA net server APAC
- EWA net server Brasil
- MPC level (market specific in-country server, e.g. at MPC Japan operated by ITM APAC Operations Support Team in Singapore)
|
|
|
|
|
| Internet connectivity (server-side) possible | Yes | No |
| VPN possible | Yes - ADC OK, EDC in preparation | depends on provider | depends on provider |
| Samples |
- Hosting for SEA/APAC in ADC Singapore
|
- smart-IT center (cahrs)
- Pappas Group Austria
- MB Canada (hosted by PQA)
- Bertel O. Steen A/S Norway
- WIS net integrated in the STAR TekInfo-Portal MBUSA
|
|
- Kunzmann, Aschaffenburg
- Hess, Trier
- Weilbacher, Eberswalde-Finow
.. with their subsidiaries in different locations
|
- Pfister, Gerolzhofen, Germany
- Zawiwi Trading Company, Oman
- Star Auto S.A, Abidjan, Ivory Coast
|
The following hardware configurations have been defined:
| Property | Value |
|
CPU
|
>= Dual Core CPU 2GHz
|
|
Memory
|
>= 1 GB
|
|
Free disk space
|
>= 50 GB
|
|
Network
|
100 MBit/s
|
|
Operating System
|
As specified above
|
|
DVD-Drive
|
Due to large database updates, a fast DVD drive is recommended on this machine (DVD 16/48)
|
Table: EWA net Server Hardware
Since EWA net does not differ to other Web applications in this respect the same guidelines apply. As a general rule it can be said that the amount of system memory is more important than the power of the CPU.
6.4 Network
- Fixed IP Addresses (no DHCP) for the application server and system database machine are recommended to be used to prevent problems with name resolving.
- Open ports like specified below:
|
Network route
|
TCP/IP Port(s)
|
Description
|
|
Client -> Application Server
|
9000
can be adjusted
|
Access to the EWA net services if no front-HTTP server is involved.
|
|
HTTP-Server -> Application Server
|
needed if HTTP Frontend Server is in use
can be configured
|
A plugin for the correspondend application server has to be attached to the HTTP front server and talks to the web application server over the port configured for that communication.
This scenario will take place in a firewalled environment.
|
|
Application Server -> Transbase
|
2054/2055
WIS net database
2034/2035
EPC net database
Plus additional ports dynamically created per DB connection on random port numbers
|
Access to the information databases of WISnet and EPC net.
It is NOT recommended to place any kind of firewall or network restriction between application and Transbase Content database server as the range of used ports vary dynamically and can not be determined. Additionally the used database is a Read-Only database which is not of interest of attacks.
|
|
Application Server -> Transbase
|
2044/2045
can be configured
|
Access to the authorization database for EWA net AccessGateway.
|
|
EWANAPI.exe (WISAPI.exe) -> Application Server
|
9000
can be adjusted
|
EWANAPI.exe (can be regarded as a normal client to the system) has to be able to access the AccessGateway in a direct manner. Proxy servers are currently not supported.
|
7 Installation
This chapter covers the installation steps for the application server, the database and the EWA net core framework (including Access Gateway and User management).
7.1 EWA net “local”
7.1.1 Run the installer
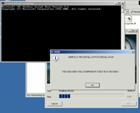
EWA net local will be installed on the local hard disk of the server containing all application components for the local environment. If a previous local version was already installed, the installer will stop when called in such an environment and ask you to make use of the Update program "AdminTool" (you will learn about this later on).
If you execute the installer on a Terminal Server environment be sure to execute it the setup program from the main console only and not from a TerminalServices client window. InstallShield-based installers appear to have major problems in such a scenario.
Installation requires administrative rights on Windows.
Installation
Login to Windows as Administrator or user who is part of the Administrators group.
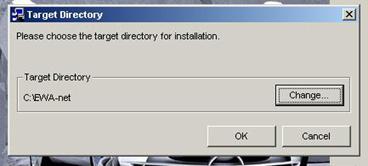
Take your DVD of the EWA net DVD release set and execute the setup file from
[DVD-DRIVE]:\ewa\setup.exe
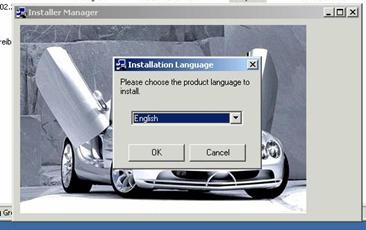
In our example installation our path was set to “C:\EWA_net”. If you use a different path for your installation, the given command and configuration examples need to be adopted to your folder structure. By default the installer suggests the installation into the Windows standard program files folder - which is perfect for "local" EWA net installations.
During the installation you get the information what steps are installed at this time.
|
First step
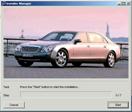
|
Further step
|
Further step
|
Further step

|
Last step
|
The installation should finish without any error messages.
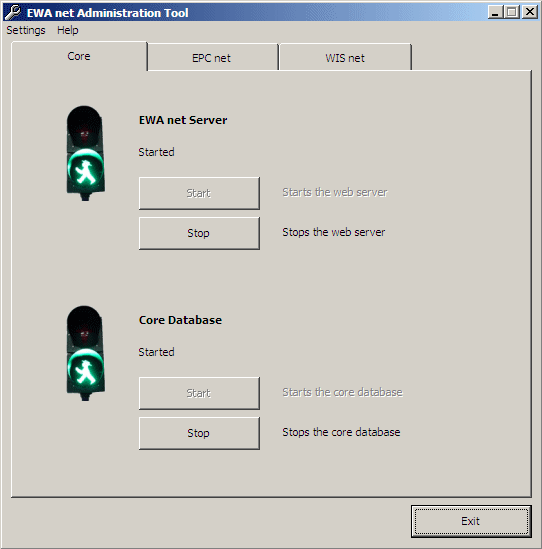
7.1.2 Check the services
After the installation you will find some new links within the Favorites of your Internet Explorer
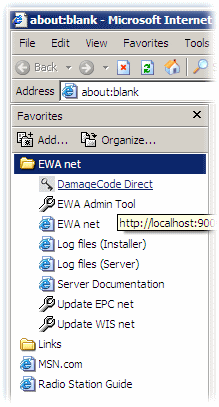
With the EWA Admin Tool you should now check the services.
The tab "Core" must display two green traffic lights, the traffic lights in the tabs "EPC net" and "WIS net" will remain dark until you installed the database content.
7.1.3 Register the access authorization(s)
For licensing open the EWA net website (use the favorite in Internet Explorer to do so. If you performed an standard installation, you might also click here).
You will be asked for a username and password. On an initial installation these values will be
Admin Username = admin
Admin Password = admin
You will immediately be asked to change your password now. Ensure you remember what you enter here.
Under the Button “Administration/Server Management/Server access authorization” you will find the input fields for the StartKey.
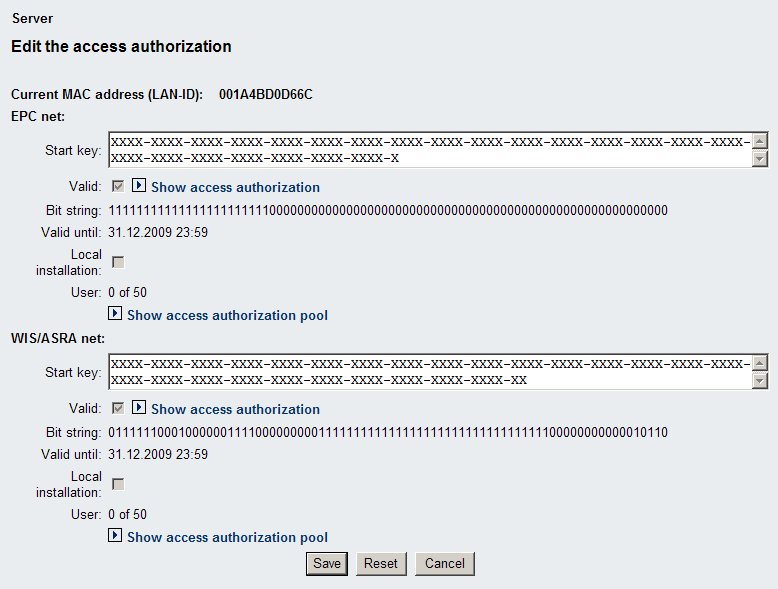
You can add StartKeys in a formatted way (with "-" as separator and with leading or trailing blanks) as well as in the plain way.
7.1.4 Add a first Group and first User
Please refer to the UserManagement manual to setup users and groups to be able to work with the system. To complete the basic installation you don't need to do this right now.
7.2 Install database content from DVDs
Retrieval Database content installation (for WIS net and EPC net) as well as whole EWA net system updates will be performed by the EWA Admin Tool. This is a windows executable that gives you an administrative interface to some system tasks like services control, software update, database clean up, ...
You will find this tool after installation in the “Favorites” in the folder “EWA net” of your Internet Explorer.
For detailed information please refer to the corresponding EWA Admin Tool documentation. It describes in detail how to install new database content for both EPC net and WIS net.
7.3 Manual modifications
From this step forward manual steps have to be performed if you want to migrate the just installed “local” version to a fully functional “central” version.
This is documented inside special documentation you can find on the delivery media within the folder:
[DVD-DRIVE]:\ewa\central\doc (all files)
If you want to migrate to a "central" version, first copy all the files from that folder into
[EWA_HOME]:\docs
which overrides the more simple "local" documentation. Then open the freshly installed documentation from there and continue reading the documentation at the current point. You will see that there is guidance on how to migrate EWA net to a central version.
7.4.1 Check on the server
In order to verify whether all components have been correctly installed and configured it is now time to reboot your system. After having rebooted, start the Internet Explorer.
In order to check the functionality of the administration go to the following URL:
http://localhost:9000/EWA-net
or use the “EWA net” Favorite in “EWA net” folder of the Internet Explorer. You should see the EWA net start page. Log in as administrator - this is currently the only user being setup in the system.
The default Admin user name and password are set by the installers to:
- User name : admin
- Password : admin
7.4.2 Check on the client
If you want to check whether your clients are well prepared to perfectly run EWA net, please assure the following manually steps have been completed as there are no automatic installation steps for the client:
- Assure that a “ping <servername>” command to your EWA net server is successful from the clients you want to run EWA net on, where <servername> has to be replaced by the name of your EWA net system server.
- Assure that your Proxy settings in Internet Explorer are correct and you can access the EWA net server when pointing it to http://<servername>:9000/EWA-net
- Install the correct Java Runtime Environment from Sun Microsystems. Use the one provided on the delivery media of EWA net or assure that a supported JRE is already installed.
You can easily find out about this feature if you open the Internet Explorer, log in as administrator and go to the "Download" section.
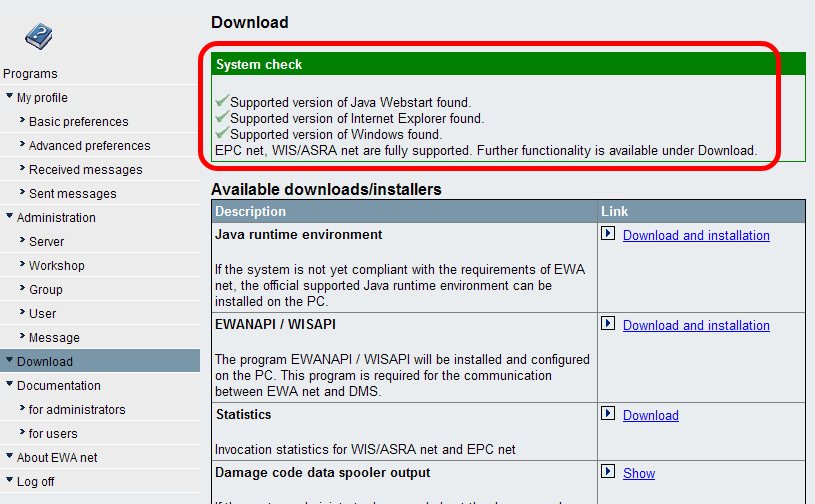
A small Active/X script will check your client for a supported Java Runtime. If - due to security restrictions - this code cannot be executed, please check your Software control panel for the correct Java Runtime.
- If you need to install a JRE, please simply download and install the one provided in the "Download" section of EWA net.
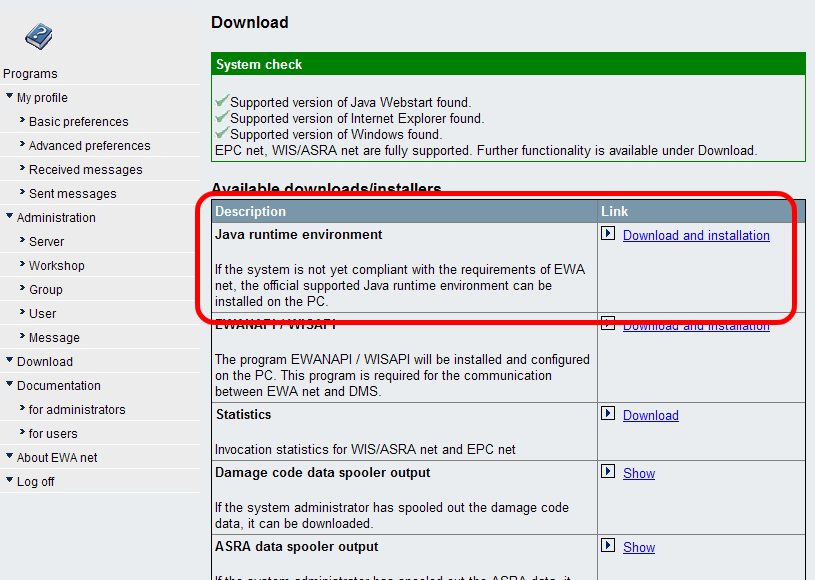
- Assure that you do not install any other Java Runtime after installing the one for EWA net.
- To easily determine whether also your WebStart Environment is setup correctly, click onto the EWANAPI "Download / Install" button to make the EWANAPI client installer run.
If it shows its GUI correctly, just close that installer and you will be fine. Nothing happened on the client. If the test failed, you should open the WebStart Control Panel and see that the Proxy configuration matches your environment.
Congratulations!
You have successfully setup a standard EWA net server. To configure the system to your needs (i.e. make use of a different authentication system), please refer to the chapters about EWA net configuration and advanced configuration to make the best out of your installation.
Many of the settings below can easily be configured via the administrative Web interface of EWA net. But there is even more that can be performed by modifying the underlying XML files.
As mentioned earlier you should have reasonable experience and a good understanding of XML before you start editing the files mentioned below. You may easily make your EWA net server fail to start even with small syntactical errors in the files.
Some basic settings described here (like email Server, access authorization reminder, feedback,...) can also be modified by a user with System Administrator user role from within EWA net's server administration masks.
The behavior of the AccessGateway and each HP Service can be configured in the [EWA_HOME]\config\core_cfg.xml file.
Example:
<?xml version="1.0" encoding="UTF-8" standalone="no"?>
<xml>
    <SECTION name="Services">
        <SECTION name="MailService">
            <!-- Parameter emailEnabled: Set this to "true" or "false" if the Email Service is active and -->
            <!--                         sending Emails.                                                  -->
            <PARAMETER name="emailEnabled">true</PARAMETER>
(...)
</xml>
|
Parameter
|
Example Value
|
Description
|
| ApplicationIntegration |
| applicationIntegrationEnabled | false | Enable or disable a list of URLs which appear in the Start menu of EWA net. If set to "false" the whole section will just be ignored. |
| ApplicationIntegration - ApplicationDetails_x (where x is a number from 1 to n, so this section can be repeated several times for multiple applications to be integrated into your start screen of EWA net) |
| URLofApplication | http://www.hp.com | URL which will be opened in a new window if this button will be clicked. If the existing session of EWA net needs to be included in the URL, you can specify the token {SESSION} to be replaced with the session ID, e.g. http://myserver/otherApp.do;jsessionid={SESSION}?param=value
|
| NameofApplication | Browse HP | Name which will appear below the button |
| URLofApplicationIcon | /EWA-net/someicon.gif | URL to an image which will displayed as button |
| NewWindowForApplication | true | Shall this application be started in a separate window instead of overriding the current window content?
true / false |
| UserRoleForApplication | WorkshopAdmin, ServerAdmin | What user role will see this application in the start menu? If you do not specify one, all users will see this. You can even comma separate multiple roles. Allowed values are:
ServerAdmin
WorkshopAdmin
WorkshopUser
|
| Services - AccountingService |
| deleteEntriesOlderThanDays | 180 | If this value is set to > 0 than entries in the accounting table which are older than the given number of days will be removed automatically. If no value has been set, a default of 180 days will be assumed. |
| Services - MailService |
| emailEnabled | true | Can email services be used within EWA net? Should be switched on and configured correctly |
| smtpServer | some.mail.server | Name or IP of the email server to be used |
| smtpPort | 25 | Email port on which the SMTP service listens. Standard is 25 |
| smtpUser | someUser | Optional:
If your SMTP server needs authentication, provide this info. Leave it blank if not required. |
| smtpPassword | secret | Optional:
If your SMTP server needs authentication, provide the password here. |
| defaultFromAddress | mail@ewanet.com | Default email address that will be used if not overridden by a service using the email service. |
| Services - ManagementService |
| managementEnabled | true | Enable or disable the JMX management console with this switch. For further options please take a look to the Monitoring and Management section. |
| Services - Portalnterface |
| portalServiceEnabled | false | Portal Service is switched off by default. Using this configuration enabled, users, groups and workshops can be administered remotely using WebServices. Please take a look to the user management documentation for more details! |
| userExpirationTimers | false | Extension for portal service configuration, enables global option to define expiration times for EWA net user accounts for blocking access after a certain time. |
| Services - GenericStorageService |
| startTime | 24:00 | Time when the GenericStorageService-Deamon should run |
| startStorageCleanupDeamon | true | Flag to decide if the GenericStorageService-Deamon should be running at all |
| disableWorkshopVisibility
| false | Shall the workshop community level be switched off for internal storage of data? If switched off even data that should be visible for all users of a workshop will then only be visible to the one who is the "owner" of the information |
| batchQuerySize
| 100 | Integer to configure the maximum number of keys which are used in a single queries to the GenericStorageService. Queries which have more keys will be broken up into batches of the defined size. The default configuration is 100. |
| Services - FinCacheService |
| NumberOfFincacheResults | 30 | Used to set the maximal Number of displayed FIN-Numbers in EPC and WIS |
|
AccessGateway - ApplicationSettings
|
|
sslEnabled
| false |
If SSL will be used within the WebApplication of EWA net.
This is not the only key to be used for the administration of SSL. Please see the the section Setting up SSL for more info.
There is currently no SSL encrypted communication between the clients (WIS net, EPC net) and the server possible. SSL will always be turned off automatically when starting the clients due to performance issues. This design is based on a decision of the ProductManagement of EWA net.
|
| sslForClientsEnabled | false | Currently SSL for Client apps is not supported. Please set it always to "false" |
|
httpPort
| 9000 |
Port for http
|
|
httpsPort
| 8443 |
Port for https (SSL).
|
|
AccessGateway - Proxy (only for StarTekInfo portal integration)
|
|
proxyEnabled
| false |
Enables EWA net server to connect to outside (e.g. to external User Management) via proxy.
|
|
host
| proxy.daimler.com |
Host name (e.g. for proxy setting)
|
|
port
| 8088 |
Port (e.g. for proxy setting)
|
|
noProxy
| localhost|15.* |
No proxy will be used for those addresses. Use Java syntax (e.g. “|” for separating two values)
|
|
AccessGateway - access authorization expiration reminder
|
|
emailEnabled
| true |
Set this to "true" or "false" if the access authorization reminder service is active and sending Reminder Emails at times where the access authorization is near to expire. All users in the system being administrators will be sent an email as soon as one of the access authorizations is about the expire
|
|
userWarningsEnabled
| true |
Set this to "true" or "false" if users should be warned by a popup-dialog inside the applications.
|
|
fromAddress
| startkey@ewanet.com |
Email sender address to use as from address in the sent emails. For most email-gateways this needs to be available.
|
|
ccAddresses
| |
Email destination addresses to deliver a copy of the messages to.The email-addresses should be entered comma separated. This field is not required if no recipents are needed for CC.
|
|
daysBeforeEmailReminder
| 14 |
Timout in number of days from which on warning messages are being sent out by the reminder service to the list of specified server administrators.
|
|
emailRepeatHours
| 48 |
Number of hours after which the server repeats in sending Email reminders about the upcoming expiration of the access authorizations.
|
|
daysBeforeUserNotification
| 3 |
Number of days before reminders are showing up on user interfaces to remind the administrator to aquire new access authorizations.
|
| Feedback (please refer to the Feedback configuration description) |
| Enabled | true | Whether feedback feature is enabled or not. |
| Modus | fax | Valid values can be:
fax (default)
email
email-or-fax
Customer Support & Feedback (CSF) related options (use of this option may depends on the timeline of the CSF project):
csf-email
csf-fax
xml-post |
| RecipientsConfigFile | feedbackRecipients.xml | Specifies the addresses (fax or email) in a distinct level of detail. A simple default configuration has been provided which you can easily adjust to your needs. The default looks like this:
<?xml version="1.0" encoding="ISO-8859-1"?>
<feedback-recipients xmlns:xsi="http://www.w3.org/2001/XMLSchema-instance" xsi:noNamespaceSchemaLocation="feedbackRecipients.xsd">
<default preferred="fax">
<email>john.doe@daimler.com</email>
<fax>+49-711-17-0</fax>
</default>
</feedback-recipients>
|
| TransferConfigFile | feedbackTransfer.xml | This specifies the file which is responsible for selecting the appropriate feedback channel (Fax, EMail or XML transfer). This file does not have to be touched and will be updated by the installer automatically.
|
| FeedbackAppURL | /Feedback/submitAppContext.do | Which URLs do the applications have to call to submit their feedback context.
Do not touch. This field will be overridden by software updates.
|
| FeedbackEmail | Empty by default | You may want to use this setting if you want to force one single email address to be set as receiver for all your emails in case email is being used as Feedback channel and will even override any automatically determined address from the mapping file feedbackRecipients.xml
Recommendation is to leave this field empty unless you make use of the global Feedback email router (ask your MPC whether your country has been setup there).
|
| FeedbackFromEmail | john.doe@daimler.com | Set the sender address for feedback which will appear as sender for feedback generated emails in case that Feedback uses EMail as channel. |
| CSF -> Selectable | false | Flag if the admin user can select the CSF related options as mode in feedback modus on the admin's server configuration web page within EWA net.
Do not touch. This field will be overridden by software updates.
|
| CSF -> URL | http://aftersales-net.daimler.com/support | URL where to post feedback information to in case of a XSF integration.
Do not touch. This field will be overridden by software updates.
|
| XSF -> XMLMapFile | | (Optional) Debug option: Write a XML file of each data request which is processed in feedback, if provided |
| XSF -> XMLFile | | (Optional) Debug option: Write a XML file to disk each time a XML is posted to feedback server - this writes a file which exactly the content which is sent to feedback back-end using HTTP Post. |
| Backup |
| root_folder | ewa_backup | Backup directory for the built in user management database. Has to be provided relative to [EWA_HOME] |
| Cluster |
| Enabled | false | Indicate here whether you run a clustered environment. In this case i.e. the simple configuration screen will be switched off and you have to assure to configure all servers consistently based on XML file configuration manually.
This approach has been chosen to avoid confusing side effects as in a cluster you cannot determine on which server you currently modify settings. |
| Spooler |
| ASRASpoolout | downloads/spooler/asra | This is the default value where the ASRA spooler files will be expected. Do not touch this setting unless you know what you do. It is the correct default for the interactive spooling. This path is relative to your EWA net home directory.
You may change this setting to an absolute path somewhere else (i.e. on a network share) if you want to run spooler jobs via "Scheduled Tasks". In this case ensure that all servers in a cluster have the same path information and that your EWA net server runs as a service with a user account having access to network locations (the "system" account does not have these privileges)
Please find more information about the spoolers here
|
| DamageCodeSpoolout | downloads/spooler/damagecode | This is the default value where the DamageCode spooler files will be expected. Do not touch this setting unless you know what you do. It is the correct default for the interactive spooling. This path is relative to your EWA net home directory.
You may change this setting to an absolute path somewhere else (i.e. on a network share) if you want to run spooler jobs via "Scheduled Tasks". In this case ensure that all servers in a cluster have the same path information and that your EWA net server runs as a service with a user account having access to network locations (the "system" account does not have these privileges)
Please find more information about the spoolers here
|
Table: core_cfg.xml
Location: [EWA_HOME]\config\license_cfg.xml
This configuration file contains the server access authorizations for EPC net and WIS net of the EWA net application server.
Example:
<?xml version="1.0" encoding="UTF-8"?>
<xml>
<SECTION name="Licenses">
     <PARAMETER name="wis">J9GF4AXXXXXXX...</PARAMETER>
     <PARAMETER name="epc">ZYVND3XXXXX...</PARAMETER>
</SECTION>
</xml>
|
Parameter
|
Example Value
|
Description
|
|
wis
|
J9GF4AXXXXXX...
|
Server access authorization for WIS net. The access authorizations can define a timeout. Also it specifies the maximum user access rights. The access authorization has to be requested from the EWA net software provider (e.g. Daimler).
|
|
epc
|
ZYVND3XXXXXXX...
|
Server access authorization for EPC net. The access authorization can define a timeout. Also it specifies the maximum user access rights. The access authorization has to be requested from the EWA net software provider (e.g. Daimler).
|
Table: Section "Licenses"
If your server run several redundant LAN adapters you might get server access authorizations for each of these LAN adapters and add those access authorizations comma or semicolon separated here to support high availability.
These files are located at [EWA_HOME]\config\um_cfg.xml
These configuration files contains all configuration concerning user management. The file um_cfg.xml is used for online authentication whereas um_batch_cfg.xml contains the configuration for batch calls as they are used for instance by “EWANAPI.exe”. Within the config files it is defined which authentication mode to use and what the connection parameters to the authentication / authorization datastores look like.
Example:
<?xml version="1.0" encoding="UTF-8" standalone="no"?>
<xml>
    <SECTION name="General">
        <!-- Type of user management; valid Entries are: StarTekInfo, HPUserManagement -->
        <PARAMETER name="userManagementService">HPUserManagement</PARAMETER>
(...)
</xml>
|
Parameter
|
Example Value
|
Description
|
|
userManagementService
| HPUserManagement |
User management, that will be used. Currently possible values are:
StarTekInfo, HPUserManagement
Note:
All following parameters do only make sense, if HPUserManagementis used here. Otherwise they are disregarded.
|
|
authenticationMode
| Own |
Authentication mode for HPUserManagment. User Logon (login and passwords) can either be authenticated by interfacing the DC-Corporate Directory or – if not applicable – against the own system database.
Currently possible values are:
Own, CorporateDirectory, LDAP
|
|
useOwnAuthOnConnectError
| false |
Use Own Authentication as fallback if external call to LDAP or Corporate Directory fails with an Exception (e.g. connection error)
Currently possible values are:
true, false
|
|
useOwnAuthOnAuthError
| false |
Use Own Authentication as fallback if external call to LDAP or Corporate Directory results in a non-authenticated result, e.g. username or password not correct.
Currently possible values are:
true, false
|
|
reAuthenticationEnabled
| true |
Configuration for en-/disabling automatic Re-Authentication.
Valid entries are: true, false
|
|
passwordChangeActive
| true |
Configuration for en-/disabling Own DB Password Change, which means that the user might change his/her password on his/her own.
Valid entries are: true, false
|
| userEditActive | true | Configuration for en-/disabling Own DB User's Details Edit. If set to false the user can not change its users details. In this case only the server administrator is able to change user details. valid entries are: true, false
|
| loginPage | https://retailfactory.mercedes-benz.com/
031_LoginEWAnet_de.aspx | Login page where is user is redirected to if session expired or user clicks on log off button on user management screen. Please provide a fully qualified URL here.
If not configured the default EWA net login page will be used.
|
| cascadedAdministration | false | Switched off by default, which means there is only one workshop which has all the access authorization the server StartKey provides. If switched on ("true") the mode changes and you can setup several workshops, where each workshop is limited individually in the number of allowed users per application
|
| showReqmntsOnLogin | false | There is an automated check whether the system on which the EWA net clients shall run is configured sufficiently to run EWA net. It basically checks for the correct Java and Java WebStart. It might not be able to run this scripted Active/X thus to avoid annoyances switch this check off here for the login screen. Nevertheless this switch is integrated anyway in the downloads area
|
| hostNameLabelOverride | My EWA net Server Installation | Label which is shown in the user management pages instead of server host name and IP address. This can be used in a clustered environment when the server administrator does not want to expose the internal server host names.
If this field is left empty, the default server host name will be used.
|
| marketNotesEditorialSupport | false | Flag if Market Notes editors can be specified in user management administration. If this is set to true, users can have the permission to edit Market Notes and Market Note sets can be exported.
valid entries are: true, false
|
| userBasedDownloadPermissisons | false | Flag if additional download permissions can be enabled per user for spooler files. If this is set to true, each user has a additional option to be administered which allows enabling of spool files downloads.
valid options are: true, false
|
| Own |
| inviteUserPerEMailEnabled | true | Do you want to allow the service that on interactive creation of users an email will be generated inviting the user to EWA net? |
| enforcePasswordChange | true | If the password has expired or has been created by a System Administrator, the User will be forced to change it before he is able to continue his work. This typically happens during the first login. |
| passwordChangeReminder | 14 | Amount of time before password expiration when EWA net shall start to request a password change. Until final expiration this request can be skipped. |
| passwordChangeInterval | 60 | Number of days a password remains valid and does not have to be changed. |
| paginationPagesize | 15 | Number of entries that will be displayed on one page when performing searches |
| searchIsCaseSensitive | false | Shall the search on the UserManagement database be performed with case sensitity on? |
Table: Section "General"
Contents of section “CorporateDirectory”:
- The following section “CorporateDirectory” is only used, if in the previous section “CorporateDirectory” was selected as authentication mode.
- All data is issued by those persons within Daimler, who are responsible for the Corporate Directory
|
Parameter
|
Example Value
|
Description
|
|
ldapHost
| hptis106.bbn.hp.com |
The hostname, where the Corporate Directory resides within Daimler
|
|
ldapPort
| 389 |
The port, on which the Corporate Directory Service listens
|
|
bindDN
| CN=test,cn=Users,DC=DC-EWO,DC=bbn,DC=hp,DC=com |
The full qualified LDAP bind user, which is used to connect to the Corporate Directory
|
|
bindPasswd
| very_secret |
The password of the LDAP bind user, which is used to connect to the Corporate Directory
|
Table: Section "CorporateDirectory"
Contents of section “LDAP"
- The following section “LDAP only used, if in the “General” section “LDAP” was selected as authentication mode.
|
Parameter
|
Example Value
|
Description
|
|
ldapHost
| 192.168.0.55 |
The hostname, where the Directory resides.
|
|
ldapPort
| 389 |
The port, on which the Directory Service listens
|
|
bindDN
| CN=ewa, CN=Users, DC=RES, DC=CAHRS, DC=CORP |
DN (Distinguished Name) used to establish the LDAP-Connection. If this field is empty, the connection will be made anonymously.
If authMode="authenticate", Tokens {userid}, {password} and {domain} will be replaced by the submitted login information.
Before replacing the tokens by the values entered in the login mask, the characters "*()" from the entered values will be escaped!
Example: authentication with LDAP:
bindDN="CN={userid}, CN=Users, DC={domain}, DC=CAHRS, DC=CORP"
Example: fixed binding with "fetch" or "search":
bindDN="CN=EWAnet, CN=Users, DC=RES, DC=CAHRS, DC=CORP"
|
|
bindPasswd
| ewaewa |
Password to use when binding with bindDN
If authMode="authenticate", Tokens {userid}, {password} and {domain} will be replaced by the submitted login information. Before replacement, the characters "*()" will be NOT escaped!
Example: authentication with LDAP:
bindPasswd="{password}"
Example: fixed binding with "fetch" or "search":
bindPasswd="secret!?”
|
|
useSSL
| false |
SSL with LDAP is currently not supported.
For later use if connection will be made secure.
|
|
authMode
| search |
authMode: Authentication mode to use to verify user permissions:
-
fetch
Fetch LDAP record from directory and compare defined attribute with submitted user password
-
search
Search for user in directory and compare defined attribute with first matched LDAP entry's attribute
-
authenticate
Try to bind LDAP with submitted user name and password.
-
search+authenticate
Best used with a MS ActiveDirectory
|
|
fetchDN
| CN={userid}, OU={domain}, DC=RES, DC=CAHRS, DC=CORP |
Name of the DN to fetch to compare attribute. Only applicable if authMode="fetch".
Tokens {userid}, {password} and {domain} will be replaced by the submitted login information.
Before replacement, the characters "*()" will be escaped (see “bindDN” above”)!
|
|
searchFilter
| sAMAccountName={userid} |
Filter attribute name which will be searched on the LDAP search if a LDAP user entry needs to be found in the directory. e.g. "sn", "mail", etc...
Only applicable if authMode="search" or "search+authenticate". See RFC 2254 for a detailed description of LDAP filters
Tokens {userid}, {password} and {domain} will be replaced by the submitted login information.
Before replacement, the characters "*()" will be escaped (see “bindDN” above”)!
Example:
searchFilter="mail= {userid}@smart.com"
or
searchFilter="mail =*_{userid}@{domain}.smart.com"
Example2:
searchFilter="(&(mail=*{userid}*)(co=*{domain}*))"
|
|
searchScope
| CN=smart-center, DC={domain}, DC=cahrs, DC=corp |
Context which will be searched for an LDAP user entry. Only applicable if authMode="search".
Tokens {userid}, {password} and {domain} will be replaced by the submitted login information.
Before replacement, the characters "*()" will be escaped (see “bindDN” above”)!
Example:
searchScope="CN=Users,DC={domain},DC=cahrs, DC=corp"
|
|
attribute
| ipPhone |
Attribute to read from LDAP entry for comparism with the submitted login information.
Only applicable if authMode="fetch" or "search".
Example:
attribute="ipPhone"
|
|
encryptAttributeBeforeCompare
| false |
Set to "true" if the LDAP-attribute needs to be encrypted before comparison with submitted login information (requires that the entered Password, is already encrypted and LDAP information is not encrypted).
Only applicable if authMode="fetch" or "search".
The used encryption algorithm is identical to the one in the HP-Usermanagement "Own" mode.
|
|
encryptPasswordBeforeCompare
| false |
Set to "true" if the submitted login password needs to be encrypted before comparison with the LDAP attribute (requires that the LDAP information is stored encrypted or is encrypted before comparison by setting encryptAttributeBeforeCompare to true).
Only applicable if authMode="fetch" or "search".
The used encryption algorithm is identical to the one in the HP-Usermanagement "Own" mode.
|
Table: Section "LDAP"
For more information about the LDAP configuration, please see the chapter about User Management configuration.
8.1.4 additional_downloads_cfg.xml
This is an optional file which will neither be installed by the installer nor be updated or modified by any software installation process. Thus if you want to integrate your own download sections within EWA net's download section please follow this short description and have a closer look into an example file which will show you how to customize your environment in respect to download options.
The configuration file will be read each time the download page will be shown so you may customize it without the need of restarting the EWA net server.
The file must be created and stored within the [EWA_HOME]\config folder with the given name additional_downloads_cfg.xml.
The basic structure of the file is as this:
<?xml version="1.0" encoding="UTF-8" standalone="no"?>
<xml>
    <!-- Section to enter further downloads to the download area -->
    <SECTION name="AdditionalDownloads">
    ....
    </SECTION>
</xml>
What we have created up to now is an extension of the downloads section with exactly 0 new entries. So we need to add the subsections which will show up inside the download area. We add an enumeration of sections called "AdditionalDownload_x" where x is a number from 1 to the number of sections you want to add.
Example:
<?xml version="1.0" encoding="UTF-8" standalone="no"?>
<xml>
<!-- Section to enter further downloads to the download area -->
<!-- UserRoleForApplication can take more than one value, the roles should be comma separated -->
<!-- The valid values for UserRoleForApplication are: ServerAdmin, WorkshopAdmin, WorkshopUser -->
<!-- The default value for UserRoleForApplication is WorkshopUser, WorkshopAdmin, ServerAdmin -->
<SECTION name="AdditionalDownloads">
<!-- Start your enumeration with value "_1" and enumerate your keys from there -->
<SECTION name="AdditionalDownload_1">
<!-- Description can be provided multiple times if you want to specify descriptions in different languages -->
<!-- But then ensure there is at least one default text without "locale=" specification -->
<PARAMETER name="Description" locale="en">This text will show up in anglish <br>if browser requests english</PARAMETER>
<PARAMETER name="Description" locale="de">Dieser Text erscheint in Deutsch wenn der Anwender Deutsch als Sprache eingestellt hat</PARAMETER>
<PARAMETER name="Description">This is the default text which will show for all other browser languages. We better use English here :)</PARAMETER>
<!-- Location to download, absolute path or, by use of URL-Rewriting, a relative EWA net Server reference -->
<PARAMETER name="URLofDownload">http://www.hp.com</PARAMETER>
<PARAMETER name="LinkText" locale="en" >Have a closer look on the HP Page i.e. for Driver Updates</PARAMETER>
<PARAMETER name="LinkText" locale="de" >HP Download Seite</PARAMETER>
<PARAMETER name="LinkText">HP Download Page</PARAMETER>
<!-- User Role that has access to this download. If not specified, all users may have access to it -->
<PARAMETER name="UserRoleForApplication">WorkshopUser, WorkshopAdmin, ServerAdmin</PARAMETER>
</SECTION>
<SECTION name="AdditionalDownload_2">
<PARAMETER name="Description">The link for the EWANAPI Installer provided here again</PARAMETER>
<!-- Location to download, absolute path or, by use of URL-Rewriting, a relative EWA net Server reference -->
<PARAMETER name="URLofDownload">/EWA-net/ewanapi_installer.jnlp</PARAMETER>
<!-- Shall we include/do we need to include session information in the URL? Default: false -->
<PARAMETER name="URLdoRewriting">true</PARAMETER>
<PARAMETER name="LinkText">EWANAPI Installer (again)</PARAMETER>
</SECTION>
<SECTION name="AdditionalDownload_3">
<PARAMETER name="Description">Download and run a setup located at [EWA_HOME]\downloads\test\Setup.exe</PARAMETER>
<!-- Location to download, absolute path or, by use of URL-Rewriting, a relative EWA net Server reference -->
<PARAMETER name="URLofDownload">/EWA-net/download/downloads/test/Setup.exe</PARAMETER>
<!-- Shall we include/do we need to include session information in the URL? We MUST use session information to allow access to download below the "downloads" directory-->
<PARAMETER name="URLdoRewriting">true</PARAMETER>
<PARAMETER name="LinkText">Some sample Setup</PARAMETER>
</SECTION>
</SECTION>
</xml>
Following parameter tags can be used:
-
Description:
This element may occur several time and can be localized by specifying a respective "locale" attribute. If no "locale" attribute is given, this text will be chosen as fallback to be displayed as description text in the download area. If the browser provides a preferred locale and a description with this locale can be found it will be used in favor of the fallback description. See the example above.
-
URLofDownload:
This is a URL which shall be referred to. You may want to redirect to another, external URL i.e. just to point to a different location, to open up an HTML document from a different location, make the user download a file from an external source.
Or you may want to publish your own downloads within the [EWA_HOME]\downloads directory.
If you want to do the latter, just create a subdirectory below the downloads directory, i.e. downloads\test. Inside this directory you may want to publish a file called Setup.exe. You may then simply create a URL now which then always begins with /EWA-net/download/downloads and then gets extended by the directory structure below the downloads directory. In the given example the resulting URL would look like this:
/EWA-net/download/downloads/test/Setup.exe
-
URLdoRewriting:
This is basically optional and by default (if not given) set to "false". Valid values are "true" and "false".
If you want to allow users to download from the EWA net "downloads" directory you must set this value to "true". EWA net does not allow anonymous downloads for security reasons!
-
LinkText:
This is the text that will shown instead of the pure URL. It can be localized in the same way as the Description. It will show up in the right column within the download overview.
-
UserRoleForApplication:
This is also an optional field. If not given, unrestricted access is given to all EWA net users. Following values may be used for restriction:
- ServerAdmin: Only Server administrators may access this URL
- WorkshopAdmin: Only Workshop admins may access this URL.
- WorkshopUser: Only normal Workshop users may access this URL.
You can combine the user roles by separating them via a colon like this: WorkshopUser, WorkshopAdmin
The example from above will result in a download area extension like this:
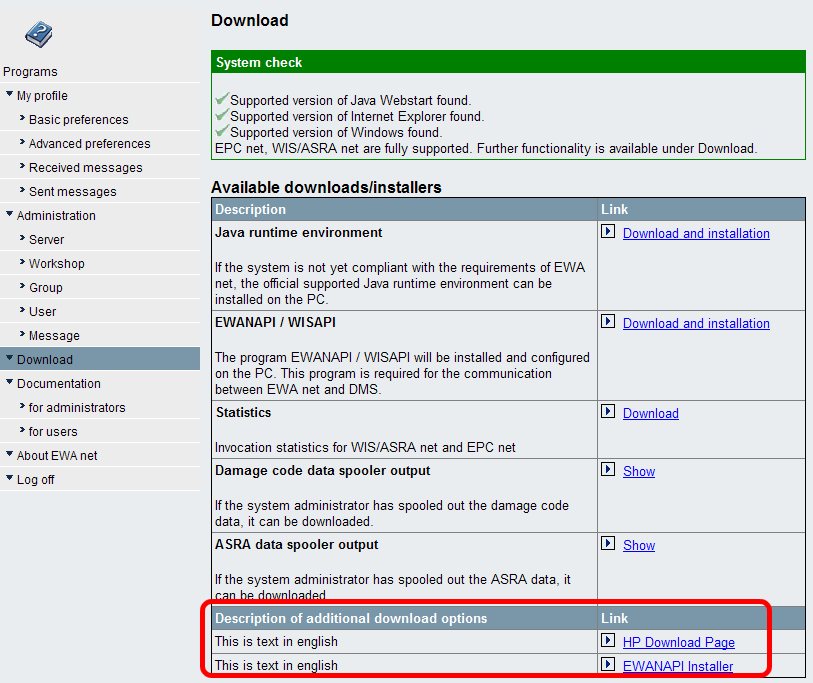
8.2.1 Introduction
EWA net is offering you in a joint effort with the project Customer Support & Feedback (XSF) a new approach in delivering your feedback (corrections of documentation, improvements, handling problems etc.) to the proper parts of the After Sales organization. The problem areas generally occurring in the workshop are clearly defined by so called event categories.
The implementation will happen in three phases which will decrease your handling time by automatically collecting context information (e.g. FIN, motor number, part number etc.) and increase step by step your ability to track the processing of your question within the organization.
- In the first phase EWA net offers in default configuration automatically generated Faxes. But you can also choose an E-Mail solution which will send your questions to either a pre-defined central Mail address (recommended solution) or alternatively you can configure special Mail-addresses.
Recommended Feedback modes: email, fax
- In the second phase (starting from 01-July-2006) EWA net will be able to automatically open a ticket in the central XSF-System if you have Internet Access. The access to XSF will be limited to certain event categories. In XSF you can track the status of your ticket. Fax and E-Mail are still possible.
Recommended Feedback modes: email, fax, email-or-fax, XSF-email, XSF-fax
- In the third phase (starting from 01-April-2007) all categories (including MB parts) will be exclusively handled via XSF. Fax is still available as an alternative if you have no Internet Access.
Recommended Feedback modes: xml-post, (email), fax
8.2.2 Technical decision tree
The following decision tree shall help you to find the best mode for feedback:
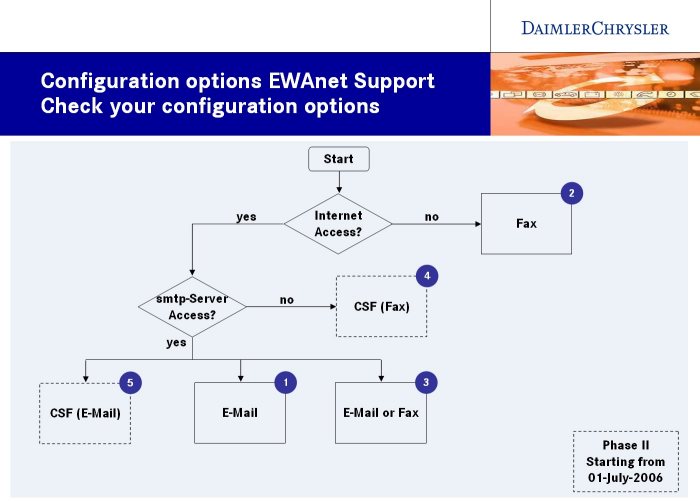
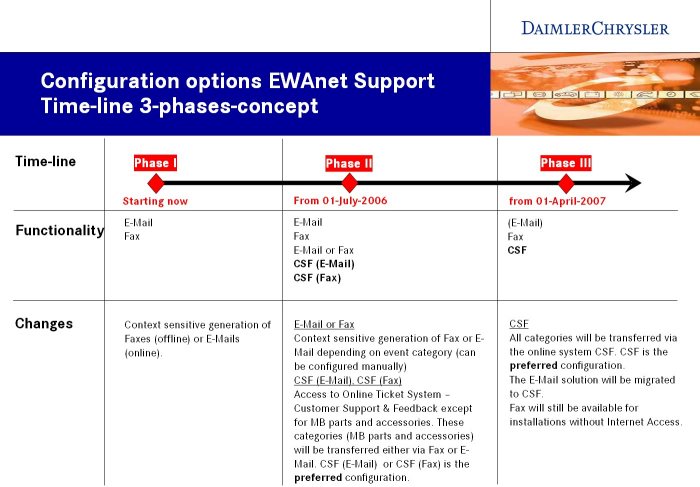
8.2.2.1 Feedback Channel: Fax
8.2.2.1.1 Preconditions
This type of Feedback channel provides the lowest level of integration and process benefit, but is the one that is expected to work almost everywhere - this is why it has been chosen as default configuration. Please choose this channel in case
In this case the only feasible option to be used is fax. This mode will automatically assemble all the relevant context information from the client applications (EPC net, WIS/ASRA net), create a printout with feedback information from the client and allow this printout to be faxed. The printed fax will contain the correct fax number to send this fax to.
8.2.2.1.2 Configuration
Steps to be performed on the server side for this configuration are:
-
Go to the [EWA_HOME]\config directory
-
core_cfg.xml: Set the feedback "Modus" parameter to fax.
-
Make a copy of the file feedbackRecipients.xml as faxRecipients.xml. This should be done to avoid that a software update will override the file.
-
Edit the file and change the default value of the parameter <fax> to the value of your choice where you want/must send your feedback information to.
Example: <fax>+49 (711) 17-12345</fax>
-
core_cfg.xml:
Set the feedback file reference parameter "RecipientsConfigFile" to the new filename you have chosen to create above like this:
<PARAMETER name="RecipientsConfigFile">faxRecipients.xml</PARAMETER>
-
Restart your EWA net server and give feedback a try.
8.2.2.2 Feedback Channel: Email
8.2.2.2.1 Preconditions
This type of Feedback channel provides a better integration and process benefit, but can only be used if some preconditions can be met. Please choose this channel in case
-
you do have permanent internet access on the server side.
-
you have access to an SMTP server - a correctly working EWA net Email configuration is needed and will allow you to test this.
-
the SMTP standard TCP/IP port 25 is correctly configured in any firewalls on the way to the SMTP server.
If these requirements can be met you may choose email as your Feedback Channel. This mode will automatically assemble all the relevant context information from the client applications (EPC net, WIS/ASRA net) and create a feedback email in a specific format. Users will not have.
8.2.2.2.2 Configuration
Steps to be performed on the server side for this configuration are:
-
Go to the [EWA_HOME]\config directory
-
core_cfg.xml: Set the feedback "Modus" parameter to email.
-
Ensure that the EWA net email service (Parameter "MailService" is up and running and setup correctly. You may test it via the "Messaging" option of EWA net.
-
Email recipients - option 1:
If your country is setup in the global Daimler Email router for Feedback (please get in contact with your MPC about that) you may simply use the functionality of that email router by setting the property "FeedbackEmail" in the core_cfg.xml to the value: test.gspsupport@daimler.com
-
Email recipients - option 2:
If you want to setup your own Email routing to different locations you may want to make use of the advanced features of EWA net's Feedback. In this case please make a copy of the file feedbackRecipients.xml as emailRecipients.xml and adjust the file core_cfg.xml:
Set the feedback file reference parameter "RecipientsConfigFile" to the new filename you have chosen like this:
<PARAMETER name="RecipientsConfigFile">emailRecipients.xml</PARAMETER>.
Edit the file according to the description of the feedbackRecipients.xml file.
-
Restart your EWA net server and give feedback a try.
8.2.2.3 Feedback Channel: Email-or-Fax
8.2.2.3.1 Preconditions
This type of Feedback channel is an automatic switch between Fax and Email depending on the setup of your feedbackRecipients.xml file which works like a decision matrix. Basically the same preconditions as for email and fax (see above) apply here.
Basically you will only want to do this if you have the full responsibility of different fax channels and you are not able to use the global email router or one single fax number for feedback.
If these requirements can be met you may choose email-or-fax as your Feedback Channel mode.
8.2.2.3.2 Configuration
Steps to be performed on the server side for this configuration are:
-
Go to the [EWA_HOME]\config directory
-
core_cfg.xml: Set the feedback "Modus" parameter to email-or-fax.
-
Ensure that the EWA net email service (Parameter "MailService" is up and running and setup correctly. You may test it via the "Messaging" option of EWA net.
-
As you want to setup your own Email and Fax routing to different locations you will want to make use of the advanced features of EWA net's Feedback. In this case please make a copy of the file feedbackRecipients.xml as recipients.xml and adjust the file core_cfg.xml:
Set the feedback file reference parameter "RecipientsConfigFile" to the new filename you have chosen like this:
<PARAMETER name="RecipientsConfigFile">recipients.xml</PARAMETER>.
Edit the file according to the description of the feedbackRecipients.xml file.
-
Restart your EWA net server and give feedback a try.
8.2.2.4 Feedback Channel: XSF-email
8.2.2.4.1 Preconditions
You may use this option only once the XSF project has reached phase 2 (planned for 01-July-2006) and you received an official Go! to use XSF features - please reconfirm with you local MPC.
This type of Feedback channel is an automatic switch between XSF functionality and Email as a fallback depending on the setup of a fixed central decision matrix feedbackTransfer.xml file provided by Daimler (for the selection whether XSF can be used for a specific event type or the email functionality shall be chosen) and the file feedbackRecipients.xml which in case of the email fallback selects the appropriate email address.
Summary of requirements:
-
XSF project has reached phase 2
-
Server has permanent Internet access (needed for email)
-
Email Service of EWA net is correctly configured and working
-
Clients have permanent Internet access on ports 80 and 443 (needed to send data via XSF channel).
-
Check whether users have access rights to TIPS. Please apply for additional rights for XSF. If access rights do not exist at all, please check with your local MPC if you are already registered with the GSSN.
If all these requirements can be met you may choose XSF-email as your Feedback Channel mode.
8.2.2.4.2 Configuration
Steps to be performed on the server side for this configuration are:
-
Go to the [EWA_HOME]\config directory
-
core_cfg.xml: Set the feedback "Modus" parameter to XSF-email.
-
Ensure that the EWA net email service (Parameter "MailService" is up and running and setup correctly. You may test it via the "Messaging" option of EWA net.
- As you will want to setup your own Email routing to different locations you will want to make use of the advanced features of EWA net's Feedback. In this case please make a copy of the file feedbackRecipients.xml as emailRecipients.xml and adjust the file core_cfg.xml:
Set the feedback file reference parameter "RecipientsConfigFile" to the new filename you have chosen like this::
<PARAMETER name="RecipientsConfigFile">emailRecipients.xml</PARAMETER>
Edit the file according to the description of the feedbackRecipients.xml file.
-
Restart your EWA net server and give feedback a try.
8.2.2.5 Feedback Channel: XSF-fax
8.2.2.5.1 Preconditions
Like the option XSF-email you may use this option only once the XSF project has reached phase 2 (planned for 01-July-2006) and you received an official Go! to use XSF features - please reconfirm with you local MPC.
This type of Feedback channel is an automatic switch between XSF functionality and Fax as a fallback depending on the setup of a fixed central decision matrix feedbackTransfer.xml file provided by Daimler (used for the selection whether XSF can be used for a specific event type or the fax functionality shall be chosen) and the file feedbackRecipients.xml which in case of the fax fallback selects the appropriate fax number.
Summary of requirements:
-
XSF project has reached phase 2
-
XSF project has not yet reached phase 3 - where the preferred channel will be the direct use of the XSF application.
-
Clients do have physical access to a printer.
-
Clients have permanent Internet access on ports 80 and 443 (needed to send data via XSF channel).
-
Check whether users have access rights to TIPS. Please apply for additional rights for XSF. If access rights do not exist at all, please check with your local MPC if you are already registered with the GSSN.
If all these requirements can be met you may choose XSF-fax as your Feedback Channel mode.
8.2.2.5.2 Configuration
Steps to be performed on the server side for this configuration are:
-
Go to the [EWA_HOME]\config directory
-
core_cfg.xml: Set the feedback "Modus" parameter to XSF-fax.
-
As you will want to setup your own Fax routing to different locations you will want to make use of the advanced features of EWA net's Feedback. In this case please make a copy of the file feedbackRecipients.xml as faxRecipients.xml and adjust the file core_cfg.xml:
Set the feedback file reference parameter "RecipientsConfigFile" to the new filename you have chosen like this:
<PARAMETER name="RecipientsConfigFile">faxRecipients.xml</PARAMETER>.
Edit the file according to the description of the feedbackRecipients.xml file.
-
Restart your EWA net server and give feedback a try.
8.2.2.6 Feedback Channel: xml-post
8.2.2.6.1 Preconditions
This option may only be used once the XSF project has reached phase 3 (planned for 01-April-2007) and you received an official Go! to use XSF features - please reconfirm with you local MPC.
This type of Feedback channel allows full integration of EWA net's Feedback module with the XSF project.
Summary of requirements:
-
XSF project has reached phase 3
-
Clients have permanent Internet access on ports 80 and 443 (needed to send data via XSF channel).
-
Check whether users have access rights to TIPS. Please apply for additional rights for XSF. If access rights do not exist at all, please check with your local MPC if you are already registered with the GSSN.
If all these requirements can be met you may choose xml-post as your Feedback Channel mode.
8.2.2.6.2 Configuration
Steps to be performed on the server side for this configuration are:
-
Go to the [EWA_HOME]\config directory
-
core_cfg.xml: Set the feedback "Modus" parameter to xml-post.
-
Restart your EWA net server and give feedback a try.
As described above the standard software setup of EWA net provides a simple, but useful feedbackRecipients.xml file which contains a global fax number and a global email address for you to be used unless you need more advanced features. This file will be updated by the software installation processes and thus might override any changes you have made within it.
Therefore it is highly recommended (as described above) that once you start editing it you make a copy of it in the config folder of EWA net and update the reference to the file within the core_xfg.xml file's parameter "RecipientsConfigFile". This ensures that your changes will not be destroyed by a software update.
The file initially looks like this:
<?xml version="1.0" encoding="ISO-8859-1"?>
<feedback-recipients xmlns:xsi="http://www.w3.org/2001/XMLSchema-instance" xsi:noNamespaceSchemaLocation="feedbackRecipients.xsd">
    <default preferred="fax">
        <email>test.gspsupport@daimler.com</email>
        <fax>+49-711-17-0</fax>
    </default>
</feedback-recipients>
You may want to simply change the default values for the recipients of fax or email by editing the fax or email elements.
But there is more that you can do with this file. The file may serve as an advanced decision matrix on the following attributes:
-
Country:
This is the top level decision in the decision tree. It represents the country of the workshop of the current user. Country numbers are a Daimler/GSP definition and 3 digits in length (i.e. 200 for Germany). A list of all valid country numbers can be looked up in the file country_codes.xml.
This feature allows country specific email addresses and/or fax numbers.
-
Workshop:
The second level in the decision tree is the number of the Workshop the current user belongs to.
-
Feedback Event Category:
This is the bottom level in the decision tree for the selected category of feedback that shall be provided. Following values are valid:
A1: Datacard
C1: Parts Query (EPC net)
C2: Passenger Car Accessories
D1: TIPS
D2: Work Documentation (WIS net)
D3: Operation Item (ASRA net)
D4: Damage Codes
E1: System Problems
To explain in more detail what the flexibility of this file is all about let's do a simple example:
 <?xml version="1.0" encoding="ISO-8859-1"?>
<feedback-recipients xmlns:xsi="http://www.w3.org/2001/XMLSchema-instance" xsi:noNamespaceSchemaLocation="feedbackRecipients.xsd">
    <country code="839" preferred= "email">
        <!-- we come here only if country of current user's workshop is Japan -->
        <category code="C1" preferred= "fax">
            <!-- we come here only if the user selected "Parts Query" in Feedback as event category -->
            <email>feedback1@dcx.jp</email>
            <fax>+81 (1) 1234</fax>
        </category>
        <!-- We are in Japan, but no further criteria was matching -->
        <default preferred= "email">
            <email>feedback2@dcx.jp</email>
            <fax>+81 (1) 12345</fax>
        </default>
    </country>
    <!-- we come here if nothing of the above matches -->
    <default preferred= "fax">
        <email>feedback@daimler.com</email>
        <fax>+49 (711) 12345</fax>
    </default>
</feedback-recipients>
Let's go through this example and explain the different options:
Toplevel we define a country element with code "839" which means that this is country "Japan". When Feedback steps down the decision tree it compares the users country code with the one it finds here. Assuming now the user is in Japan. Then feedback remembers that in case of the email-or-fax mode email is the preferred choice via the preferred attribute. The next level of decision was to check for workshop. But this optional level is omitted so feedback steps further down and checks the event category that the user has chosen. Assuming now he has pressed the Feedback button inside the EPC net client or has pressed the "Parts Query - EPC net" button on the feedback mask, Feedback will match this against the given code "C1" here - and this code really represents the "Parts Query" event category. Feedback now remembers at this point that in case of email-or-fax the preferred Feedback channel will be email. Feedback has resolved the information it needs and will work in the following way:
- Configured Feedback channel is "email" or "XSF-email":
The given email (feedback1@dcx.jp) will be used and an email will be sent to this address.
- Configured Feedback channel is "fax" or "XSF-fax":
The given fax number (+81 (1) 1234) will be used and be printed into the fax form.
- Configured Feedback channel is "email-or-fax":
Feedback uses the information from the last read attribute "preferred" to determine which channel now to use. In our example from above the dynamically selected channel would have been "fax" and the information from the respective element would have been chosen.
Let's continue with this example. Assuming the user is in Japan, but would have chosen a different category - not the "Parts Query". Then feedback would have stepped into the "default" element within this workshop element and would have resolved the information from there.
Assuming the user is one located in Germany then already on the top level of the decision tree Feedback would have stepped into the global "default" section (the one at the bottom of the file) as no other matching workshop could be found. It would have resolved the information from there.
More advanced features:
- The "code" attribute of the XML elements country, workshop and category allow you to specify multiple codes at once by separating them with a blank.
Examples: <workshop code="000000 A302X C2020" preferred="fax">
<country code="200 557" preferred="fax">
<category code="C1 C2 D1 D2 D3 D4" preferred="email">
- The "email" element allows to specify more then one email address (if needed): just separate them by colons.
Example: <email>email1@daimler.com,email2@dcx.com</email>
An even more complex configuration that could be used for example multi-country servers of EWA net may look like this:
<?xml version="1.0" encoding="ISO-8859-1"?>
<feedback-recipients xmlns:xsi="http://www.w3.org/2001/XMLSchema-instance" xsi:noNamespaceSchemaLocation="feedbackRecipients.xsd">

    <country code="200 557">
    <!-- we come here only if country of current user's workshop is Germany or Austria -->

        <workshop id="000000 A030X2">
            <category code="A1 C1" preferred= "fax">
                <email>feedback1@dcx.de</email>
                <fax>+49 (711) 17-12345</fax>
            </category>
            <category code="C2" preferred= "email">
                <email>feedback2@dcx.de</email>
                <fax>+49 (711) 17-123456</fax>
            </category>
            <!-- used for Austria or Germany and workshop either "00000" or "A030X2" but other feedback event category -->
            <default preferred= "fax">
                <email>feedback3@dcx.de</email>
                <fax>+49 (711) 17-12347</fax>
            </default>
        </workshop>

        <!-- used for all other workshops within Germany and Austria -->
        <category code="A1 C1" preferred= "fax">
            <email>feedback4@dcx.de</email>
            <fax>+49 (711) 17-12348</fax>
        </category>

        <default preferred= "fax">
            <email>feedback5@dcx.de</email>
            <fax>+49 (711) 17-12349</fax>
        </default>
    </country>

    <country code="839" preferred= "email">
        <!-- we come here only if country of current user's workshop is Japan -->
        <category code="C1" preferred= "fax">
        <!-- we come here only if the user selected "Parts Query" in Feedback as event category -->
            <email>feedback1@dcx.jp</email>
            <fax>+81 (1) 1234</fax>
        </category>
        <!-- We are in Japan, but no further criteria was matching -->
        <default preferred= "email">
            <email>feedback2@dcx.jp</email>
            <fax>+81 (1) 12345</fax>
        </default>
    </country>

    <!-- we come here if nothing of the above matches, so this is the "catch all" block -->
    <default preferred= "fax">
        <email>feedback@daimler.com</email>
        <fax>+49 (711) 12345</fax>
    </default>
</feedback-recipients>
8.3 Configuration of WIS net
The configuration file of the WIS-net server is located in [EWA_HOME]\config\wis_cfg.xml file.
Example:
<?xml version="1.0"?>
<!-- <!DOCTYPE export SYSTEM "wisconfig.dtd"> //-->
<WISCONFIGURATION>
    <SECTION name="imagecache">
        <!-- Size is given in Megabyte -->
        <PARAMETER name="maximumsize">128</PARAMETER>
    </SECTION>
    <SECTION name="pool">
        <SECTION name="co">
            <SECTION name="db">
                <PARAMETER name="driver">oracle.jdbc.driver.OracleDriver</PARAMETER>
                <PARAMETER name="url">jdbc:oracle:thin:@(DESCRIPTION=(ADDRESS_LIST=(ADDRESS=(PROTOCOL=TCP)(HOST=53.74.251.22)(PORT=1521)))(CONNECT_DATA=(SID=COL)(SERVER=DEDICATED)))</PARAMETER>
                <PARAMETER name="user">wisnet</PARAMETER>
                <PARAMETER name="password">wisnet</PARAMETER>
            </SECTION>
            <SECTION name="schema">
                <PARAMETER name="german">CASEONLINE_D</PARAMETER>
                <PARAMETER name="english">CASEONLINE_E</PARAMETER>
                <PARAMETER name="config">CO_STWS</PARAMETER>
            </SECTION>
            <PARAMETER name="size">5</PARAMETER>
            <PARAMETER name="pingstatement">select count(*) from dual</PARAMETER>
        </SECTION>
        <SECTION name="db">
            <PARAMETER name="driver">transbase.jdbc.Driver</PARAMETER>
            <PARAMETER name="url">jdbc:transbase://localhost:2054/wisnet</PARAMETER>
            <PARAMETER name="user">tbadmin</PARAMETER>
            <PARAMETER name="password"></PARAMETER>
            <PARAMETER name="size">5</PARAMETER>
            <PARAMETER name="pingstatement">select count(*) from Config</PARAMETER>
        </SECTION>
    </SECTION>

    <SECTION name="client">
        <!-- Java heap size of client in MB, default is 64 MB -->
        <PARAMETER name="heapsize">128</PARAMETER>
    </SECTION>

    <SECTION name="server">
        <PARAMETER name="codebase">WIS-net/html</PARAMETER>
        <PARAMETER name="helpbase">http://localhost:9000/WIS-net/online-help/html</PARAMETER>
        <PARAMETER name="languagebase">http://localhost:9000/WIS-net/html/resources</PARAMETER>
        <PARAMETER name="gateway">http://localhost:9000/EWA-net/ewa-net</PARAMETER>
        <PARAMETER name="language_preset">en</PARAMETER>
        <!-- debugLevel is on of ALERT, ERROR, WARNING, INFO or DEBUG -->
        <PARAMETER name="debugLevel">INFO</PARAMETER>
        <PARAMETER name="useMultiline">false</PARAMETER>

        <!-- Network/server version -->
        <PARAMETER name="webetmbase">http://localhost:9000/WIS-net</PARAMETER>

        <PARAMETER name="client_font_directory">c:\temp\</PARAMETER>

        <!-- activate/deactivate collection of performance data for statistic page -->
        <PARAMETER name="collectPerformanceData">true</PARAMETER>
        <PARAMETER name="datacardUrl">http://localhost:9000/EPC-net/datacardapi</PARAMETER>
    </SECTION>
    <SECTION name="casedirect">
        <PARAMETER name="rootdir">C:\temp</PARAMETER>
        <PARAMETER name="webserver">http://53.74.251.21:8080</PARAMETER>
        <PARAMETER name="proxyserver"></PARAMETER>
        <PARAMETER name="proxyport">80</PARAMETER>

        <SECTION name="cookie">
            <SECTION name="1">
                <PARAMETER name="path">/caseonline</PARAMETER>
                <PARAMETER name="name">caseonline_rechte</PARAMETER>
                <PARAMETER name="value">14634</PARAMETER>
                <PARAMETER name="domain">.daimlerchrysler.com</PARAMETER>
            </SECTION>
            <SECTION name="2">
                <PARAMETER name="path">/caseonline</PARAMETER>
                <PARAMETER name="name">caseonline_passwort</PARAMETER>
                <PARAMETER name="value">stws</PARAMETER>
                <PARAMETER name="domain">.daimlerchrysler.com</PARAMETER>
            </SECTION>
            <SECTION name="3">
                <PARAMETER name="path">/caseonline</PARAMETER>
                <PARAMETER name="name">caseonline_login</PARAMETER>
                <PARAMETER name="value">stws</PARAMETER>
                <PARAMETER name="domain">.daimlerchrysler.com</PARAMETER>
            </SECTION>
            <SECTION name="4">
                <PARAMETER name="path">/caseonline</PARAMETER>
                <PARAMETER name="name">caseonline_login</PARAMETER>
                <PARAMETER name="value">stws</PARAMETER>
                <PARAMETER name="domain">u10grz02.grz.mbcase.daimlerchrysler.com:8091</PARAMETER>
            </SECTION>
            <SECTION name="5">
                <PARAMETER name="path">/caseonline</PARAMETER>
                <PARAMETER name="name">caseonline_sprache</PARAMETER>
                <PARAMETER name="value">000</PARAMETER>
                <PARAMETER name="domain">u10grz02.grz.mbcase.daimlerchrysler.com:8091</PARAMETER>
            </SECTION>
        </SECTION>


    </SECTION>

    <!-- needed for G.07 configuration -->
    <SECTION name="caseonline">
        <SECTION name="mappings">
            <SECTION name="fzgart_table">
                <PARAMETER name="1">P</PARAMETER>
                <PARAMETER name="2">P</PARAMETER>
                <PARAMETER name="3">T</PARAMETER>
                <PARAMETER name="4">T</PARAMETER>
                <PARAMETER name="6">N</PARAMETER>
                <PARAMETER name="8">O</PARAMETER>
                <PARAMETER name="9">U</PARAMETER>
            </SECTION>
        </SECTION>
    </SECTION>

    <SECTION name="setup">
        <SECTION name="caseonline">
            <PARAMETER name="allowed">true</PARAMETER>
            <!-- true = merge WIS and CO docs, false = only show CO doc even if both exist -->
            <PARAMETER name="merge_wis">true</PARAMETER>
            <SECTION name="sync">
                <PARAMETER name="mainswitch">1</PARAMETER>
            </SECTION>
        </SECTION>
        <SECTION name="damagecode">
            <!-- Set to true to enable one-click navigation in damage code -->
            <PARAMETER name="oneclick">true</PARAMETER>
        </SECTION>
        <SECTION name="casedirect">
            <PARAMETER name="allowed">true</PARAMETER>
        </SECTION>
        <SECTION name="asra">
            <PARAMETER name="defaultJoborderFileName">C:\temp\MBCASE\joborder\joborder.txt</PARAMETER>
        </SECTION>
        <SECTION name="infotypes">
            <PARAMETER name="sti_code">-1</PARAMETER>
            <PARAMETER name="sti_name">F_WS_P_INFO_L_STI</PARAMETER>
            <PARAMETER name="structure">1;2,3,4|5;6,7,8,9,10,11|12;13,14|15;16,17,18,19,20,21,22,26,27|22;23,24,25|28;29,30,31,32,33</PARAMETER>
        </SECTION>
        <SECTION name="tasks">
            <PARAMETER name="task_id">1|2|3</PARAMETER>
            <PARAMETER name="tasks_rb">F_WS_P_INFO_SL_REPAIR|F_WS_P_INFO_SL_FUNCTIONALITYDESCRIPTION|F_WS_P_INFO_SL_DIAGNOSIS</PARAMETER>
            <PARAMETER name="tasks2dpyinfotypes">2,8,10|3,13|8,9,21,22,23,24,25</PARAMETER>
        </SECTION>
        <SECTION name="paperformat">
            <PARAMETER name="paperformat_names">A3|A4|Letter|Legal</PARAMETER>
            <PARAMETER name="paperformat_rb">F_SETUP_P_WS_PRINT_SL_A3|F_SETUP_P_WS_PRINT_SL_A4|F_SETUP_P_WS_PRINT_SL_LETTER|F_SETUP_P_WS_PRINT_SL_LEGAL</PARAMETER>
            <PARAMETER name="A3">29.7cm*42cm</PARAMETER>
            <PARAMETER name="A4">20.9cm*29.1cm</PARAMETER>
            <PARAMETER name="Letter">8.5in*11in</PARAMETER>
            <PARAMETER name="Legal">8.5in*14in</PARAMETER>
        </SECTION>
        <SECTION name="feedback">
            <PARAMETER name="subject">WIS Online Feedback Mail</PARAMETER>
            <PARAMETER name="fromuser">insert@sender.here.de</PARAMETER>
            <SECTION name="recipients">
                <PARAMETER name="CAT0">insert@recipient.here.de</PARAMETER>
                <PARAMETER name="CAT1">insert@recipient.here.de</PARAMETER>
                <PARAMETER name="CAT2">insert@recipient.here.de</PARAMETER>
                <PARAMETER name="CAT3">insert@recipient.here.de</PARAMETER>
            </SECTION>
            <SECTION name="hostconfig">
                <PARAMETER name="smtphost">danetis.is.danet.de</PARAMETER>
                <PARAMETER name="smtpuser">bpf</PARAMETER>
                <PARAMETER name="smtppassword">sagichnicht</PARAMETER>
            </SECTION>
        </SECTION>
        <SECTION name="fonts">
            <SECTION name="MODERN">
                <PARAMETER name="PLAIN.W32">Arial</PARAMETER>
                <PARAMETER name="BOLD.W32">Arial Bold</PARAMETER>
                <PARAMETER name="ITALIC.W32">Arial Italic</PARAMETER>
                <PARAMETER name="BOLD-ITALIC.W32">Arial Bold Italic</PARAMETER>

                <PARAMETER name="PLAIN.20.W32">MS Gothic</PARAMETER>
                <PARAMETER name="BOLD.20.W32">MS Gothic</PARAMETER>
                <PARAMETER name="ITALIC.20.W32">MS Gothic</PARAMETER>
                <PARAMETER name="BOLD-ITALIC.20.W32">MS Gothic</PARAMETER>

                <PARAMETER name="PLAIN.28.W32">MS Song</PARAMETER>
                <PARAMETER name="BOLD.28.W32">MS Song</PARAMETER>
                <PARAMETER name="ITALIC.28.W32">MS Song</PARAMETER>
                <PARAMETER name="BOLD-ITALIC.28.W32">MS Song</PARAMETER>

                <PARAMETER name="PLAIN.39.W32">SimSun</PARAMETER>
                <PARAMETER name="BOLD.39.W32">SimSun</PARAMETER>
                <PARAMETER name="ITALIC.39.W32">SimSun</PARAMETER>
                <PARAMETER name="BOLD-ITALIC.39.W32">SimSun</PARAMETER>

                <PARAMETER name="PLAIN.86.W32">Gulim</PARAMETER>
                <PARAMETER name="BOLD.86.W32">Gulim</PARAMETER>
                <PARAMETER name="ITALIC.86.W32">Gulim</PARAMETER>
                <PARAMETER name="BOLD-ITALIC.86.W32">Gulim</PARAMETER>

                <PARAMETER name="PLAIN.87.W32">Arial Unicode MS</PARAMETER>
                <PARAMETER name="BOLD.87.W32">Arial Unicode MS</PARAMETER>
                <PARAMETER name="ITALIC.87.W32">Arial Unicode MS</PARAMETER>
                <PARAMETER name="BOLD-ITALIC.87.W32">Arial Unicode MS</PARAMETER>

                <PARAMETER name="PLAIN.88.W32">Arial Unicode MS</PARAMETER>
                <PARAMETER name="BOLD.88.W32">Arial Unicode MS</PARAMETER>
                <PARAMETER name="ITALIC.88.W32">Arial Unicode MS</PARAMETER>
                <PARAMETER name="BOLD-ITALIC.88.W32">Arial Unicode MS</PARAMETER>
            </SECTION>
            <SECTION name="CLASSIC">
               <PARAMETER name="PLAIN.W32">Arial</PARAMETER>
               <PARAMETER name="BOLD.W32">Arial Bold</PARAMETER>
               <PARAMETER name="ITALIC.W32">Arial Italic</PARAMETER>
               <PARAMETER name="BOLD-ITALIC.W32">Arial Bold Italic</PARAMETER>

               <PARAMETER name="PLAIN.20.W32">MS Gothic</PARAMETER>
               <PARAMETER name="BOLD.20.W32">MS Gothic</PARAMETER>
               <PARAMETER name="ITALIC.20.W32">MS Gothic</PARAMETER>
               <PARAMETER name="BOLD-ITALIC.20.W32">MS Gothic</PARAMETER>

               <PARAMETER name="PLAIN.28.W32">MS Song</PARAMETER>
               <PARAMETER name="BOLD.28.W32">MS Song</PARAMETER>
               <PARAMETER name="ITALIC.28.W32">MS Song</PARAMETER>
               <PARAMETER name="BOLD-ITALIC.28.W32">MS Song</PARAMETER>

               <PARAMETER name="PLAIN.39.W32">SimSun</PARAMETER>
               <PARAMETER name="BOLD.39.W32">SimSun</PARAMETER>
               <PARAMETER name="ITALIC.39.W32">SimSun</PARAMETER>
               <PARAMETER name="BOLD-ITALIC.39.W32">SimSun</PARAMETER>

               <PARAMETER name="PLAIN.86.W32">Gulim</PARAMETER>
               <PARAMETER name="BOLD.86.W32">Gulim</PARAMETER>
               <PARAMETER name="ITALIC.86.W32">Gulim</PARAMETER>
               <PARAMETER name="BOLD-ITALIC.86.W32">Gulim</PARAMETER>

               <PARAMETER name="PLAIN.87.W32">Arial Unicode MS</PARAMETER>
               <PARAMETER name="BOLD.87.W32">Arial Unicode MS</PARAMETER>
               <PARAMETER name="ITALIC.87.W32">Arial Unicode MS</PARAMETER>
               <PARAMETER name="BOLD-ITALIC.87.W32">Arial Unicode MS</PARAMETER>

               <PARAMETER name="PLAIN.88.W32">Arial Unicode MS</PARAMETER>
               <PARAMETER name="BOLD.88.W32">Arial Unicode MS</PARAMETER>
               <PARAMETER name="ITALIC.88.W32">Arial Unicode MS</PARAMETER>
               <PARAMETER name="BOLD-ITALIC.88.W32">Arial Unicode MS</PARAMETER>
            </SECTION>
            <PARAMETER name="HELVETICA.PLAIN.W32">Arial</PARAMETER>
            <PARAMETER name="HELVETICA.BOLD.W32">Arial Bold</PARAMETER>
            <PARAMETER name="HELVETICA.ITALIC.W32">Arial Italic</PARAMETER>
            <PARAMETER name="HELVETICA.BOLD-ITALIC.W32">Arial Bold Italic</PARAMETER>
            <PARAMETER name="TIMES.PLAIN.W32">Times New Roman</PARAMETER>
            <PARAMETER name="TIMES.BOLD.W32">Times New Roman Fett</PARAMETER>
            <PARAMETER name="TIMES.ITALIC.W32">Times New Roman Kursiv</PARAMETER>
            <PARAMETER name="TIMES.BOLD-ITALIC.W32">Times New Roman Fett Kursiv</PARAMETER>
            <PARAMETER name="TIMES_ROMAN.PLAIN.W32">Times New Roman</PARAMETER>
            <PARAMETER name="TIMES_ROMAN.BOLD.W32">Times New Roman Fett</PARAMETER>
            <PARAMETER name="TIMES_ROMAN.ITALIC.W32">Times New Roman Kursiv</PARAMETER>
            <PARAMETER name="TIMES_ROMAN.BOLD-ITALIC.W32">Times New Roman Fett Kursiv</PARAMETER>
            <PARAMETER name="SWISS.PLAIN.W32">Arial</PARAMETER>
            <PARAMETER name="SWISS.BOLD.W32">Arial Bold</PARAMETER>
            <PARAMETER name="SWISS.ITALIC.W32">Arial Italic</PARAMETER>
            <PARAMETER name="SWISS.BOLD-ITALIC.W32">Arial Bold Italic</PARAMETER>
            <PARAMETER name="TYPEWRITE.PLAIN.W32">Courier New</PARAMETER>
            <PARAMETER name="DEFAULT.PLAIN.W32">Courier New</PARAMETER>
            <PARAMETER name="COURIER.PLAIN.W32">Courier New</PARAMETER>
            <PARAMETER name="COURIER.BOLD.W32">Courier New Fett</PARAMETER>
            <PARAMETER name="ARIAL.PLAIN.W32">Arial Narrow</PARAMETER>
            <PARAMETER name="ARIAL.BOLD.W32">Arial Fett</PARAMETER>
            <PARAMETER name="SYMBOLS.PLAIN.W32">Symbols</PARAMETER>
            <PARAMETER name="SYMBOLS.PLAIN.W32.offset">61440</PARAMETER>
            <PARAMETER name="GREEK.PLAIN.W32">Greek</PARAMETER>
            <PARAMETER name="GREEK.PLAIN.W32.offset">61440</PARAMETER>
            <PARAMETER name="GREEK.BOLD.W32">Greek Bold</PARAMETER>
            <PARAMETER name="GREEK.BOLD.W32.offset">61440</PARAMETER>
            <PARAMETER name="GREEK.ITALIC.W32">Greek Italic</PARAMETER>
            <PARAMETER name="GREEK.ITALIC.W32.offset">61440</PARAMETER>
            <PARAMETER name="GREEK.BOLD-ITALIC.W32">Greek Bold Italic</PARAMETER>
            <PARAMETER name="GREEK.BOLD-ITALIC.W32.offset">61440</PARAMETER>
            <PARAMETER name="MATH~A.PLAIN.W32">Math A</PARAMETER>
            <PARAMETER name="MATH~A.PLAIN.W32.offset">61440</PARAMETER>
            <PARAMETER name="MATH~B.PLAIN.W32">Math B</PARAMETER>
            <PARAMETER name="MATH~B.PLAIN.W32.offset">61440</PARAMETER>
            <PARAMETER name="MATH~EXT;.PLAIN.W32">Math Ext.</PARAMETER>
            <PARAMETER name="MATH~EXT;.PLAIN.W32.offset">61440</PARAMETER>
            <PARAMETER name="LOGOC0.PLAIN.W32">MB Service</PARAMETER>
            <PARAMETER name="LOGOC0.PLAIN.W32.offset">0</PARAMETER>
            <PARAMETER name="LOGO1C0.PLAIN.W32">MB Laenderkennzeichen</PARAMETER>
            <PARAMETER name="LOGO1C0.PLAIN.W32.offset">0</PARAMETER>
            <PARAMETER name="LOGO1C41.PLAIN.W32">MB Diktogramme</PARAMETER>
            <PARAMETER name="LOGO1C41.PLAIN.W32.offset">61440</PARAMETER>
            <PARAMETER name="LOGO1C356.PLAIN.W32">MB Fahrzeuge</PARAMETER>
            <PARAMETER name="LOGO1C356.PLAIN.W32.offset">0</PARAMETER>
            <PARAMETER name="LOGO1C357.PLAIN.W32">MB Pruefzeichen</PARAMETER>
            <PARAMETER name="LOGO1C357.PLAIN.W32.offset">0</PARAMETER>
            <PARAMETER name="LOGO1C360.PLAIN.W32">MB Kurzzeichen</PARAMETER>
            <PARAMETER name="LOGO1C360.PLAIN.W32.offset">61440</PARAMETER>
            <PARAMETER name="LOGO2C0.PLAIN.W32">AMS New Digital</PARAMETER>
            <PARAMETER name="LOGO3C0.PLAIN.W32">MB Bedienzeichen</PARAMETER>
            <PARAMETER name="LOGO3C0.PLAIN.W32.offset">61440</PARAMETER>
            <PARAMETER name="LOGO3C41.PLAIN.W32">MB Bedienzeichen S-Klasse</PARAMETER>
            <PARAMETER name="LOGO3C41.PLAIN.W32.offset">0</PARAMETER>
            <PARAMETER name="LOGO3C356.PLAIN.W32">MB Handkurzzeichen</PARAMETER>
            <PARAMETER name="LOGO3C356.PLAIN.W32.offset">0</PARAMETER>
            <PARAMETER name="LOGO3C357.PLAIN.W32">MB Digitalanzeige S-Klasse</PARAMETER>
            <PARAMETER name="LOGO3C357.PLAIN.W32.offset">61440</PARAMETER>
            <PARAMETER name="LOGO3C360.PLAIN.W32">MB Schweisszeichen</PARAMETER>
            <PARAMETER name="LOGO3C360.PLAIN.W32.offset">61440</PARAMETER>
            <PARAMETER name="LOGO3C361.PLAIN.W32">MB Bed. Zeichen W210</PARAMETER>
            <PARAMETER name="LOGO3C361.PLAIN.W32.offset">61440</PARAMETER>
            <PARAMETER name="FONT3C0.PLAIN.W32">MB Fahrzeuge II</PARAMETER>
            <PARAMETER name="FONT3C0.PLAIN.W32.offset">61440</PARAMETER>
            <PARAMETER name="FONT3C41.PLAIN.W32">MBFahrzeuge III</PARAMETER>
            <PARAMETER name="FONT3C41.PLAIN.W32.offset">0</PARAMETER>
        </SECTION>
        <SECTION name="image">
            <SECTION name="TIFF">
                <PARAMETER name="matcher">dcx.wis_online.common.image.TIFFMatcher</PARAMETER>
                <PARAMETER name="decoder">dcx.wis_online.common.image.TIFFDecoder</PARAMETER>
            </SECTION>
            <SECTION name="GIF">
                <PARAMETER name="matcher">dcx.wis_online.common.image.GIFMatcher</PARAMETER>
                <PARAMETER name="decoder">dcx.wis_online.common.image.GIFDecoder</PARAMETER>
            </SECTION>
            <SECTION name="JPEG">
                <PARAMETER name="matcher">dcx.wis_online.common.image.JPEGMatcher</PARAMETER>
                <PARAMETER name="decoder">dcx.wis_online.common.image.JPEGDecoder</PARAMETER>
            </SECTION>
            <SECTION name="DTW">
                <PARAMETER name="matcher">dcx.wis_online.common.image.dtwdecoder.DTWMatcher</PARAMETER>
                <PARAMETER name="decoder">dcx.wis_online.common.image.dtwdecoder.DTWDecoder</PARAMETER>
            </SECTION>
        </SECTION>
        <SECTION name="symptom">
            <SECTION name="appearance">
                <PARAMETER name="id">1|2|3|9|4|5|6|8|0</PARAMETER>
                <PARAMETER name="label.1">F_WS_P_SYMPTOM_CB_APPEARANCE_ACOUSTIC</PARAMETER>
                <PARAMETER name="label.2">F_WS_P_SYMPTOM_CB_APPEARANCE_OPTIC</PARAMETER>
                <PARAMETER name="label.3">F_WS_P_SYMPTOM_CB_APPEARANCE_SENSITIVE</PARAMETER>
                <PARAMETER name="label.9">F_WS_P_SYMPTOM_CB_APPEARANCE_ACOUSTIC_AND_SENSITIVE</PARAMETER>
                <PARAMETER name="label.4">F_WS_P_SYMPTOM_CB_APPEARANCE_LEAKY</PARAMETER>
                <PARAMETER name="label.5">F_WS_P_SYMPTOM_CB_APPEARANCE_SCENTING</PARAMETER>
                <PARAMETER name="label.6">F_WS_P_SYMPTOM_CB_APPEARANCE_MALFUNCTION</PARAMETER>
                <PARAMETER name="label.8">F_WS_P_SYMPTOM_CB_APPEARANCE_READABLE</PARAMETER>
                <PARAMETER name="label.0">F_WS_P_SYMPTOM_CB_APPEARANCE_UNASSIGNABLE</PARAMETER>
            </SECTION>
            <SECTION name="state">
                <PARAMETER name="id">1|2|5|3|4|8|6|7|9|0</PARAMETER>
                <PARAMETER name="label.1">F_WS_P_SYMPTOM_CB_STATE_DRIVING</PARAMETER>
                <PARAMETER name="label.2">F_WS_P_SYMPTOM_CB_STATE_SPEED</PARAMETER>
                <PARAMETER name="label.5">F_WS_P_SYMPTOM_CB_STATE_DRIVING_AND_SPEED</PARAMETER>
                <PARAMETER name="label.3">F_WS_P_SYMPTOM_CB_STATE_REV</PARAMETER>
                <PARAMETER name="label.4">F_WS_P_SYMPTOM_CB_STATE_OPERATING</PARAMETER>
                <PARAMETER name="label.8">F_WS_P_SYMPTOM_CB_STATE_REV_AND_OPERATING</PARAMETER>
                <PARAMETER name="label.6">F_WS_P_SYMPTOM_CB_STATE_DRIVING_AND_REV</PARAMETER>
                <PARAMETER name="label.7">F_WS_P_SYMPTOM_CB_STATE_DRIVING_AND_OPERATING</PARAMETER>
                <PARAMETER name="label.9">F_WS_P_SYMPTOM_CB_STATE_DRIVING_REV_AND_OPERATING</PARAMETER>
                <PARAMETER name="label.0">F_WS_P_SYMPTOM_CB_STATE_UNASSIGNABLE</PARAMETER>
            </SECTION>
            <SECTION name="environment">
                <PARAMETER name="id">1|2|7|3|8|4|0</PARAMETER>
                <PARAMETER name="label.1">F_WS_P_SYMPTOM_CB_ENVIRONMENT_WEATHER</PARAMETER>
                <PARAMETER name="label.2">F_WS_P_SYMPTOM_CB_ENVIRONMENT_ROAD</PARAMETER>
                <PARAMETER name="label.7">F_WS_P_SYMPTOM_CB_ENVIRONMENT_WEATHER_AND_ROAD</PARAMETER>
                <PARAMETER name="label.3">F_WS_P_SYMPTOM_CB_ENVIRONMENT_TEMPERATURE</PARAMETER>
                <PARAMETER name="label.8">F_WS_P_SYMPTOM_CB_ENVIRONMENT_WEATHER_AND_TEMPERATURE</PARAMETER>
                <PARAMETER name="label.4">F_WS_P_SYMPTOM_CB_ENVIRONMENT_FLUIDS</PARAMETER>
                <PARAMETER name="label.0">F_WS_P_SYMPTOM_CB_ENVIRONMENT_UNASSIGNABLE</PARAMETER>
            </SECTION>

        </SECTION>
        <SECTION name="markers">
            <PARAMETER name="anzieh.t">SIDS_ANZIEHMOMENTE</PARAMETER>
            <PARAMETER name="as.t">SIDS_AS_TABELLE</PARAMETER>
            <PARAMETER name="basdat">SIDS_BASISDATEN</PARAMETER>
            <PARAMETER name="bilder.t">SIDS_FIGURE</PARAMETER>
            <PARAMETER name="diag.t">SIDS_DIAGNOSE</PARAMETER>
            <PARAMETER name="fig">SIDS_FIGURE</PARAMETER>
            <PARAMETER name="aender.t">SIDS_AENDERUNGSHINWEISE</PARAMETER>
            <PARAMETER name="fuell.t">SIDS_FUELLMENGEN</PARAMETER>
            <PARAMETER name="hndwkz.t">SIDS_HDLSUEBL_WERKZEUGE</PARAMETER>
        </SECTION>
        <SECTION name="aggtypabk2bmart">
            <PARAMETER name="A">A</PARAMETER>
            <PARAMETER name="AG">G</PARAMETER>
            <PARAMETER name="MG">G</PARAMETER>
            <PARAMETER name="H1">HA</PARAMETER>
            <PARAMETER name="H2">HA</PARAMETER>
            <PARAMETER name="LG">L</PARAMETER>
            <PARAMETER name="P">P</PARAMETER>
            <PARAMETER name="V1">VA</PARAMETER>
            <PARAMETER name="V2">VA</PARAMETER>
            <PARAMETER name="VG">VG</PARAMETER>
            <PARAMETER name="T">T</PARAMETER>
            <PARAMETER name="M">M</PARAMETER>
            <PARAMETER name="L">L</PARAMETER>
            <PARAMETER name="G">G</PARAMETER>
            <PARAMETER name="HA">HA</PARAMETER>
            <PARAMETER name="VA">VA</PARAMETER>
        </SECTION>
        <SECTION name="snap">
            <PARAMETER name="sortclass_1">SORTCLASS.P</PARAMETER>
            <PARAMETER name="sortclass_1.id">1</PARAMETER>
            <PARAMETER name="sortclass_2">SORTCLASS.G</PARAMETER>
            <PARAMETER name="sortclass_2.id">2</PARAMETER>
            <PARAMETER name="sortclass_3">SORTCLASS.L</PARAMETER>
            <PARAMETER name="sortclass_3.id">3</PARAMETER>
            <PARAMETER name="sortclass_4">SORTCLASS.T</PARAMETER>
            <PARAMETER name="sortclass_4.id">4</PARAMETER>
            <PARAMETER name="sortclass_5">SORTCLASS.F</PARAMETER>
            <PARAMETER name="sortclass_5.id">6</PARAMETER>
            <PARAMETER name="sortclass_6">SORTCLASS.M</PARAMETER>
            <PARAMETER name="sortclass_6.id">6</PARAMETER>
            <PARAMETER name="sortclass_7">SORTCLASS.S</PARAMETER>
            <PARAMETER name="sortclass_7.id">6</PARAMETER>
            <PARAMETER name="sortclass_8">SORTCLASS.O</PARAMETER>
            <PARAMETER name="sortclass_8.id">8</PARAMETER>
            <PARAMETER name="sortclass_9">SORTCLASS.U</PARAMETER>
            <PARAMETER name="sortclass_9.id">9</PARAMETER>
            <PARAMETER name="sortclass_10">SORTCLASS.V</PARAMETER>
            <PARAMETER name="sortclass_10.id">3</PARAMETER>
            <PARAMETER name="sortclass_11">SORTCLASS.C</PARAMETER>
            <PARAMETER name="sortclass_11.id">1</PARAMETER>
            <PARAMETER name="sortclass_12">SORTCLASS.K</PARAMETER>
            <PARAMETER name="sortclass_12.id">9</PARAMETER>
        </SECTION>
    </SECTION>

    <SECTION name="services">
        <!--  Licence string for application "Damage Code Standalone"
             (Position 63 to 72 will be used for country code which should
             be 0, meaning international)
         -->
        <PARAMETER name="damageCodeLicence">01111110001000000111100000000011111111111111111111111111111111100000000000011110</PARAMETER>
    </SECTION>
</WISCONFIGURATION>
The next table explanes the important configuration settings.
| Parameter | Example Value | Description |
| imagecache |
| maximumsize | 128 | The cache size for images in MB. |
| pool.co |
| size | 5 | Pool size for CASE-Online database access. |
| pool.co.db |
| driver | oracle.jdbc.driver.OracleDriver | JDBC-Driver to connect to CASE-Online database. |
| url | jdbc:oracle:thin:@(DESCRIPTION=
(ADDRESS_LIST=(ADDRESS=(PROTOCOL=TCP)
(HOST=53.74.251.22)(PORT=1521)))
(CONNECT_DATA=(SID=COL)(SERVER=DEDICATED))) | URL for CASE-Online database.
|
| user | wisnet | User for CASE-Online database access. |
| password | wisnet | Password for CASE-Online database access. |
| pool.db |
| driver | transbase.jdbc.Driver | JDBC-Driver to connect to WIS-net database. |
| url | jdbc:transbase://localhost:2054/wisnet | URL for WIS-net database. |
| user | tbadmin | User for WIS-net database access. |
| password | | Password for WIS-net database access. |
| size | 5 | Pool size for WIS-net database access.
Attention:
A pool size of 5 is only suitable for a standalone installation. For a server installation a size of 200 may be adequate (it depends on the number of parallel user using this server).
|
| client |
| heapsize | 128 | Java heap size of client in MB, default is 64 MB. |
| server |
| codebase | WIS-net/html | Path on the server where to find the WIS-net application . The Prefix "http://<server>:<port>/" is added automatically. |
| helpbase | http://localhost:9000/WIS-net/online-help/html | URL pointing to help resources. |
| languagebase | http://localhost:9000/WIS-net/html/resources | URL pointing to language resources. |
| gateway | http://localhost:9000/EWA-net/ewa-net | URL pointing to the access gateway. |
| language_preset | en | Language pre settings used. This is the default UI language for clients connecting to this server. Each user can override this setting by choosing a preferred language in his personal client setup. Language presets either have the form en, de to specify only a country, or en_us, de_de to specify country and language. |
| debugLevel | INFO | Debug level for WIS-net server. One of ALERT, ERROR, WARNING, INFO or DEBUG |
| useMultiline | false | Use multiline mode for log output (true or false allowed). |
| webetmbase | http://localhost:9000/WIS-net | URL where WebETM Cadviewer is found. |
| client_font_directory | c:\temp\ | Path where font files will be expanded. |
| collectPerformanceData | true | Activate/deactivate collection of performance data. |
| datacardUrl | http://localhost:9000/EPC-net/datacardapi | URL pointing to EPC datacard api. |
| casedirect |
| rootdir | C:\temp | Root directory to use for CASE-Online direct access. |
| webserver | http://53.74.251.21:8080 | URL where CASE-Online is reachable. |
| proxyserver | | Proxy server name (if needed). |
| proxyport | 80 | Proxy server port (if needed). |
| casedirect.cookie | | The cookie section is configured for the currently used CASE-Online webserver. If the webserver should require other cookie settings some day, please contact the CASE-Online providers to get the correct values. |
| setup.caseonline |
| allowed | true | This flag triggers two things:
Enable/disable the checkbox "Perform every search across latest documents" in client setup window. If the flag is set to false, users cannot perform searches on the CASE-Online database. |
| merge_wis | true | It set to true, search results of WIS and CASE-Online are merged. |
| setup.damagecode |
| oneclick | true | Activate onclick seletion in damage code application (true) or deactivate it (false). |
| setup.casedirect |
| allowed | true | This flag enables or disables the server to access the CASE-Online database directly. |
| setup.asra | | |
| defaultJoborderFileName | C:\temp\MBCASE\joborder\joborder.txt | Set default joborder path and file name for ASRA job orders. It is possible to use any variables (%VARNAME%) which will be substituted at client side when defined. |
| setup.infotypes |
| sti_code | -1 | Internal settings. Do not change. |
| sti_name | F_WS_P_INFO_L_STI | Internal settings. Do not change. |
| setup.tasks |
| task_id | 1|2|3 | Internal settings. Do not change. |
| task_id | F_WS_P_INFO_SL_REPAIR | F_WS_P_INFO_SL_FUNCTIONALITYDESCRIPTION |
F_WS_P_INFO_SL_DIAGNOSIS | Internal settings. Do not change. |
| tasks2dpyinfotypes | 2,8,10|3,13|8,9,21,22,23,24,25 | Internal settings. Do not change. |
| setup.paperformat |
| paperformat_names | A3|A4|Letter|Legal | Names for used paper formats. |
| paperformat_rb | F_SETUP_P_WS_PRINT_SL_A3 |
F_SETUP_P_WS_PRINT_SL_A4 | F_SETUP_P_WS_PRINT_SL_LETTER | F_SETUP_P_WS_PRINT_SL_LEGAL | Resource bundle names for paper formates. |
| A3 | 29.7cm*42cm | Paper size for format A3. |
| A4 | 20.9cm*29.1cm | Paper size for format A4. |
| Letter | 8.5in*11in | Paper size for format Letter. |
| Legal | 8.5in*14in | Paper size for format Legal. |
| feedback |
| subject | WIS Online Feedback Mail | Mail subject to use for feedback mail. |
| fromuser | insert@sender.here.de | Sender address of feedback mail. |
| feedback.recipients |
| CAT0 | insert@recipient.here.de | First recipient address to use. |
| CAT1 | insert@recipient.here.de | Second recipient address to use. |
| CAT2 | insert@recipient.here.de | Third recipient address to use. |
| CAT3 | insert@recipient.here.de | Forth recipient address to use. |
| feedback.hostconfig |
| smtphost | danetis.is.danet.de | Mail host to use. |
| smtpuser | bpf | Mail user to use. |
| smtppassword | sagichnicht | Mail user password to use. |
| services |
| damageCodeLicence | 011111100010000001111000000000111111111
11111111111111111111111100000000000011110 | License to use for damage code application. |
| profiledummy | true | Use profile dummy. |
| profilefile | C:\temp\wis_profile_ | File name prefix where profile will be saved. |
| fincachedummy | true | Use FIN cache dummy. |
| fincachefile | C:\temp\wis_fincache_ | File name prefix where FIN chache will be saved. |
Table: wis_cfg.xml
8.4 Configuration of EPC net
The configuration file of the EPC-net server is located in [EWA_HOME]\config\epc_cfg.xml file.
Example:
<config>
<param name="gateway">EWA-net/ewa-net</param>
<param name="applicationMode">HPSERVICE</param>
<param name="clientMainClass">com.proquest.epc.view.impl.MBEPCApplication</param>
<param name="dbDriver">transbase.jdbc.Driver</param>
<param name="SPECIAL_URL">pooling:30:null:10000:null:2:null:null:null:null:null:null:jdbc:transbase://localhost:2034/SPECIALFILES</param>
<param name="COMM_URL">pooling:50:null:10000:null:5:null:null:null:null:null:null:jdbc:transbase://localhost:2034/COMM</param>
<param name="ALLBMS_URL">pooling:50:null:10000:null:2:true:null:null:null:null:null:jdbc:transbase://localhost:2034/ALLBMS</param>
<param name="DCEX_DCEX_URL">pooling:30:null:10000:null:2:null:null:null:null:null:null:jdbc:transbase://localhost:2034/DCEX_DCEX</param>
<param name="MBJA_DCJA_URL">pooling:30:null:10000:null:2:null:null:null:null:null:null:jdbc:transbase://localhost:2034/MBJA_DCJA</param>
<param name="MBIE_DCIE_URL">pooling:30:null:10000:null:2:null:null:null:null:null:null:jdbc:transbase://localhost:2034/MBIE_DCIE</param>
<param name="MBLA_DCLA_URL">pooling:30:null:10000:null:2:null:null:null:null:null:null:jdbc:transbase://localhost:2034/MBLA_DCLA</param>
<param name="MBOE_DCBUS_URL">pooling:30:null:10000:null:2:null:null:null:null:null:null:jdbc:transbase://localhost:2034/MBOE_DCBUS</param>
<param name="MBOE_DCCAR_URL">pooling:30:null:10000:null:2:null:null:null:null:null:null:jdbc:transbase://localhost:2034/MBOE_DCCAR</param>
<param name="MBOE_DCGWGN_URL">pooling:30:null:10000:null:2:null:null:null:null:null:null:jdbc:transbase://localhost:2034/MBOE_DCGWGN</param>
<param name="MBOE_DCTRAC_URL">pooling:30:null:10000:null:2:null:null:null:null:null:null:jdbc:transbase://localhost:2034/MBOE_DCTRAC</param>
<param name="MBOE_DCTRAN_URL">pooling:30:null:10000:null:2:null:null:null:null:null:null:jdbc:transbase://localhost:2034/MBOE_DCTRAN</param>
<param name="MBOE_DCTRK_URL">pooling:30:null:10000:null:2:null:null:null:null:null:null:jdbc:transbase://localhost:2034/MBOE_DCTRK</param>
<param name="MBOE_DCUMOG_URL">pooling:30:null:10000:null:2:null:null:null:null:null:null:jdbc:transbase://localhost:2034/MBOE_DCUMOG</param>
<param name="MBNA_DCNA_URL">pooling:30:null:10000:null:2:null:null:null:null:null:null:jdbc:transbase://localhost:2034/MBNA_DCNA</param>
<param name="MBSA_DCSA_URL">pooling:30:null:10000:null:2:null:null:null:null:null:null:jdbc:transbase://localhost:2034/MBSA_DCSA</param>
<param name="MBSM_DCSM_URL">pooling:30:null:10000:null:2:null:null:null:null:null:null:jdbc:transbase://localhost:2034/MBSM_DCSM</param>
<param name="COMMONI_H_URL">pooling:30:null:10000:null:2:null:null:null:null:null:null:jdbc:transbase://localhost:2034/COMMONI</param>
<param name="JAIMG_H_URL">pooling:30:null:10000:null:2:null:null:null:null:null:null:jdbc:transbase://localhost:2034/JAIMG</param>
<param name="LAIMG_H_URL">pooling:30:null:10000:null:2:null:null:null:null:null:null:jdbc:transbase://localhost:2034/LAIMG</param>
<param name="NAIMG_H_URL">pooling:30:null:10000:null:2:null:null:null:null:null:null:jdbc:transbase://localhost:2034/NAIMG</param>
<param name="SAIMG_H_URL">pooling:30:null:10000:null:2:null:null:null:null:null:null:jdbc:transbase://localhost:2034/SAIMG</param>
<param name="SMIMG_H_URL">pooling:30:null:10000:null:2:null:null:null:null:null:null:jdbc:transbase://localhost:2034/SMIMG</param>
<param name="OEBUSI_H_URL">pooling:30:null:10000:null:2:null:null:null:null:null:null:jdbc:transbase://localhost:2034/OEIMG</param>
<param name="OECARI_H_URL">pooling:30:null:10000:null:2:null:null:null:null:null:null:jdbc:transbase://localhost:2034/OEIMG</param>
<param name="OEGWGNI_H_URL">pooling:30:null:10000:null:2:null:null:null:null:null:null:jdbc:transbase://localhost:2034/OEIMG</param>
<param name="OETRACI_H_URL">pooling:30:null:10000:null:2:null:null:null:null:null:null:jdbc:transbase://localhost:2034/OEIMG</param>
<param name="OETRANI_H_URL">pooling:30:null:10000:null:2:null:null:null:null:null:null:jdbc:transbase://localhost:2034/OEIMG</param>
<param name="OETRKI_H_URL">pooling:30:null:10000:null:2:null:null:null:null:null:null:jdbc:transbase://localhost:2034/OEIMG</param>
<param name="OEUMOGI_H_URL">pooling:30:null:10000:null:2:null:null:null:null:null:null:jdbc:transbase://localhost:2034/OEIMG</param>
<param name="OESAIMG_H_URL">pooling:30:null:10000:null:2:null:null:null:null:null:null:jdbc:transbase://localhost:2034/OESAIMG</param>
<param name="OEAGGIMG_H_URL">pooling:30:null:10000:null:2:null:null:null:null:null:null:jdbc:transbase://localhost:2034/OEAGGIMG</param>
<param name="MBIE1COMM_H_URL">pooling:30:null:10000:null:2:null:null:null:null:null:null:jdbc:transbase://localhost:2034/MBIE1COMM</param>
<param name="COMMONI_H_IMAGES_URL">COMMONI_H_URL</param>
<param name="MBJA_AGGBM_IMAGES_URL">COMMONI_H_URL,JAIMG_H_URL</param>
<param name="MBJA_CARBM_IMAGES_URL">COMMONI_H_URL,JAIMG_H_URL</param>
<param name="MBJA_TRANBM_IMAGES_URL">COMMONI_H_URL,JAIMG_H_URL</param>
<param name="MBIE_AGGBM_IMAGES_URL">COMMONI_H_URL,MBIE1COMM_H_URL</param>
<param name="MBLA_AGGBM_IMAGES_URL">COMMONI_H_URL,LAIMG_H_URL</param>
<param name="MBLA_CVBM_IMAGES_URL">COMMONI_H_URL,LAIMG_H_URL</param>
<param name="MBLA_TRANBM_IMAGES_URL">COMMONI_H_URL,LAIMG_H_URL</param>
<param name="MBOE_AGGBM_IMAGES_URL">COMMONI_H_URL,OESAIMG_H_URL,OEAGGIMG_H_URL</param>
<param name="MBOE_BUSBM_IMAGES_URL">COMMONI_H_URL,OEBUSI_H_URL</param>
<param name="MBOE_CARBM_IMAGES_URL">COMMONI_H_URL,OECARI_H_URL</param>
<param name="MBOE_GWGNBM_IMAGES_URL">COMMONI_H_URL,OEGWGNI_H_URL</param>
<param name="MBOE_TRACBM_IMAGES_URL">COMMONI_H_URL,OETRACI_H_URL</param>
<param name="MBOE_TRANBM_IMAGES_URL">COMMONI_H_URL,OETRANI_H_URL</param>
<param name="MBOE_TRKBM_IMAGES_URL">COMMONI_H_URL,OETRKI_H_URL</param>
<param name="MBOE_UMOGBM_IMAGES_URL">COMMONI_H_URL,OEUMOGI_H_URL</param>
<param name="MBNA_AGGBM_IMAGES_URL">COMMONI_H_URL,NAIMG_H_URL</param>
<param name="MBNA_CARBM_IMAGES_URL">COMMONI_H_URL,NAIMG_H_URL</param>
<param name="MBSA_AGGBM_IMAGES_URL">COMMONI_H_URL,SAIMG_H_URL</param>
<param name="MBSA_CARBM_IMAGES_URL">COMMONI_H_URL,SAIMG_H_URL</param>
<param name="MBSA_CVBM_IMAGES_URL">COMMONI_H_URL,SAIMG_H_URL</param>
<param name="MBSA_TRANBM_IMAGES_URL">COMMONI_H_URL,SAIMG_H_URL</param>
<param name="MBSM_CARBM_IMAGES_URL">COMMONI_H_URL,SMIMG_H_URL</param>
<param name="MBSM_AGGBM_IMAGES_URL">COMMONI_H_URL,SMIMG_H_URL</param>
<param name="COMM_IMAGES_URL">COMMONI_H_URL,OESAIMG_H_URL:402702003303603903204,NAIMG_H_URL:804,JAIMG_H_URL:105,LAIMG_H_URL:705,SAIMG_H_URL:405,SMIMG_H_URL:207</param>
<param name="MBNOART_IMAGES_URL">COMMONI_H_URL</param>
<param name="dbUser">tbuser</param>
<param name="helpPath">/EPC-net/online-help/html</param>
<param name="wnewPath">/EPC-net/whatsnew/html</param>
<param name="logoPath">/images/logo/background_main.jpg</param>
<param name="showLogoImage">true</param>
<param name="dmsPartNoDelims">' ','-'</param>
<param name="imageop1">ScaleSmooth</param>
<param name="defaultDatabaseLocale">en</param>
<param name="defaultLocale">G</param>
<param name="defaultLocaleGUI">G</param>
<param name="hasSA">true</param>
<param name="availableClasses">1,2,3,4,5,6,7,F,M,T,A,S</param>
<param name="availableClasses_NA">1,2</param>
<param name="availableClasses_JA">1,2,3</param>
<param name="availableClasses_LA">3,4,5,6</param>
<param name="availableClasses_SA">1,2,3,4,5,6,7</param>
<param name="availableClasses_SMART">F</param>
<param name="shoplistVersion">1.1</param>
<param name="loggerLevel">4</param>
<param name="XFR_Delete_Exit">true</param>
<param name="LookAndFeel">Automatic</param>
<param name="enhancedFilteringClasses">1</param>
<param name="SupplementaryTextIn_SL_XFR_File">true</param>
<param name="sendAllModelsForDK">false</param>
<param name="searchHitListWarningLimit">500</param>
</config>
The next table explains the important configuration settings.
| Parameter | Example Value | Description |
| config |
| gateway | EWA-net/ewa-net | Path to Access Gateway |
| applicationMode | HPSERVICE | Mode is in EWA net always HPSERVICES |
| clientMainClass | com.proquest.epc.view.impl.MBEPCApplication | Java class path to application |
| dbDriver | transbase.jdbc.Driver | Driver for EPC net DB data |
| *_URL | pooling:
arg1 -- 30:
arg2 -- null:
arg3 -- 10000:
arg4 -- null:
arg5 -- 2:
arg6 -- null:
arg7 -- null:
arg8 -- null:
arg9 -- null:
arg10-- null:
arg11-- null:
arg12-- jdbc:transbase://localhost:2034/* | Connection pool settings:
arg1 -- MaxNumber Connections to this DB
arg2 -- whenExhaustedAction (byte)
arg3 -- maxWait (long) - default: -1 (forever)
arg4 -- maxIdle (int) - 5 connections
arg5 -- minIdle (int) - default: 0 connections
arg6 -- testOnBorrow (boolean) - default: false - do not test
arg7 -- testOnReturn (boolean) - default: false - do not test
arg8 -- timeBetweenEvictionRunsMillis (long) - default: -1 (forever)
arg9 -- numTestPerEvictionRun (int) - 5 (should not matter in this case)
arg10-- minEvictableIdleTimeMillis (long - default: 1000 * 60 * 30 (= 1800000 msec = 1800 sec = 30 min)
arg11-- testWhileIdle (boolean) - default: false - do not test
arg12-- Driver and path to DB - localhost could be redirect to a different DB server. 2034 is the port number for EPC net Transbase DB |
| *_IMAGES_URL | *_H_URL | Internal references - Don't touch |
| dbUser | tbuser | User name for EPC net DB access |
| helpPath | /EPC-net/online-help/html | Root path to help files |
| wnewPath | /EPC-net/whatsnew/html | Root path to Whats New files |
| logoPath | /images/logo/background_main.jpg | Path to background image in the epc.jar file |
| showLogoImage | true | Background image disable = false |
| dmsPartNoDelims | ' ','-' | This is the default setting for Terminal Emulation in the Options Setup dialog. |
| imageop1 | ScaleSmooth | Image view parameter Don't touch |
| migrationRegkey | HKEY_LOCAL_MACHINE\SOFTWARE\BHPS\mbxx1 | Not used in EPC net |
| defaultDatabaseLocale | en | Default fallback data language |
| defaultLocale | G | Default data language
G = German
E = English
S = Spanish
P = Portuguese
F = French
I = Italian |
| defaultLocaleGUI | G | This is the GUI language in one character. The application will convert this character over to a java locale for the application to use as the default GUI language. |
| hasSA | true | Enables/Disables the SA/Component radio button in the Compman search window. |
| availableClasses* | 1,2,3,4,5,6,7,F,M,T,A,S | Set the classes available in each market |
| shoplistVersion | 1.1 | This is the version of the internal shopping list structure. |
| XFR_Delete_Exit | true | Tranfer file behaviour when exit EPC
true = delete (default)
false = keep it |
| LookAndFeel | Automatic | EPC net Look and Feel
possible settings:
- Automatic (Windows for JRE 1.4.2 and WindowsClassic for JRE 1.5.x)
- Windows
- CrossPlatform
- WindowsClassic (shows up on JRE 1.4.2 as CrossPlatform) |
| enhancedFilteringClasses | 1 | Enhanced Filter Rules valid for the set classes. Additional Classes could be set with comma seperated.
Attention:
This filtering could in some cases hide valid parts |
| SupplementaryTextin_SL_XFR_File | true | Default setting for new users of the Supplementary Text in XFR file setting. Could always be changed on the client side. This setting could be overwritten with the epc_xfr_cfg.xml file settings SuplementaryTextInXFR |
| sendAllModellsForDK | false | If autonavigate into a Modell is the Modell pulldown menu only showing the current modell. This was done for performance reasons. If the value is "true" than the pulldown shows all Modells. |
| searchHitListWarningLimit | 500 | Number of hits when search stops and shows a confirmation dialog to continue or cancel. |
Table: epc_cfg.xml
8.5 Advanced configuration of EPC net
8.5.1 EPC Shopping lists
Please find more information regarding EPC net shopping list handling and configuration here.
The standard installation will make EWA net run on the specific port 9000. This is to avoid conflicts with existing installations of an HTTP server listening on port 80 (i.e. Windows 2000 Server installations with IIS running for administrative tasks). If you make use of an upfront web server as described in the section about setting up EWA net for clustering you will already find EWA net running on the port 80.
So apart from the steps described in the following sections to make the EWA net Application Server listen on port 80, you might also want to see the clustering documentation and setup a WebServer in front of the application server.
However, to allow you to switch your application server installation to use the HTTP default port 80, following instructions might be helpful for you:
- Edit the J2EE Server configuration
For the "local" environment this is:
[EWA_HOME]\server\conf\server.xml
Find the section and edit the line:
<!--
    Define a non-SSL HTTP/1.1 Connector on port 9000
-->
<Connector port="80"
           protocol="HTTP/1.1"
           secure="false"
           maxHttpHeaderSize="8192"
           acceptCount="300"
           maxThreads="200"
           minSpareThreads="25"
           maxSpareThreads="75"
           enableLookups="false"
           redirectPort="8443"
           connectionTimeout="60000"
           disableUploadTimeout="false" />
Replace the current value for "port" (i.e. "9000") with the new value “80".
- Edit the central config file of EWA net:
[EWA_HOME]\config\core_cfg.xml
Edit the value
[...]
<PARAMETER name="httpPort">80</PARAMETER>
[...]
Replace the value with “80”.
- Edit the EPC configuration file. Adjust the property for the datacard access URL:
[EWA_HOME]\config\epc_cfg.xml
Find the section and edit the line:
[...]
<param name="datacardapi">http://localhost:80/EPC-net/datacardapi</param>
[...]
Replace the value with “80”
- Restart the EWA net server
- If you make use of EWANAPI please assure that all clients refer to the corrected address now. As EWANAPI has to connect to the server, it needs the correct URL, including a correct port number for the URL.
Find and edit the file:
EWANAPI.INI
and edit the entry
[...]
[HTTP-Config]
[...]
Port=80
Replace the value with “80”.
9.2 Logging
EWA net makes use of the Log4J logging API, a de-facto standard in the Java world. Its configuration will be performed within the file
[EWA_HOME]\config\log4_config.xml
You will find different so called “appenders” within this file to be configured. Each of them has properties that you can use to fine tune the logging mechanisms:
There are 2 basically different files that log different things:
- A developer log file being that contains typically the most information.
This information will be generated by two appenders: one writing HTML formatted output (name of the appender is “HTML”), the other one writing plain ASCII (name of this appender is “STANDARD_FILE”)
- A DC compliant monitor file reporting monitoring information.
This information will be generated by an appender named “DCMONFILE”. It creates a file in the format specified by Daimler
9.2.1.1 File names and location of logfiles
You can modify the filenames into which the appenders write. The filenames are being defined by the parameter “File” for each appender. You are free in choosing a filename you like. As long as you specifiy simply a filename without directory information, this file will be created in the folder [EWA_HOME]\logs.
As soon as you provide an absolute path, this will be chosen.
Example:
<param name=”File” value=”C:\test__log.txt” />
will write the output directly into the root directory of drive C:
Please be aware that changing the directory in which EWA net will log might have unwanted side effects. One of them is that neither Dr.EWA nor the administration pages will be able to find those log files then. EWA net's tools expect that logfiles will be written into [EWA_HOME]\logs.
9.2.1.2 Log level
The log level for the log appenders can be set individually for the both appenders writing the debugging log information. For each of these appenders you will find the entry
<param name=”Threshold” value=”WARN” />
There are different log levels available. The higher you set the level (from DEBUG up to FATAL) the less narrative the log file will be, but you will then only see the more critical reports :
| Level Setting | Description / Meaning |
| DEBUG | all messages, including developer statements not aimed for productive use
Be careful not use simply use this level. It will almost keep your server from running as so much information will be logged!
|
| INFO | no debug info, but everything that is informative |
| WARN | more then just informative messages: but warnings and errors. Can be used for productive environments |
| ERROR | only errors and exceptions |
| FATAL | worst case if the application is in a state where it typically cannot recover from |
9.2.2 Application Server logging
EWA net will be run inside and under the control of the application server. During runtime of the application server all of its components perform some kind of communication between each other and fulfill different tasks. Those are not under the control of EWA net and will be monitored within separate, application server specific files.
If something goes wrong – i.e. an exception occurs (some unexpected behavior) – It will be logged into an application server (often also referred to as "container") own log file. The details of the logging information depends upon the configured log level (or debug level).
These logfiles will mainly contain information in the startup phase of the components. Typically during runtime you will find the most relevant information within the logfiles that EWA net writes on its own (see above).
The application server uses its own logging mechanism, which is used for server internal messages. This file can be access from the following path:
[EWA_HOME]\logs\stdout.log
9.2.3 Client Side Logging
Besides logging on server side, logging can also be influenced on client side. This can mainly be used for troubleshooting of client application problems.
Logging is per default enabled on information level but can be configured during runtime to a different level or format. Logging configuration is set by a file on the clients machine. The format of the file is described below and will be searched in the following order:
-
%USERPROFILE%\logging.properties
-
C:\logging.properties
-
(default configuration)
The client application is watching for a configuration change for every 10 seconds and refreshes the logging configuration if the file has been altered.
An example logging configuration on client side could look like this:
# Handler to which the log output is directed to
handlers=java.util.logging.ConsoleHandler

# Default global logging level.
# This specifies which kinds of events are logged across
# all loggers. For any given facility this global level
# can be overriden by a facility specific level
# Note that the ConsoleHandler also has a separate level
# setting to limit messages printed to the console.
.level=INFO

# For example, set the com.hp logger to only log SEVERE messages:
com.hp.level=SEVERE
Logging levels can be specified for different application component structures and set to different levels. Levels can be...
-
SEVERE (highest value)
-
WARNING
-
INFO
-
CONFIG
-
FINE
-
FINER
-
FINEST (lowest value)
For further configuration options, please take a look to the Java Logging Overview,
Support for SSL is optional. Installing SSL requires general SSL knowledge. Before installing SSL please make sure the server is running correctly. Only after you tested the system completely and assured it is running fine, start installing SSL. After completing the SSL installation, you can use the system like before. You can even use your old bookmark. EWA net will automatically switch to SSL during logon. You can recognize this by finding the yellow lock icon in the Internet Explorer status bar.
For protection against unsolicited access please find more information here.
During the SSL installation, please stop the EWA net server and restart it only after completing the SSL setup. If you do not do this you might get confused as files might be locked or the server will not react in the way you expected it.
Get a certificate for the computer
Before using SSL you have to get an official SSL certificate for the server you want to run the EWA net application server on. This certificate will be issued to the host name and IP address. It can either be a "self signed" certificate (for first simple tests this might be sufficient) or an official certificate signed by a known certificate authority like Verisign or Thawte.
A self signed certificate should only be used for testing. EWANAPI doesn’t support self signed certificates. Also the Internet Explorer will show a warning, that the certificate issuer is not trusted.
General approach for getting a certificate (find more details about that later on):
- Use an empty key store like the one provided on the EWA net media (or create a new empty key store for your certificate)
Key stores are a Java mechanism for storing the private/public key pairs that finally make up your certificate. You can think of those files like a treasure box which is locked by a password that only you and of course your application server know.
- Generate a public/private key pair in that key store. This key pair will again be protected by a password.
Ensure you use the same password for both your key pair and your key store itself!
If you muss this, you will not be able to run the Application Server in SSL mode as it then cannot access your certficate.
- Request a certificate from a certificate authority (CA) for that key
- Import the certificate you have received from the CA. Import the chain certificate (the certificate authentication the CA).
An example can be found at http://www.caucho.com/quercus/faq/question.xtp?question_id=1306
For getting an official and trusted certificate please refer to the certificate authorities and your internal processes for doing so.
Prepare the key store
Find the prepared and empty key store on the delivery media (you may also create your own if you have good experience). We will later refer to the key store in the server's file system at:
File: [EWA_HOME]\certificates\ewanet.jks
So, copy the key store file from the delivery media at
[DVD-DRIVE]:\ewa\central\config\ewanet.jks
to
[EWA_HOME]\certificates\ewanet.jks
(create the directory "certificates" if needed).
Please ensure to remove any write protection on the file after you copied it from the delivery media..
The file is a Java key store file and we will make use of it in the next steps.
To be able to work with the system you could simply make use of Sun's "keytool" which is part of a public Java Development Kit. But we recommend to make use of the “KeyTool GUI” (http://www.waynegrant.info/keytool.html). This document assumes you have this software installed.
Assuming you have installed the "KeyTool GUI", you will now be able to open the key store at
EWA_HOME\certificates\ewanet.jks
Double-click the file and a GUI will open, asking you for the key store's password.
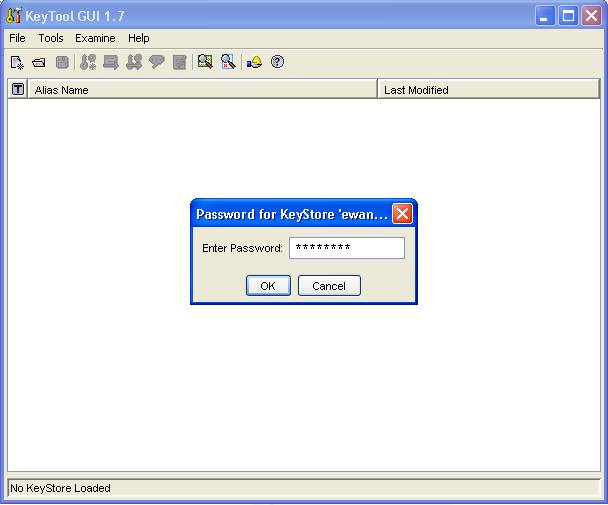
- You will be asked for a password. Enter "changeit" as this is the default when you use the key store from the delivery media
- We recommend you change the password now and save the key store again (use the menu "Tools / Set Keystore password" to do this and then click on "File / Save").
- Create a public/private key pair (this will make up your certificate later).
Use RSA, 1024 Bits and the default settings for the rest.
When asked for information, (Common Name (CN), Email,...) please set at least a meaningful duration (i.e. 365 days for one year) and the Common Name attribute with exactly the DNS name that your client later will refer to when trying to connect your EWA net server.
Make use of the default algorithm (MD2withRSA).
It is important that for the "Common Name" you specify exactly the server name that your clients of EWA net will make use of in the future. Typically it is recommended to use the fully qualified DNS name of the EWA net server.
- You will then be asked for an alias. This will not be used by the server, it is just an intuitive name for your reference, as you could i.e. add several different certificates within the given key store. You may just accept the suggestion of the KeyTool application.
- Enter a password for the keypair now.
Note:
It is important that you now use exactly the same password as for the key store itself. If you do this wrong, your EWA net server will definitely not run with SSL switched on as it will not be able to access your certificate. So make use of the password that you have set for the key store itself again.

- Now you must save your keystore again.
Congratulations! You successfully created a "self-signed" certificate.
It is not yet trusted, but to test your system you could for now skip the next few steps of this documentation and try to configure your server.
DO NOT DELETE THE KEYSTORE NOW. It will be used by the server and you will also need it to re-import the real certificate from a trusted authority like VeriSign. If you delete the keystore and then get your official certificate back, it will be worthless. You will not be able to recreate a keystore and keypair matching this certficate.
- To get a real certificate, please first create a Certificate Signing Request (CSR) now
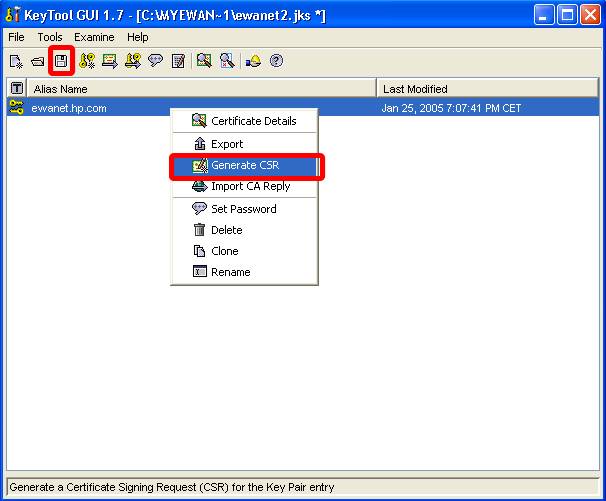
Save this to the disk and get in contact with i.e. VeriSign or Thawte where you will have to upload this information.
They will return 2 certificates after a few days - and after you paid it, of course :)
- a so called "chain certificate"
- your personal "trusted" and official certificate that now will be accepted by all browsers and the EWANAPI executable once imported into your key store.
Both have to be imported via "Import CA Reply" in the context menu of your certificate in the key store (see screenshot above) - starting always with the chain certificate!
Please follow the instructions of the certificate authority where you received the certificate files from. Should you have any problems importing the certificates, please contact the certificate authority or have a look at: http://www.caucho.com/quercus/faq/question.xtp?question_id=1306,
which basically tells you that you might have to import and export the files through the InternetExplorer certificate store.
- Do not forget to save your key store now. Then close the KeyTool application.
- Congratulations! Your key store is complete, but to use it you now have to activate SSL in the server - something you will have to do after each update of the software.
Activate SSL within the application server
File: [EWA_HOME]\server\conf\server.xml
Activate the TomCat SSL connector. To do this simply un-comment the Connector for SSL. Change the attribute “keyStore” to the file path of ewanet.jks, e.g. c:/EWA_net/certificates/ewanet.jks.
If you are using a different password then the standard "changeit", please add/modify the appropriate attribute like in the example below. Remember to replace the token "[EWA_HOME]" by the real path of your installation. Also do not forget to un-comment the section!
Example:
<!--
    Define a non-SSL HTTP/1.1 Connector on port 9000
-->
<Connector port="9000"
    protocol="HTTP/1.1"
    secure="false"
    maxHttpHeaderSize="8192"
    acceptCount="300"
    maxThreads="200"
    minSpareThreads="25"
    maxSpareThreads="75"
    enableLookups="false"
    redirectPort="8443"
    connectionTimeout="60000"
    disableUploadTimeout="false" />


<!--
    Define a SSL HTTP/1.1 Connector on port 8443
<Connector port="8443"
           protocol="HTTP/1.1"
           maxHttpHeaderSize="8192"
           acceptCount="300"
           maxThreads="200"
           minSpareThreads="25"
           maxSpareThreads="75"
           enableLookups="false"
           scheme="https"
           secure="true"
           clientAuth="false"
           connectionTimeout="60000"
           disableUploadTimeout="false"
           keystoreFile="[EWA_HOME]/certificates/ewanet.jks"
           keystorePass="changeit"
           sslProtocol="TLS" />
-->
Ensure that your replace the placeholder string "[EWA_HOME]" by your real installation directory, i.e. "C:/EWA_net" wherever it appeared in the samples above.
Now you successfully activated the SSL mode of the application server, but EWA net is not yet aware of this setting.
Activate SSL inside of the EWA net application
After configuring your application server to make use of SSL you finally have to tell the EWA net application itself about your intention to use SSL and on which ports your application server listens. This is needed as there is no common API in the different application servers to ask them for this information.
In opposite to early versions of EWA net is not necessary anymore to perform this step after each software update.
Edit the configuration file:
File: [EWA_HOME]\config\core_cfg.xml
Activate SSL inside of EWA net. Go to the AccessGateway -> ApplicationSettings section at the very bottom of that file. There set the property “sslEnabled” from false to true.
<SECTION name="AccessGateway">
    <SECTION name="ApplicationSettings">
    <!-- SSL within EWA net - do not forget to configure your server accordingly -->
    <PARAMETER name="sslEnabled">true</PARAMETER>
    <!-- currently SSL for Client apps is not supported. Future use.
    Needs further extension of SSL for Struts -->
    <PARAMETER name="sslForClientsEnabled">false</PARAMETER>
    <PARAMETER name="httpPort">9000</PARAMETER>
    <PARAMETER name="httpsPort">8443</PARAMETER>

    </SECTION>
The system should be protected against unsolicited access. In general all URLs that shouldn’t explicitly accessed from outside should be blocked. For the application itself the so called AccessGateway will be a single point of entry. No direct access to business logic is allowed and possible. This prevents potential security issues. There are also URLs that should be only accessible for system administrator (e.g. run time statistics).
The security constraint feature of the web application settings (web.xml) will be used to reach this goal. Only few resources should be accessible from outside. Unfortunately it isn’t possible to define a positive list (which URLs are allowed) but only a negative list.
The protection level are:
- Public: External access allowed
- Protected: No external access allowed.
- Admin: These URLs are only allowed to access using a system administrator role.
|
URL
|
Description
|
Defined in
|
Protection level
|
|
/ewa-net
|
AccessGateway
|
core_cfg.xml, wis_cfg.xml
|
public
|
|
/ewa-net.jnlp
|
AccessGateway WebStart
|
web.xml
|
public
|
|
/jnlp/*.jnlp
|
Client Tools + Resources for WebStart
|
core_cfg.xml
|
public
|
|
/jars/*
|
Client Tools JAR files
|
core_cfg.xml
|
public
|
|
/jsp/*
|
Web interface
|
struts_config.xml
|
public
|
|
/Login/*
|
Web interface
|
struts_config.xml
|
public ¹
|
|
/Admin/*
|
Web interface
|
struts_config.xml
|
public ¹
|
|
/images/*
|
Images
|
|
public
|
|
/forward.htm
|
Welcome file
|
web.xml
|
public
|
EWA-net URLs
¹Internal info: these URLs have already been protected by Apache Struts.
|
URL
|
Description
|
Defined in
|
Protection level
|
|
/EPCServlet
|
EPC net Business logic
|
core_cfg.xml
|
protected
|
|
/jnlpServlet
|
EPC net WebStart
|
core_cfg.xml
|
protected
|
|
/datacardapi
|
Datacard API
|
epc_cfg.xml
|
public
|
|
/servlets/epc.jar
|
EPC net jar
|
epc_cfg.xml
|
public
|
|
/servlets/*
|
Mixed
|
|
public
|
|
/servlets/Html/*
|
Online help
|
epc_cfg.xml
|
public
|
|
/database/*
|
Database
|
|
protected
|
EPC-net URLs
|
URL
|
Description
|
Defined in
|
Protection level
|
|
/wis
|
WISnet Business logic
|
core_cfg.xml
|
protected
|
|
/webstart.jnlp
|
WISnet WebStart
|
core_cfg.xml
|
protected
|
|
/statistic
|
WISnet statistics
|
web.xml
|
admin
|
|
/html/*
|
WISnet jars
|
wis_cfg.xml
|
public
|
|
/online-help/html/*
|
Online help
|
wis_cfg.xml
|
public
|
|
/html/*
|
Resourcebundles
|
wis_cfg.xml
|
public
|
|
/* (???)
|
WebETM Base
|
wis_cfg.xml
|
t.b.d.
|
|
/errorPages/404.jsp
|
Error pages
|
web.xml
|
public
|
|
/resources/*
|
CAD viewer
|
|
protected
|
|
/index.html
|
Welcome page
|
web.xml
|
public
|
WIS-net URLs
Configure web.xml
Change the settings of all installed web applications. The settings file is
EWA-net: [EWAHOME]\webapps\EWA-net\WEB-INF\web.xml
EPC-net: [EWAHOME]\webapps\EWA-net\WEB-INF\web.xml
WIS-net: [EWAHOME]\webapps\EWA-net\WEB-INF\web.xml
Add to the web.xml:
<security-constraint>
    <web-resource-collection>
        <web-resource-name>Blocked URLs</web-resource-name>
        <description>Block all traffic to unwanted URLs.</description>
        <url-pattern>/jsp/*</url-pattern>
        <url-pattern>/someotherurl</url-pattern>
    </web-resource-collection>
    <auth-constraint>
        <description>This group doesn't contain user. So no user is allowed to
            access such URLs</description>
        <role-name>ewanet_protected</role-name>
    </auth-constraint>
</security-constraint>

<security-constraint>
    <web-resource-collection>
        <web-resource-name>Admin URLs</web-resource-name>
        <description> URLs accessible for administrators only</description>
        <url-pattern>/statistic</url-pattern>
        <url-pattern>/someotherurl</url-pattern>
    </web-resource-collection>
    <auth-constraint>
        <description>Only admin user </description>
        <role-name>ewanet_admin</role-name>
    </auth-constraint>
</security-constraint>

<login-config>
    <auth-method>BASIC</auth-method>
</login-config>

<security-role>
    <role-name>ewanet_protected</role-name>
    <role-name>ewanet_admin</role-name>
</security-role>
File: [EWA_ HOME]\config\core_cfg.xml
File: [EWA_ HOME]\config\um_cfg.xml
File: [EWA_ HOME]\config\um_batch_cfg.xml
The User Management configuration can be changed by editing the files core_cfg.xml and um_cfg.xml. Additionally the file um_batch_cfg.xml is used for installations which support EWANAPI. It is required to configure the login method for EWANAPI authentication calls.
EWANAPI uses the values of "um_batch_cfg.xml" where as the standard login masks use "um_cfg.xml" as configuration. So the best way to configure EWANAPI access to setup a correct and tested "um_cfg.xml" and then after successful tests make a copy of it and rename it "um_batch_cfg.xml".
9.4.1 HP User Management
HP User Management is the default User Management. It is being switched on automatically at the time when EWA net local is installed.
Edit: [EWA_ HOME]\config\um_cfg.xml
Set <PARAMETER name="userManagementService">HPUserManagement</PARAMETER>
Set <PARAMETER name="authenticationMode">Own</PARAMETER>
EWA net supports different authentication modes for the HP User Management:
- Own
Authentication will be performed against the EWA net built in user management database only.
- LDAP
Authentication will be performed against an LDAP capable User directory (i.e. MS Active Directory). Nevertheless the users will have to be setup within the EWA net built in user management database for authorization.
- Corporate Directory
Daimler internal authentication directory.
9.4.2 LDAP
LDAP authentication offers the possibility to authenticate users using a generic LDAP server. Also Microsoft Active Directory can be used as authentication interface using LDAP. LDAP authentication is only possible if HP User Management is switched on.
The LDAP authentication interface offers four possibilities for authentication of users:
- LDAP Authentication (Most simple mode)
The entered user name, domain and password are used for authentication by trying to bind against a LDAP server. If the bind is successful, it is assumed that the password was correct.
- LDAP Attribute comparism (Fetch Mode)
The LDAP server is bound using a fixed account. An LDAP record is fetched using the userid and domain name of the entered credentials. One attribute from the record is then compared to the entered password of the user.
- LDAP Search and Result Attribute comparism (Search Mode)
The LDAP server is bound using a fixed account. A LDAP record is searched in the directory using a specific scope with a filter which is generated using the credentials of the user. One attribute from the LDAP search result is compared with the password of the user.
- LDAP Entry Search and User Authentication
The LDAP directory is searched for a user name like in search mode, the resulting matched user is authenticated using the provided password.
9.4.2.1 General Setup of LDAP
To enable LDAP authentication the following configuration needs to be adopted:
Edit: files [EWA_ HOME]\config\um_cfg.xml / [EWA_ HOME]\config\um_batch_cfg.xml
Set <PARAMETER name="userManagementService">HPUserManagement</PARAMETER>
Set <PARAMETER name="authenticationMode">LDAP</PARAMETER>
Modify the section “LDAP” to match your LDAP environment.
No matter which type of authentication you want to make use of, there is one common thing for all of them:
Specify your LDAP Server and Port:
<PARAMETER name="ldapHost">your.ldap.server</PARAMETER>
<PARAMETER name="ldapPort">389</PARAMETER>
Port 389 is an LDAP port of a typical "standard" environment.
See the sections below for the specific settings of each individual authentication method.
9.4.2.2 Using LDAP Authentication (Simple mode)
Using this simple mode basically performs a "bind" against the given LDAP server. If a "bind" is succesful, the user will be authenticated successfully, if not the user will not be authenticated. Typically this will not work in large and complex setups where users are distributed in LDAP over several nodes which cannot be expressed by one single DN pattern.
To authenticate the user against LDAP by issuing a direct bind with the user credentials, the following settings in sections LDAP need to be adopted:
- Specify the bind DN to use for authentication:
<PARAMETER name="bindDN">[your bind DN]</PARAMETER>
DN with which the LDAP-Connection is established. Placeholders in the DN - to make the DN more flexible - are:
{userid}
{password}
{domain} Note: This value only exists if you setup userids in the form "<domain>\<userid>"
They will be replaced from the provided login information of the user. Before replacement, the characters "*()" of the entered user credentials will be escaped.
Example for a bindDN parameter, which expects users in the subtree (com - company - {domain} - Users):
CN={userid},CN=Users,DC={domain},DC=company,DC=com
- Specify the binding password for the connection:
Placeholders
{userid}
{password}
{domain}
will be replaced by the submitted login information. The characters "*()" of the user credentials will be NOT escaped! To authenticate against LDAP, use the following setting:
<PARAMETER name="bindPasswd">{password}</PARAMETER>
- Specify the mode for authentication:
<PARAMETER name="authMode">authenticate</PARAMETER>
All other options in the section LDAP are not relevant in this case.
9.4.2.3 Using LDAP Fetch Mode
If you do not want to make use of LDAP user passwords for your EWA net users, you may want to sign a specific attribute within the User object in LDAP as pseudo password. In this case we follow the approach:
- Bind to the LDAP server with one explicit "bind user" or even anonymous.
- Go down the hierarchy following a provided, flexible DN
- Resolve the attribute of the user object that was found and compare the password against this attribute
To process authentication using a LDAP fetch the following settings need to be performed within the configuration:
- Specify the bind DN to use for authentication:
<PARAMETER name="bindDN">[your bind DN]</PARAMETER>
DN with which the LDAP-Connection is established with an explicit "bind user". These values will be fixed as they are needed for binding and do not make use of the provided login information during the.authentication process. You might even be able to bind anonymously. In this case you can leave the "bind" fields empty.
Example:
CN=Administrator,CN=Users,DC=myDomain,DC=company,DC=com
- Specify the binding password for the connection:
<PARAMETER name="bindPasswd">noBodyShouldKnowTh1s</PARAMETER>
- Specify the mode for authentication:
<PARAMETER name="authMode">fetch</PARAMETER>
- Specify the DN to fetch. This means that the LDAP tree will be followed down the given path stated by the DN and at the located User object a distinct attribute will be compared against the password or another fixed value.
The DN is typically composed using the entered user credentials. The placeholders
{userid}
{password}
{domain}
will be replaced by the submitted login information. Before replacement, the characters "*()" in the entered credentials will be escaped.
Example:
<PARAMETER name="fetchDN">
CN={userid},CN=Users,DC={domain},DC=company,DC=com
</PARAMETER>
- Specify the attribute of the LDAP User object which should be used for comparison against the password:
Example:
<PARAMETER name="attribute">telephoneNumber</PARAMETER>
- Specify whether the attribute value should be encrypted before comparism. The encryption method is SHA-1.
This will be set to "false" in most cases.
<PARAMETER name="encryptAttributeBeforeCompare">false</PARAMETER>
- Specify whether the entered password of the user should be encrypted before comparism. The encryption method is SHA-1.
This will correspond to "false" in most cases.
<PARAMETER name="encryptPasswordBeforeCompare">false</PARAMETER>
All other options of section LDAP are not relevant in this case.
9.4.2.4 Using LDAP Search Mode
The "search" mode is even more advanced. In complex environments, the User objects will typically be distributed over several different subtrees within LDAP. Fetch is not sufficient in this case, so we allow a recursive "search" below a given subtree. To perform this search we need a root part of the tree - the DN from which to start (here referred to as "searchScope"). Furthermore we need a search clause to tell us how we find a User object that might by a potential candidate. And finally we need an attribute to compare the password against.
To process authentication using a LDAP search the following settings need to be done in the configuration:
- Specify the bind DN to use for authentication:
<PARAMETER name="bindDN">[your bind DN]</PARAMETER>
DN with which the LDAP-Connection is established. These values will be fixed as they are needed for binding, but could also be anonymous.
Example:
CN=Administrator,CN=Users,DC=myDomain,DC=company,DC=com
- Specify the binding password for the connection:
<PARAMETER name="bindPasswd">noBodyShouldKnowTh1s</PARAMETER>
- Specify the mode for authentication:
<PARAMETER name="authMode">search</PARAMETER>
- Specify the search filter to use when trying to find a LDAP record.
Regular LDAP search filter expressions can be entered. See RFC 2254 for a detailed description of LDAP filters.
The known placeholders
{userid}
{password}
{domain}
can be used in the expression and will be replaced automatically by the submitted login information. Before replacement, the characters "*()" in the entered credentials will be escaped.
Note: Only the first matching record will be used for authentication!
Examples:
<PARAMETER name="searchFilter">
mail=*_{userid}@{domain}.company.com
(&(sAMAccountName={userid})(ObjectClass=user))
employeeNumber={userid}
</PARAMETER>
- Specify the search scope.
Context which will be searched for an LDAP user entry.
Again, the tokens
{userid}
{password}
{domain}
can be used and will be replaced by the submitted login information. Before replacement, the characters "*()" in the entered credentials will be escaped.
Example:
<PARAMETER name="searchScope">
CN=Users,DC={domain},DC=company,DC=com
</PARAMETER>
- Specify the attribute which should be compared against the password:
Example:
<PARAMETER name="attribute">telephoneNumber</PARAMETER>
- Specify whether the attribute value should be encrypted before comparism. The encryption method is SHA-1.
This will correspond to "false" in most cases.
<PARAMETER name="encryptAttributeBeforeCompare">false</PARAMETER>
- Specify whether the entered password of the user should be encrypted before comparism. The encryption method is SHA-1.
This will correspond to "false" in most cases.
<PARAMETER name="encryptPasswordBeforeCompare">false</PARAMETER>
All other options of the section LDAP are not relevant in this case.
9.4.2.5 Using LDAP Search and Authentication Mode (most valuable for accessing an MS ActiveDirectory)
Typically in an ActiveDirectory world you will still not be satisfied with the approaches discussed up to now. "Bind" will not work as in large environments you will not be able to specifiy a bind DN which is flexible enough, and "search" and "fetch" rely on attributes to be compared instead of using the ActiveDirectory password - which is not exposed as a separate attribute that we could use for comparison.
Any help out of this dilemma? Yes. We allow another mode which is "Search and Authenticate". The basic idea is that after finding a user candidate in the LDAP tree we bind it, because we now can get the real bind DN of this user. The name of this attribute holding the DN is "distinguishedName" in MS ActiveDirectory, in other LDAP directories it might be different, i.e. "dn".
To process authentication using a LDAP search and authenticate the following settings need to be done in the configuration:
- Specify the bind DN to use for authentication for searching the user account:
<PARAMETER name="bindDN">[your bind DN]</PARAMETER>
DN with which the LDAP-Connection is established. These values will be fixed as they are needed for binding.
Example:
CN=Administrator,CN=Users,DC=myDomain,DC=company,DC=com
- Specify the binding password for the connection:
<PARAMETER name="bindPasswd">noBodyShouldKnowTh1s</PARAMETER>
- Specify the mode for authentication:
<PARAMETER name="authMode">search+authenticate</PARAMETER>
- Specify the search filter to use when trying to find a LDAP user.
Regular LDAP search filter expressions can be entered. See RFC 2254 for a detailed description of LDAP filters.
Tokens
{userid}
{password}
{domain}
will be replaced by the submitted login information. Before replacement, the characters "*()" in the entered credentials will be escaped.
Note: Only the first matching record will be used for authentication!
Examples:
<PARAMETER name="searchFilter">
mail=*_{userid}@{domain}.company.com
(&(sAMAccountName={userid})(ObjectClass=user))
employeeNumber={userid}
</PARAMETER>
- Specify the search scope.
Context which will be searched for an LDAP user entry.
Again, tokens
{userid}
{password}
{domain}
will be replaced by the submitted login information. Before replacement, the characters "*()" in the entered credentials will be escaped.
Example:
<PARAMETER name="searchScope">
CN=Users,DC={domain},DC=company,DC=com
</PARAMETER>
- Specify the attribute which should be user to define the DN of the user.:
Examples:
<PARAMETER name="attribute">dn</PARAMETER>
<PARAMETER name="attribute">distinguishedName</PARAMETER> (recommended for MS Active Directory)
All further options of section LDAP are not relevant in this case.
9.4.3 Corporate Directory
This is basically used by Daimler internally in Stuttgart.
Edit: [EWA_HOME]\config\um_cfg.xml
Set <PARAMETER name="userManagementService">HPUserManagement</PARAMETER>
Set <PARAMETER name="authenticationMode">CorporateDirectory</PARAMETER>
Modify the section “CorporateDirectory” to match the DC CorporateDirectory LDAP settings and furthermore assure that the internal IT allows your EWA net Server to access the Corporate Directory.
9.4.4 StarTekInfo
This is only used by MB USA for integration of EWA net into the external StarTek portal. In this mode most parts of the EWA net internal UserManagement become switched off.
Copy
[DVD-DRIVE]:\ewa\central\config\startekapi.properties
to
[EWA_HOME]\config
Edit the URL to the StarTekInfo server inside this file, if the server has changed.
Edit: [EWA_HOME]\config\um_cfg.xml
Set <PARAMETER name="userManagementService">StarTekInfo</PARAMETER>.
To run the WIS net / EPC net applications the user needs to log on using the StarTekInfo Portal. The rendered portal web page needs to use the following or an equivalent HTML form to start the application:
<form name="docWisForm" method="post" action="http://server.domain:9000/EWA-net/ewa-net.jnlp">
    <input type="hidden" name="userid" value="STAR0101" />
    <input type="hidden" name="sessionid" value="ABCDEFGHIJKLMNOPQRSTUVWXYZ" size="50" />
    <input type="hidden" name="function" value="start" />
    <input type="hidden" name="method" value="start" />
    <input type="hidden" name="appid" value="50" />
</form>
Check the Proxy Settings in the core configuration file [EWA_HOME]\config\core_cfg.xml. The EWA net server needs to perform HTTP network access to the configured StarTek server and thus you may have to specify a proxy to allow this.
10 Single Sign On with EWA net
When it comes to web applications and portal solutions, one of the main annoyances that users have to deal with is having to enter their credential information again and again for many of those applications. Single Sign On (often referred to as SSO) is a mechanism to provide more comfort to the user while still keeping the security aspects in mind.
Single Sign On can be enabled transparently for EWA net, but as it has some requirements from the infrastructure side it cannot and will not be enabled and installed by default. If you decide to switch your EWA net environment to Single Sign On, please keep in mind that you still have to store all the relevant user information inside EWA net's User database. This is caused by the fact that EWA net still has to perform the authorization internally - although the authentication might have already been performed by Single Sign On.
Single Sign On feature will be automatically switched on in case your environment has been prepared according to the steps below. If a user cannot be authenticated via Single Sign On then EWA net automatically falls back to interactive login.
10.1.1 Windows NTLM Authentication
You will typically make use of Windows NTLM authentication if
- most or even all of the users who want to have access to EWA net are setup in a Windows ActiveDirectory structure and login to Windows into a domain
- a Web Server is already part of this domain or can be made part of this domain
Please ensure that you have setup all users with their respective MS Windows domain accounts inside of EWA net, i.e. not just "johndoe", but "EMEA\johndoe" in case the user "johndoe" is part of the "EMEA" domain. Forgetting this results in the fact that users cannot automatically be authenticated.
The passwords of the users inside the EWA net system do not have to be "real" passwords. Dummy passwords ensuring that the EWA net passwords policy are being matched will be sufficient.
10.1.1.1 Setting up SSO on Tomcat and Internet Information Server (IIS)
A quick overview over the necessary steps that are required to allow NTLM authentication with Tomcat and IIS:
After setting up Tomcat and IIS you must also perform the steps in the following sections:
The steps will be described in detail below. Don't worry, they are quite quickly and easily performed.
You may setup IIS on the same machine as your EWA net installation is running on, or you may install it on a separate machine. For smaller installations that will run in NTLM mode only it might be sufficient to setup the IIS on the same machine as the EWA net server is running on.
For large EWA net installations and/or installations that you want to run in mixed mode (users being part of a Windows domain and "other" users who would have to login to EWA net interactively) you will definitely have to setup separate instances of Web Servers - one with NTLM security switched on, one with anonymous security to allow interactive login to EWA net.
If you run a local version of EWA net (with a local access authorization) you will definitely have to setup the WebServer on the same machine as the EWA net Server is running on. If you do not follow this guideline, the EPC net and WIS net application will not start claiming that the cannot exchange a token with the server.
Installation, if not already done, can be performed via the Windows Control Panel in the "Add/Remove Software" control. Choose "Add/Remove Windows Components".
This description assumes that IIS can be used for the EWA net integration only. For hosting of several different applications with this single IIS instance you may encounter restrictions or problems.
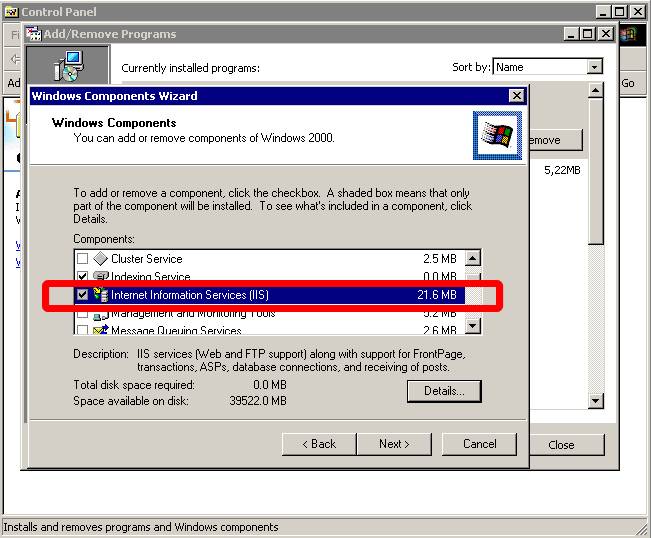
After installing IIS you have a new directory structure below C:\InetPub
In order to allow a Web Server plugin to contact the EWA net application server we must enable the module allowing this. Open the file
[EWA_HOME]\server\conf\server.xml
Search for the word "AJP/1.3" which will guide you to the connector for the Web Server plugin. This is by default commented out, so remove the XML comments before and after the "Connector" section.
If the content in your standard XML file looked like this:
  <!--
      Define an AJP 1.3 Connector on port 8009
<Connector port="8009"
    backlog="200"
    maxThreads="200"
    enableLookups="false"
    redirectPort="8443"
    secure="false"
    protocol="AJP/1.3"
    tomcatAuthentication="false" />
 -->
Simply change it to this (see the marked characters):
  <!--
      Define an AJP 1.3 Connector on port 8009
  -->
<Connector port="8009"
    backlog="200"
    maxThreads="200"
    enableLookups="false"
    redirectPort="8443"
    secure="false"
    protocol="AJP/1.3"
    tomcatAuthentication="false" />
Now we have to tell EWA net that clients will contact the EWA net environment via the standard HTTP port 80 instead of the standard EWA net port 9000. In order to achieve this, please open the file
[EWA_HOME]\config\core_cfg.xml
in a text editor and change the following setting accordingly to port 80. Ensure you have SSL disabled
<SECTION name="AccessGateway">
    <SECTION name="ApplicationSettings">
    <!-- SSL within EWA net - do not forget to configure your server accordingly -->
     <PARAMETER name="sslEnabled">false</PARAMETER>
        <!-- currently SSL for Client apps is not supported. Future use.
        Needs further extension of SSL for Struts -->
        <PARAMETER name="sslForClientsEnabled">false</PARAMETER>
     <PARAMETER name="httpPort">80</PARAMETER>
SSL on the EWA net server will not be used. If you want to secure access to EWA net you may install a server certificate on the Web Server machine. Secured connection between the Web Server and the EWA net server is not needed.
Restart the EWA net server now. You will still be able to access the login page via port 9000 on the EWA net server itself, but you will not be able to start any EWA net client application anymore. This is okay.
- Create a new directory on your Web Server machine, i.e. C:\InetPub\wwwroot\ewa_sso. (this is the directory this documentation refers to in the subsequent sections)
- Open the ZIP file which contains the files needed for the integration from [DVD_DRIVE]\ewa\central\tools\iis_integration.zip
- Copy the following files from the ZIP into the directory mentioned above (C:\InetPub\wwwroot\ewa_sso)
isapi_redirect.dll
isapi_redirect.properties
uriworkermap.properties
workers.properties (if you also intend to setup a cluster you may choose to install workers.properties.cluster and rename it to workers.properties) into this directory:
- If you installed the files into the directory recommended above, you can skip this step.
If you decided to choose another location, please open the file isapi_redirect.properties in a text editor now and adjust the path information inside it according to the directory you have chosen to install the files in.
The file by default looks like this - you may change the settings marked bold:
# DO NOT TOUCH THE NEXT ENTRY
extension_uri=/jakarta/isapi_redirect.dll


# YOU MAY TOUCH THESE
# Modify this section to your needs.
log_file=C:\Inetpub\wwwroot\ewa_sso\iis_redirect.log
# MODIFY THIS VALUE TO error ONCE YOUR SYSTEM RUNS CORRECTLY. The logfile size will increase heavily in debug mode!
log_level=debug
worker_file=C:\Inetpub\wwwroot\ewa_sso\workers.properties
worker_mount_file=C:\Inetpub\wwwroot\ewa_sso\uriworkermap.properties
- Open the file workers.properties in a text editor and set the property for the hostname correctly. The standard is "localhost" for an installation where IIS and EWA net server run on the same machine. Replace "localhost" by the name or IP address of your EWA net server.
Example:
# workers.properties.minimal -
#
# This file provides minimal jk configuration properties needed to
# connect to Tomcat.
#
# The workers that jk should create and work with
#
worker.list=ewanet


#
# Defining a worker named ajp13w and of type ajp13
# Note that the name and the type do not have to match.
#
worker.ewanet.type=ajp13
worker.ewanet.host=localhost
worker.ewanet.port=8009
After you have all files installed you can start configuring the IIS. Open the Windows Management Console and open the hive of the "Internet Information Services".
Add the redirection handler which will forward all EWA net related request to the EWA net server. Select the "Default Web Site" hive and display its properties. Select the tab "ISAPI Filters" and add a new filter with name "jakarta" and pointing it to the isapi_redirect.dll file in the installation directory of your SSO files, i.e. C:\InetPub\wwwroot\ewa_sso\isapi_redirect.dll
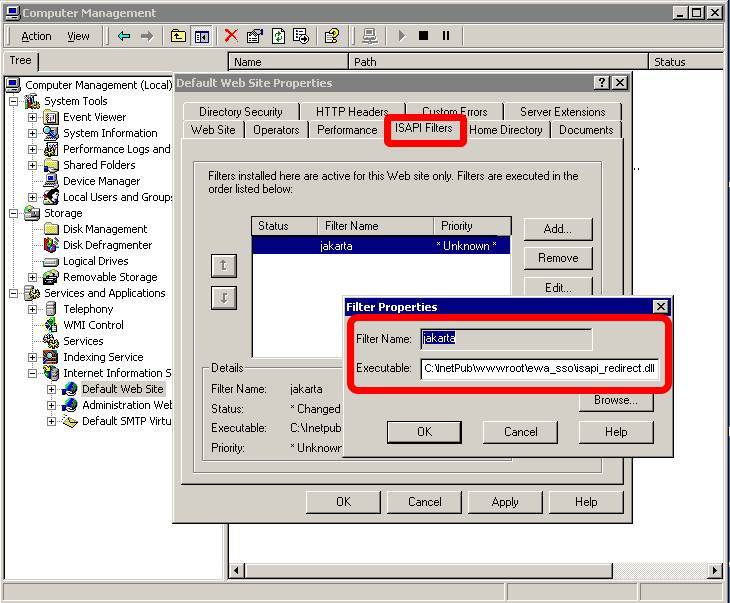
Press "OK" and select the tab called "Directory Security". Click on "Edit" in the field named "Anonymous access and authentication control". Uncheck any current checkmark and set the checkmark "Integrated windows authentication". Ensure that only this checkmark is set.
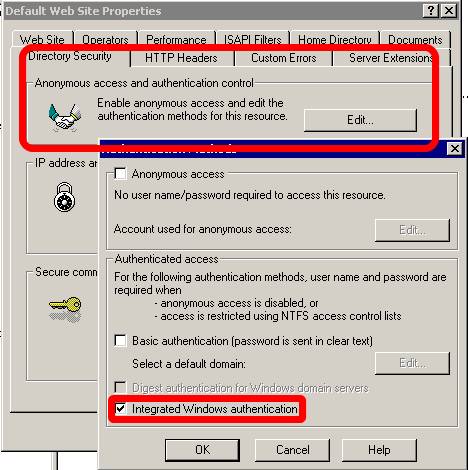
Press "OK" to close this dialog and press "OK" again on the properties main dialog. You might be asked whether you want to apply the setting to some other components as well. Simply press "OK" here again and continue.
Now install an additional so called "Virtual Directory". Right-click the "Default Web Site" hive and select "New -> Virtual Directory". This will open a wizard. Please follow the following instructions exactly:
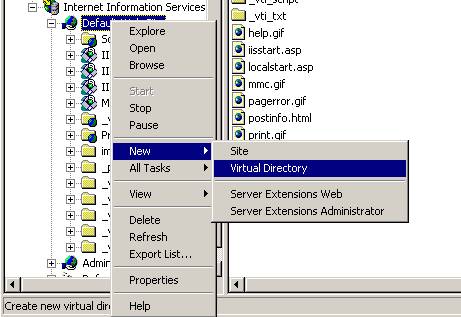
You will be asked for an alias. Please enter "jakarta".
The next screen will ask you for the directory which this virtual directory shall represent. Please enter "C:\InetPub\wwwroot\ewa_sso" or the directory you had chosen above.
The last screen will ask you for the permissions. Ensure you enable the checkmark "Execute (such as ISAPI applications or CGI)".
Finalize the wizard, right click the just created virtual directory "jakarta" and compare your settings with the following screen:
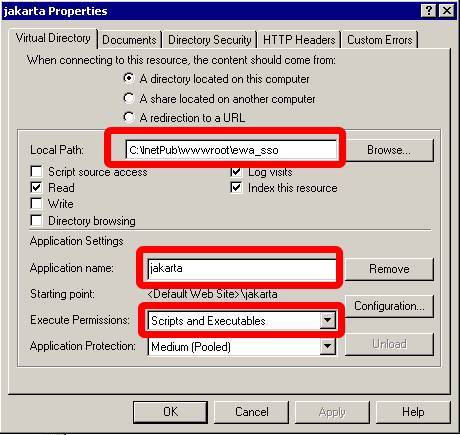
If you run Windows 2003 Server for your Web Server (only in this case) you will have to perform the following additional step which is not needed on Windows 2000 Server based systems:
Click on the "Web Service Extensions" hive and click on "Add a new Web Service extension". If you forget this step the integration will not work as by default unknown ISAPI filters will be forbidden to run. Fill out the appearing dialog as follows:
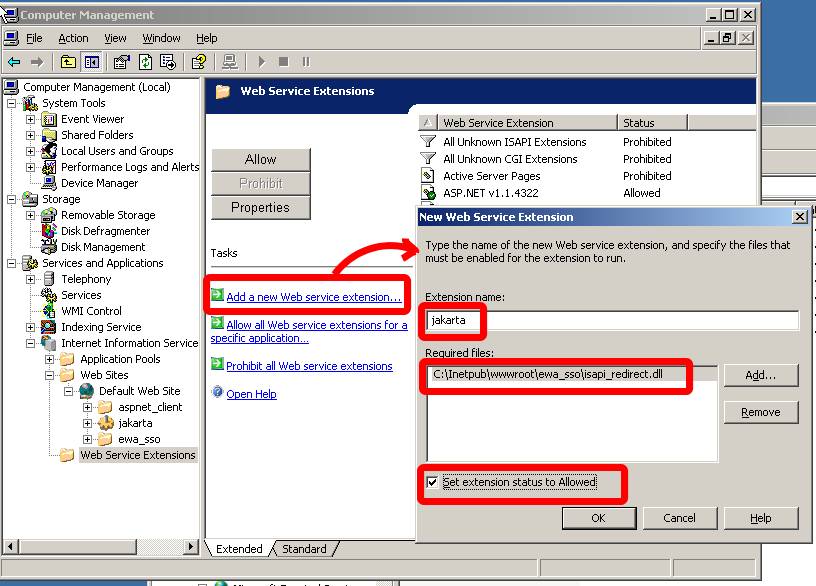
Okay, that's all for the configuration of the Web Server.
Go to the "Services" hive inside the Management console and restart the "IIS Admin Service" now.
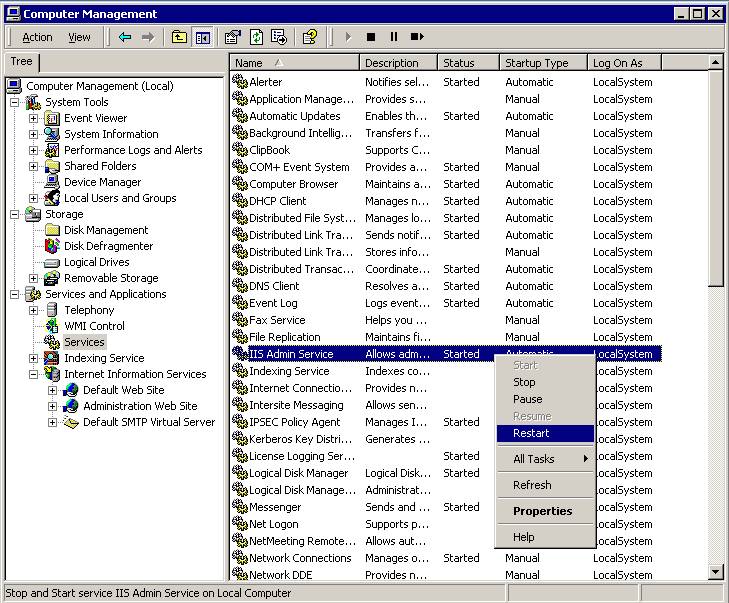
Please review again all your settings.
You can now check whether your Web Server is correctly forwarding the requests to the EWA net server.
Open Internet Explorer on the Web Server machine and enter the URL:
http://localhost/EWA-net
The minimum you should see now is the login mask of EWA net. If you cannot see this, please review the steps above and perform each of the steps again. Typical pitfalls are misspelled directory names, a wrong hostname, etc.
If this check is correctly working, try to connect the Web Server from any other computer of the domain and see if that works as well. Complete your tests by also starting WIS net and EPC net to ensure that your environment is completely working.
If you are currently logged on to a Windows domain and this account has already been setup within EWA net's User Management then you should automatically be logged in - the interactive login page in this case will automatically be skipped and you will automatically see the "Programs" menu within EWA net.
SSO will automatically be used if you connect to the EWA net server via the URL
http://localhost/EWA-net
If you want your users to be forced to login interactively tell them to connect via the URL
http://localhost/EWA-net/Login/showLogonForm.do
If you perform tests on your Web Server on Windows 2003 directly, please check your Site settings within Internet Explorer to ensure that NTLM credentials will really be sent to the web server. The appropriate settings can be found in "Tools -> Internet Options -> Security". Please click on "Sites..." and ensure that "http://localhost" is part of that list. See below:
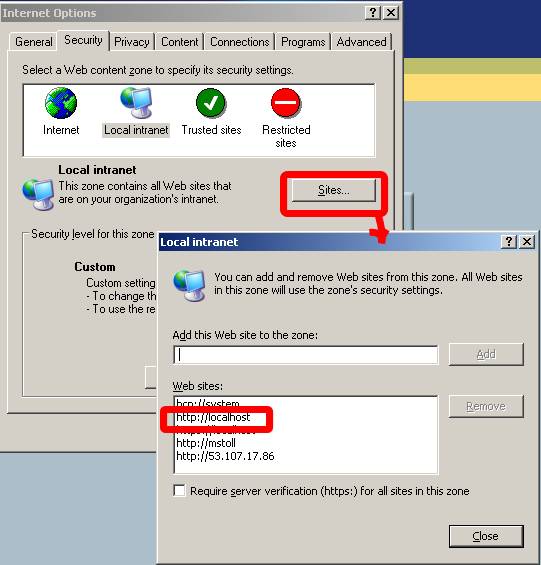
Example:
Let's assume you have been logged on to Windows as "EMEA\johndoe" where "johndoe" is the account name (user login) and "EMEA" the name of the Windows domain the user belongs to. You may setup a user (no matter which user role) now in EWA net with the fully qualified user login "EMEA\johndoe" (pattern <domain>\<userid>) instead of only his login name. This is the most important thing to be aware of. You will have to provide a password for him as EWA net , but this will not be used for SSO, of course, but it might be used as a fallback should the domain login not be possible.
Now that your Web Server integration successfully works, please do not forget to switch the logging level for the bridge down to "error". Open the file isapi_redirect.properties and change the line loglevel=debug to loglevel=error. Restart the IIS Admin service.
The Java Runtime has recently been improved by Sun to support NTLM authentication in the HTTP Connectivity Layer. This is an important step forward and allows also EWANAPI to be working with SSO enabled.
Thus ensure that at least Java Version 1.5.0_08 has been installed on all the client machines that want to make use of the SSO feature.
This step will only have to be performed if your installation makes use of the EWANAPI interface (i.e. for DMS interconnectivity,...). In order to ensure that EWANAPI can make use of the SSO feature, it needs the information to which Web Server it has to talk and on which port.
Therefore the users have to login to EWA net, run the EWANAPI Installer which will perform the updates.
After the update, you might simply issue a command like this in a command prompt:
EWANAPI.exe
See it? On Windows clients being part of the domain the user credentials will not have to be provided to EWANAPI anymore. The current user credentials of the logged on user will automatically be used. For users not being part of the domain it's still the old game - they will have to provide their credentials on the command line.
The call above should start the WIS net client with the user account of the user who is currently logged on against a domain on that client machine.
Congratulations! Working with EWA net has become even more comfortable for you and your users.
10.1.2 SiteMinder Authentication
The aim of this section is to describe how to integrate EWA net into a SiteMinder authentication environment. SiteMinder is a web based Single Sign On (SSO) solution from Computer Associates. Web application can be seamlessly integrated into SiteMinder SSO – this is achieved by configuring the application’s front end HTTP Server so that requests to the application can be intercepted and in case that the user is not yet authenticated, SiteMinder will redirect the user’s browser to the SiteMinder web based login form where the user can supply his username and password. After successfully authenticating SiteMinder issues an access token in the form of a browser cookie and the user’s browser is redirected back the original page which it attempted to open. Each and every request to the application server is intercepted by SiteMinder, if the request contains a valid access token (cookie) then the request is passed on the Web Application Server (e.g. tomcat via JK/AJP).
Special adaptation of EWA net was required as WIS net and EPC net applications are Java-Swing applications and not web based. These applications communicate with the backend server via HTTP to read or persist data. The “Client Communication Layer” is the component which has been extended to handle the SiteMinder authentication challenges, where possible transparent to the user. In a minor number of cases a Java-Swing dialog will be displayed to gather the user’s credentials required for SiteMinder authentication
10.1.2.1 Configuration of SiteMinder
The installation and base configuration of SiteMinder WebAgent component on the front end HTTP server is beyond the scope of this document please refer to the Computer Associates documentation. After installing the SiteMinder WebAgent on the front end HTTP server it is necessary to specify which URL’s will be secured and which will remain unprotected. Unprotected areas are required for the following reasons:
- EPC net & WIS net use Java WebStart to load the application components (jars etc) from the server. Java WebStart downloads these components from the Application Web Server, however Java WebStart is not capable of handling the SiteMinder authentication challenges.
- When help is started by clicking in one of the Java Swing applications a web browser is started. As this is a new browser instance SiteMinder would challenge the user for a username and password before displaying the help text.
- To allow communication with the server to retrieve SiteMinder settings before the user has logged on.
| URL | Security Setting |
| | |
| /WIS-net/ | Unprotected |
| /EPC-net/ | Unprotected |
| | |
| /EWA-net/ | Protected including all sub directories except the following |
| /EWA-net/download/ | Unprotected |
| /EWA-net/jnlp/ | Unprotected |
| /EWA-net/xmlparameter | Unprotected |
| /EWA-net/user | Unprotected |
It is necessary to configure the SiteMinder WebAgent not to Preserve Post Data. To do this add/set PreservePostData="NO" to the SiteMinder WebAgent LocalConfig.conf file.
SiteMinder installations protecting corporate sites are usually visually customized, thus a few parameters must be configured so that EWA net can function correctly. The following table lists the parameters which must be configured in the core_cfg.xml file which is in the [EWA_HOME]\config\ folder. The parameters are in the SiteMinder subsection of the AccessGateway section.
| Configuration | Default | Type | Description |
| siteMinderEnabled | false | Boolean as String (true | false) | Set to true if the EWA net server is protected by SiteMinder. |
| authURLPattern | n/a | Regular Expression String | The Java Regular Expression which matches positive for the SiteMinder URL to which a request is redirected when authentication is required. |
| form | -- Not set -- | String | The name attribute of the SiteMinder authentication HTML <form> element. If the value is not set then the first form will be assumed. |
| formUser | USER | String | The name attribute of the HTML <input> element where the Username must be entered. |
| formPassword | PASSWORD | String | The name attribute of the HTML <input> element where the Password must be entered. |
| formSubmit | -- Not set -- | String | The name attribute of the HTML <input> element used to submit the form. |
| formCredCookie | FROMCRED | String | The name of the Form Credentials Cookie set by SiteMinder in response to submitting user credentials to the Authentication screen. |
| formSession | SMSESSION | String | The name of the SiteMinder Session Cookie set by SiteMinder in response to submitting a request with a Form Credentials Cookie containing valid user credentials. |
10.1.2.2 Working with SiteMinder SSO integration activated
To finalize the installation restart the Web Application Server [Tomcat | WebSphere] and login to EWA net. You will also need to ensure the usernames in EWA net are the same as those user for logging onto SiteMinder (usually the Email address of the user). When starting EWA net in the browser the URL of the front end server, which has been configured for SiteMinder, will be used. The user will be initially redirected to the Corporate SiteMinder login page where he or she must login. After logging the SSO mechanism of EWA net will come into action and the EWA net application will be shown without the user needing to login again. EPC or WIS net can now be started.
In one use case it will be necessary to reenter his/her credentials. This happens if the SiteMinder session times out which happens if the SiteMinder integration has be configured to force users to re-authenticate after a defined period of time. This configuration is a setting of the SiteMinder plug-in which was installed on the front end Server). If the user is working with a web application then he/she will be redirected to the web based corporate logion screen. If however this happens which working with a non web based application (EPC net or WIS net) then the application will display a dialog requesting the user's credentials.
11 Clustering of an EWA net Server
This chapter is based on an evaluation performed for EWA net. Goal was to find existent possibilities to deliver EWA net in a clustered environment. The main motivation behind the effort is to provide in the future a high available, distributed, fault-tolerant and load-balanced environment.
A clustered EWA net should improve:
- Performance
- Fault-tolerance
- Overall user perception of the system
And reduce:
- application’s downtime potentially to zero[Cluster1]
- number of complains made by users
- time and money lost due to system’s downtime
Nonetheless this description does not inquire into:
- DNS Request Distribution
- Fault-Tolerant, Load Balancing between DNS Servers
- DNS strategies (like round-robin) to resolve domains behind clusters
- TCP NAT Request Distribution
- Distribution of requests across web servers.
- Commercial NAT products that could be used.
- Database/JDBC Request Distribution [Cluster2]
- Fault-tolerant, distributed requests through parallel database in-stances.
- Products offering solutions for database/jdbc clustering
Clustering EWA net local version depends on Apache and Jakarta Tomcat clustering features.
Basically this document assumes that an appropriate DNS and NAT solution for EWA net will be provided by Daimler or other responsible network administrators. On the other hand, this description provides the necessary steps and options to set up an EWA net application with multiple web-servers and JSP Servlet engines. How TCP/HTTP requests reach each of these clustered web-servers is not defined or described.
11.2 Clustering EWA net using Tomcat application server
EWA net local architecture uses Jakarta Tomcat as web server and servlet container. Since EWA net’s content is mostly dynamic, HP suggest keeping mainly Tomcat as web server for serving content. Additional front-end web servers can be used to distribute request amongst several cluster nodes in the EWA net server farm. Besides the request distribution (using a sticky session) the usage of a front-end HTTP server will not generate further performance benefits. The main part for clustering lies in clustering the application servers. HTTP front-end servers could be clustered to improve availability. The EWA net installation in this case should be complete and each application server node should contain the application server and the Transbase content databases. The User Management database should be located at a central location and have a high performance clustered server. The clustered architecture of EWA net should look like this:
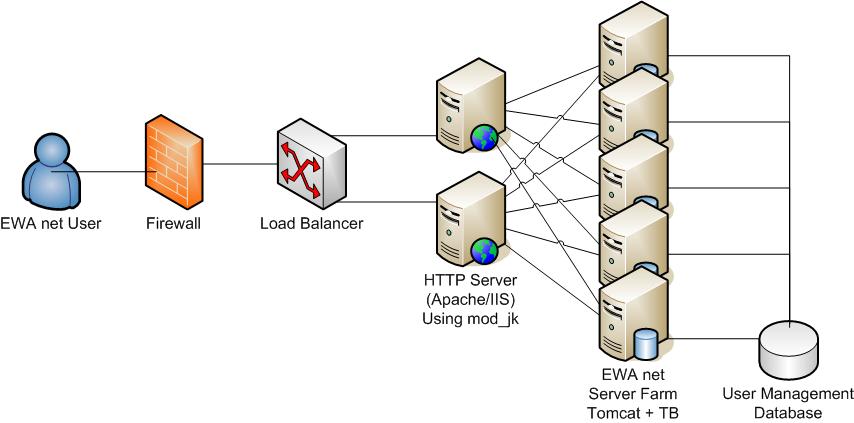
Example Clustering setup in a EWA net Farm
11.2.1 NAT Request distributors / Load Balancers
NAT request distributors or Load Balancers can be used for load balancing, fault tolerance, or both. Usually the algorithm chosen to distribute requests depends on the NAT product installed. Most NAT request distributors also offer fault tolerance by detecting various kinds of web server faults, and then will stop distributing requests to any server that is down.
There are many NAT request distributor implementations available, both commercial and as open source software that runs on commodity computer hardware. However further investigation is not part of the scope of this description.
Besides regular NAT request distributor products also Build in Windows 2003 server functionality for load balancing (NLB) can be used for Distributing requests. Note that Windows 2003 NLB is a layer 3 distributor so is not able to detect session types or application server service failures!
11.2.2 Using mod2jk and Apache httpd for Load Balacing
When using Apache httpd as web server and Tomcat as servlet container, the communication connector offered by Tomcat (mod_jk) offers best load balancing and failover across several Tomcat instances. Each Apache with mod_jk in a cluster can perform:
-
Distribute requests to one or more Tomcat instances
-
Detect Tomcat instance failure
-
Detect when a Tomcat instance comes back after failing
-
Understand the Tomcat HTTP Sessions and provide a sticky affinity of the application's EWA net session
11.2.3 Distributed Java Servlet Containers
A distributed servlet container will generally deploy and run one instance of the application per servlet container, with each servlet container and web application in a separated JVM, and requests will be processed in parallel. Additionally, each Tomcat instance runs its own instance of the web application, and treats the application instance as if it is the only instance running.
11.2.3.1 Servlet Sessions
Defined by Java Servlet Specification 2.4 and chosen by Tomcat developers, all requests belonging to the same session from a single client must be processed by the same servlet container instance. This makes Session object replication an optional feature of distributed servlet containers. According to the specification, it is not mandatory for distributed servlet containers to implement session replication.
11.2.3.2 Session Affinity (or Sticky Sessions)
For web applications that are marked as distributable, all requests belonging to one HTTP session are served by one Tomcat instance. This is called session affinity. Session replication is not necessary for the application to function if session affinity is used. However, if the Tomcat instance or the server machine it runs on fails, the servlet session data is lost and the user may need to login again.
As the WIS net and EPC net applications support transparent session recovery, a failover may not be critical is most cases, so using sticky sessions will prevent the requirement for session replication.
If you are not able to run the installation with sticky sessions, you need to implement a session replication, so that the current session state is replicated to all cluster nodes.
11.2.3.3 Replicated Sessions
With replicated sessions, if one Tomcat instance crashes, the session state data is not lost because at least one other Tomcat instance has been sent a copy of that data. Some servlet session replication implementations replicate all sessions to all servlet container instances in the cluster, whereas other implementations replicate one servlet container instance’s sessions to only one or two “buddy” servlet container instances in the cluster.
If the request distribution mechanism between the servers use sticky sessions, session replication is not required (as the application automatically re-connect to server). However session replication can prevent some detailed use cases where problems may arise.
It is also required to mention that the implementation of session replication will generate a bit of network and CPU overhead compared to standalone installations.
11.2.3.3.1 Session Replication in Tomcat 5
Tomcat 5.5 has at least a couple of session replication implementations. This section investigates the open-source implementation which is integrated into Tomcat 5.5. This session replication works based on UDP multicast. Therefore it is necessary that the network adapter used supports multicasting. A unicast TCP implementation is provided for Tomcat 5 also.
Note:
The Windows systems required to run EWA net should already have the appropriate ServicePack installed to solve some issues related to multicasting like Q319627 (Multicast Fragmentation).
See here for more information: http://support.microsoft.com/default.aspx?scid=kb;en-us;319627
11.3 Steps to Cluster EWA net with Tomcat as Application Server
This section assumes you have successfully installed EWA net.
11.3.1 Installing Apache Web Server
Extract the Apache HTTPd installation EXE from EWA net delivery DVD, which is contained in \ewa\central\tools\apache_httpd.zip. (Alternatively you can download the release from http://httpd.apache.org/download.cgi and compile it on your own). Apache installation steps for Windows are simple. Make sure the following Windows services are stopped and configured for “Manual” start if you are using Windows 2000:
Install as many Apache Web servers as the cluster foresees. Usually each HTTP server is installed in a separated server.
This description describes the integration with Apache 2.2.3 - any other version may also be suitable - but has not been tested.
11.3.2 Install and Configure mod_jk Connector
This section describes how to install and use Tomcat 5.5 as a backend servlet container to the Apache HTTPd web server via a custom protocol connector module. The steps must be followed for each Apache and Tomcat instance running and the clustered architecture is assumed to be similar to the architecture figure shown earlier:
-
Before installing mod_jk2 connector, please make sure the Apache HTTPd server is running correctly.
-
Stop “EWA net Server” and Apache HTTPd windows services.
-
Extract the connector from EWA net installation media. The mod_jk is contained in \ewa\central\tools\apache_httpd.zip. Alternatively you can download the module sources from http://tomcat.apache.org/download-connectors.cgi the release 2.0.4 of mod_jk2 connector.
-
Unzip mod_jk.so file into [APACHE_HOME]\modules a file called mod_jk.so.
-
Edit the file [APACHE_HOME]\conf\httpd.conf and add the configuration entries as contained in \ewa\central\tools\apache_httpd.zip --> httpd.conf_entries_example. For further reference please visit http://tomcat.apache.org/connectors-doc/config/apache.html. Please do not forget to adjust the described path's in the file!
# Sample extension file which needs to be added to Apache HTTPD configuration file httpd.conf
# For further referece, please take a look to:
# http://tomcat.apache.org/connectors-doc/config/apache.html

# TODO: Please align path's to you installation
# TODO: After integration is completed and is working, set the logging switch to error
#Load the jk_mod
LoadModule jk_module modules/mod_jk.so
# The name of a worker file for the Tomcat servlet containers
JkWorkersFile "C:/Program Files/Apache Software Foundation/Apache2.2/conf/workers.properties"

# Full or server relative path to the Tomcat Connector module log file
JkLogFile "C:/Program Files/Apache Software Foundation/Apache2.2/logs/mod_jk.log"

# The Tomcat Connector module log level, can be debug, info, warn error or trace
# Note: Set to error if the integration is working!
JkLogLevel debug

# A mount point from a context to a Tomcat worker
JkMount /EWA-net ewanet
JkMount /EWA-net/* ewanet
JkMount /WIS-net/* ewanet
JkMount /EPC-net/* ewanet
-
Extract the file workers.properties from the archive \ewa\central\tools\apache_httpd.zip and modify it with a text editor (i.e. Windows Notepad) depending on your environment. Note that the name of each defined worker needs to match the defined jvmRoute in Tomcats server.xml!
# Configuration filr for mod_jk to connect to Tomcat
# For further reference, please take a look to:
# http://tomcat.apache.org/connectors-doc/config/workers.html

# Define the central EWA net worker
worker.list=ewanet

# Define the EWA net worker as a cluster to balance requests to three hosts
worker.ewanet.type=lb
worker.ewanet.balanced_workers=ewanode1,ewanode2,ewanode3
worker.ewanet.sticky_session=1
worker.ewanet.sticky_session_force=0

# Define EWA net working application host 1
worker.ewanode1.type=ajp13
worker.ewanode1.host=192.168.0.10
worker.ewanode1.port=8009
worker.ewanode1.lbfactor=1

# Define EWA net working application host 2
worker.ewanode2.type=ajp13
worker.ewanode2.host=192.168.0.11
worker.ewanode2.port=8009
worker.ewanode2.lbfactor=1

# Define EWA net working application host 3
worker.ewanode3.type=ajp13
worker.ewanode3.host=192.168.0.12
worker.ewanode3.port=8009
worker.ewanode3.lbfactor=1
11.3.2.1 Changes in all EWA net Servers
These changes should be applied to all EWA net servers in your cluster.
-
Open the file <EWA-net>\server\conf\server.xml and un-comment (enable) the following lines in the connectors section of the file:
<!--
    Define an AJP 1.3 Connector on port 8009
-->
<Connector port="8009"
           backlog="200"
           maxThreads="200"
           enableLookups="false"
           redirectPort="8443"
           secure="false"
           protocol="AJP/1.3" />
-
If you don’t want anymore the users to access EWA net directly through Tomcat, you can comment the connector declaration which uses port 9000 in the file server.xml mentioned before.
-
In the same file modify the Engine definition of Tomcat by modifying the jvmRoute attribute. Each EWA net server in the cluster must have a unique jvmRoute name (e.g. ewanode1, ewanode2, etc). Note that for sticky session the workers in mod_jk's workers.properties need to be named accodingly matching the jvmRoute's!
<!--
    Define the top level container in our container hierarchy
-->
<Engine name="EWA net Server Engine"
        defaultHost="localhost"
        jvmRoute="ewanode1">
11.3.2.2 Configuring Session Replication
Session replication for Tomcat 5.5 is implemented in the core version of the application server. No special extensions of software modules are required.
-
Stop all EWA net servers in your cluster.
-
Tomcat session replication makes use of multicast. Make sure all EWA net servers and used network interfaces support multicasting. Please check out your operating system manuals.
-
Open the file <EWA-net>\server\conf\server.xml and un-comment the following lines inside the EWA net Host section of the file:
<Cluster className="org.apache.catalina.cluster.tcp.SimpleTcpCluster"
         managerClassName="org.apache.catalina.cluster.session.DeltaManager"
         expireSessionsOnShutdown="false"
         useDirtyFlag="true"
         notifyListenersOnReplication="true">

    <Membership className="org.apache.catalina.cluster.mcast.McastService"
                mcastAddr="228.0.0.4"
                mcastPort="45564"
                mcastFrequency="500"
                mcastDropTime="3000"/>

    <Receiver className="org.apache.catalina.cluster.tcp.ReplicationListener"
              tcpListenAddress="auto"
              tcpListenPort="4001"
              tcpSelectorTimeout="100"
              tcpThreadCount="6"/>

    <Sender className="org.apache.catalina.cluster.tcp.ReplicationTransmitter"
            replicationMode="pooled"
            ackTimeout="15000"
            waitForAck="true"/>

    <Valve className="org.apache.catalina.cluster.tcp.ReplicationValve"
           filter=".*\.gif;.*\.js;.*\.jpg;.*\.png;.*\.htm;.*\.html;.*\.css;.*\.txt;"/>

    <ClusterListener className="org.apache.catalina.cluster.session.ClusterSessionListener"/>
</Cluster>
-
Restart Tomcat and Apache.
[Cluster1] A non-stop service is theoretically possible but in practice depends on the clustering choices made regarding overall application architecture, hardware platforms. Training the system’s administrators is also an effective way to reduce downtime.
12 De-Installation
For the de-installation of EWA net just follow the standard way for Windows applications. Go into the Control panel into “Add or Remove Programs”, select the entry “EWA net” and click on “Change/Remove”.
The EWA net software will be completely deinstalled from the system.
12.1 "Hardcore" de-installation
You might at some point face the problem that one step of the advanced de-installation fails and subsequently the whole de-installation fails. This is a frustrating thing with Windows installation software as the smallest change to your environment might make a de-installer fail. To help you out of this misery, we provide a script that de-installs the software in a batched way.
The following step will wipe your EWA net installation, but it does not remove services or de-install your standard products. So please be aware to perform stopping and removing probable EWA net services as described above before you execute the script.
Use this script own your own risk - this is not the official way to de-install the software. But it has proven to often run much better then the official way.
You can find the script on the delivery media:
[DVD-DRIVE]:\ewa\tools\CleanEWAInstallation.vbs
Update and migration steps are only supported from the exact previous delivery version to the current one. If you have an older version, you might want to de-install it and install EWA net from scratch using the most current delivery media.
EWA net does not support a full recover option. You may want to make a full backup of your system before updating the software. A good harddrive partitioning tool or tape backup will help to get the server back working if something should go wrong during an update.
There are two aspects of updating the EWA net system:
- Monthly updates (typically database content for WIS net and EPC net as well as updates of resources)
- Major updates of the system software
Typically you will not see a difference in the way how to perform those updates.
Typically once a month you will receive a new set of DVDs (or receive your media sets online via the ManageSoft online channel). Updating is a simple thing.
If you make use of a distributed server environment (having database server and application server on different physical machines), you will not perform integrated updates via AdminTool. Therefore in these environments you as administrator are responsible for keeping the system consistent.
On the application server, call setup.exe /u for a pure software update, then apply the manual changes as described.
On the database server(s), call setup.exe /u as well for updating the software, then make use of the advanced features of the AdminTool. Please refer to the AdminToolGuide.
Even though using this enhanced setup procedure it is possible to install a new database content without upgrading the software. Nevertheless it is highly recommended to ALWAYS update the software when updating the database content. The software setup will only upgrade components when they have changed but additionally will ensure that help files, what's new pages and translations are up to date.
In Summary: Please update the software also when updating the databases in your EWA net installation.
Go to the favorites of your Internet Explorer and click on the buttons “Update WIS net” to perform an update of WIS net and then click onto the favorite “Update EPC net” to perform an update of EPC net. The system will be automatically updated and check any dependencies between WIS net and EPC net. There might be situations where you have to provide both DVD sets to allow an upgrade. If you cannot provide the valid media sets, you might not be able to upgrade. This is to ensure consistency of the system software.
For more information please refer to the corresponding EWA Admin Tool documentation.
If you performed an upgrade from a 1.2 version of EWA net to the current version, a migration of the database internals will have to be performed based on some heuristics.
If you have set up only one workshop with several groups and users, the single workshop will be migrated and visible. If you have defined multiple workshops, a new Server Workshop will be created containing the administrator user. In this case other workshops and users are not visible anymore (but still existing!). In this case the "Cascaded Workshop Administration" needs to be enabled. This will allow you to use multiple workshops in your installation. Information on how to do this can be found here.
Anyway it is recommended you check the relationships of your user objects to groups and workshops after migration and manually correct it where the migration algorithm did not perform the steps you would have expected.
14 Additional software installation
14.1.1 General
EWA net provides basically the same spooler programs as provided as part of the former WIS. Those spoolers have slightly been modified to fit better into the EWA net architecture.
This description is not a replacement for the spooler manuals. It just describes installation and basic ideas behind the spoolers in the special context of EWA net.
For a reference of the spooler manuals including a description of the file formats please refer to the documentation's table of contents.
In order to run the spoolers successfully you need at least 2 GB free harddisk space on the disk where the WIS net database service is running (!) as complex SQL queries on the database may need temporary space on the disk. Especially the creation of DamageCode rules files need a lot of temporary harddisk space.
In order to be able to create spool files the spooler programs (ASRA spooler and Damagecode spooler) will have to be installed manually from the delivery media of EWA net onto the same machine where the EWA net installation resides. The installation will be described in more detail in the following sections.
The basic mechanism to spool out data (either via ASRA spooler or Damagecode spooler) and to make it accessible for download in the download area is:
- Install the spooler on the server machine of EWA net.
You will find the installer on the delivery media at
[DVD-Drive]:\ewa\spooler\setup.exe
This installer will install both spoolers at once.
- After successful installation you will find two more icons in the list of your favorites in the Internet Explorer:
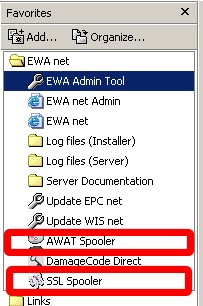
- Check for a necessary configuration step.
If you run an installation where the database system for WIS net still remains on the same server machine as where the spooler is installed, you can start right away. (This is the standard case after a local or a basic central installation)
If your database server for WIS net data has been installed on a different server, you will have to tell the spooler programs what the hostname of the WIS net database server is.
You can do this by use of a Windows environment variable.
Simply set the variable EWANET_DB_SERVER_NAME to the name of your database server.
Example:
EWANET_DB_SERVER_NAME=ewadb.my.company.com
You can do this via the control panel for environment variables in Windows.
- Ensure you have installed a valid WIS net access authorization.
- Now you can successfully start the spoolers.
- Spool out results will be written by default into the [EWA_HOME]\downloads\spooler directory, separated for the Damagecode spooler and the ASRA spooler.
- By spooling these files into special directories within EWA net's home directory, these files can be made available on every client with access to EWA net and for users with access rights for spoolout files (typically users with administrative rights like server administrators and workshop administrators). But EWA net has also the ability to be switched into a mode where any user can gain the right to download spoolout files, independent from its user role. See the UserManagement documentation how to do this.
14.1.2 Configuration
14.1.2.1 Spool file location
The location for the spool out files can be changed by editing the core configuration file core_cfg.xml within the section "Spooler". By default a relative path is set for both ASRA and Damagecode spooler which is interpreted as relative to the EWA_HOME directory. Server administrators which intend to run the spoolers in batch mode and in a clustered environment may want to change this location to a distinct location which is accessible by all EWA net cluster nodes.
Default (relative path)
<SECTION name="Spooler">
    <PARAMETER name="ASRASpoolout">downloads/spooler/asra</PARAMETER>
    <PARAMETER name="DamageCodeSpoolout">downloads/spooler/damagecode</PARAMETER>
</SECTION>
Example (absolute path)
<SECTION name="Spooler">
    <PARAMETER name="ASRASpoolout">N:/ewanet_spooler_results/asra</PARAMETER>
    <PARAMETER name="DamageCodeSpoolout">N:/ewanet_spooler_results/asra/damagecode</PARAMETER>
</SECTION>
It is important for you to know that if you switch your file locations to a network path (accessed via UNC path or via mapped drive letters) you will have to change the account under which your EWA net server is running to a user account being allowed to access network resources. The "system" account in Windows is not allowed to do so.
14.1.2.2 Access rights for spool out files
By default EWA net gains users with user role "System Administrator" or "Workshop Administrator" access to the download area for spooled files. You can change this behavior to a per-user-setting by changing the value "userBasedDownloadPermissisons" to "true" in the section "General" of the UserManagement configuration file um_cfg.xml. Once done you must explicitly assign the user right "Allow download of spooler files" to any user who should gain access to this download area. Even the system administrator does not have this right by default!
14.1.3 Interactively running the spoolers
14.1.3.1 ASRA Spooler (AWAT data spooler)
This spooler allows the extraction of ASRA related data from the WIS net database in the same way as it was possible with "classic" WIS. After startup of the application you will see the following screen:
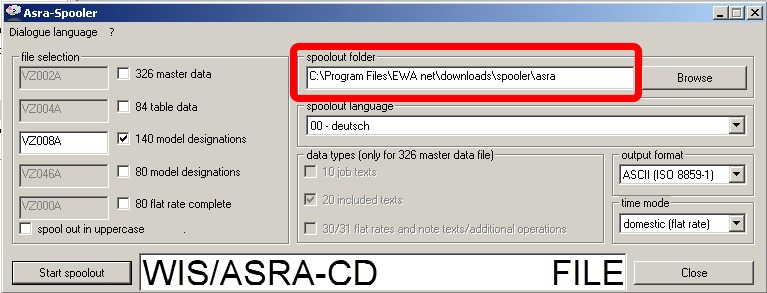
The marked text field shows the automatically pre-selected output folder for your files. It is recommended to not change this folder in order to ensure that your spool out files will be written into a location where EWA net can find them to allow downloads via the EWA net download page.
Please ensure that you do not accidently override existing files. Please move those files into a backup location before spooling out the files.
After spooling out the data you may login into EWA net from any client and display the download section (assuming you have the rights to access those pages).
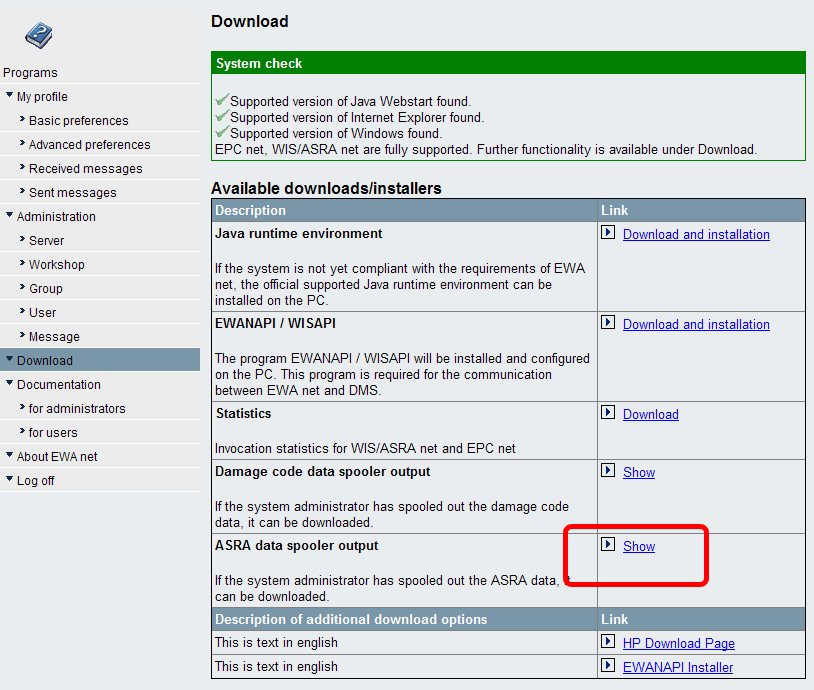
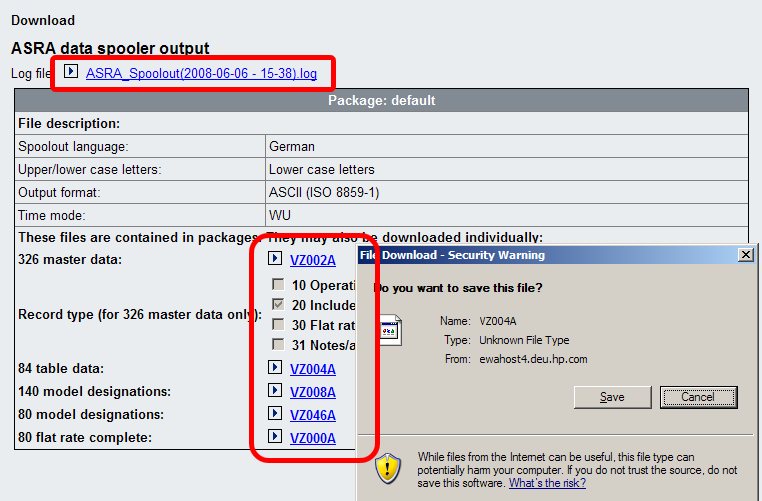
You may download the files for the ASRA Spooler from the section named "ASRA Spooler Output". You may even browse the log file from here. The download page will list all the file that have been spooled out along with the configuration information that was used to create those files. Clicking on one of the hyperlinks in the browser will make the browser start the download of the appropriate file.
14.1.3.2 Damagecode Spooler (SSL data spooler)
This spooler allows the extraction of damage code related data from the WIS net database in the same way as it was possible with "classic" WIS. After startup of the application you will see the following screen:
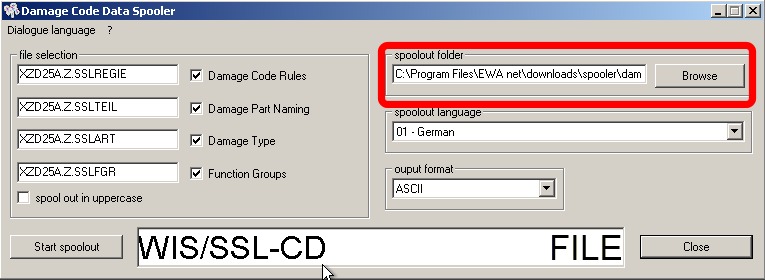
The marked text field shows the automatically pre-selected output folder for your files. It is recommended to not change the output folder in order to ensure that your spool out files will be written into a location where EWA net can find them to allow downloads via the EWA net download page.
Please ensure that you do not accidently override existing files. Please move those files into a backup location before spooling out the files.
After spooling out the data you may login into EWA net from any client and display the download section (assuming you have the rights to access those pages).
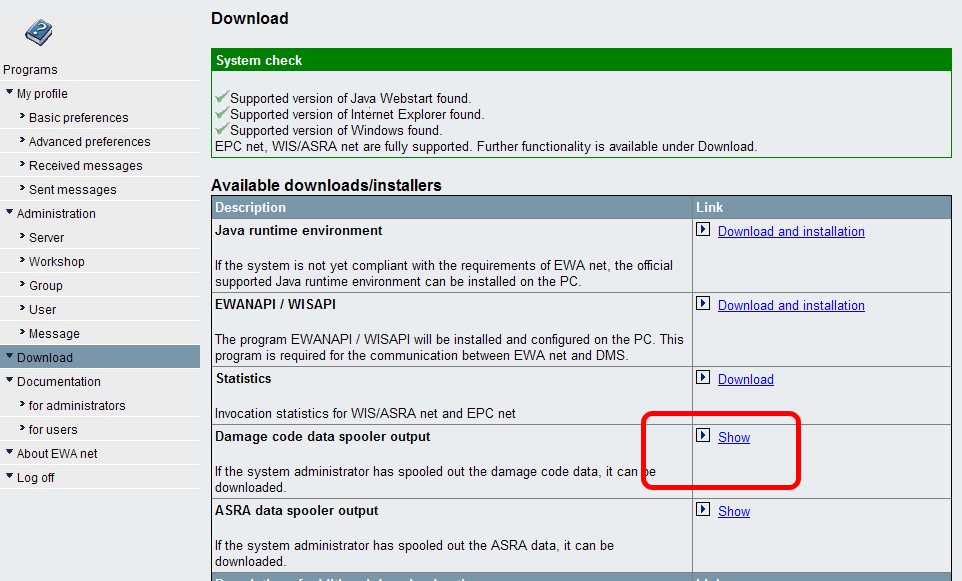
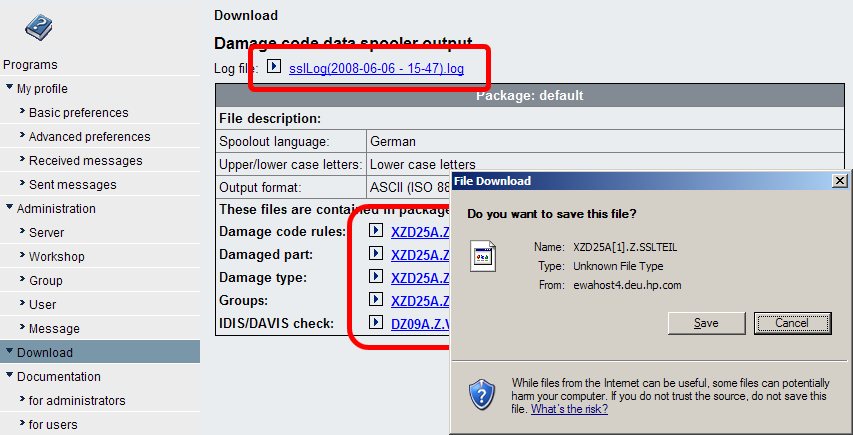
You may download the files for the Damage Code Spooler from the section named "Damage Code Spooler Output". You may even browse the log files from here.
14.1.4 Scheduled process of spooling / Spooling multiple "packages"
If you want to make use of more advanced features like
- Scheduled spooling
- Spooling several "packages" of files
you will want to make use of the option to run the spooler executables in "batch mode" which means that they do not show any user interface but get their configuration information from a separate ini-file which basically tells them what they have to do. Once you are sure that your created configuration files are valid and operating the way you expect them you can easily make this process part of the Windows Scheduler.
This spooler configuration file must be created in ASCII (ISO-8859-1) encoding.
The spooler will always start a process and will not return values to the command prompt if started from there. The spooler will write a logfile into the spool out directory defined in the configuration file. If you cannot find a logfile after starting the process there is a good chance that the spooler could not find the config file at all. Be sure to quote the path correctly and be sure to always provide the full path to the configuration file like
/f "C:\Program Files\EWA net\spooler\dc_sample.ini"
14.1.4.1 ASRA spooler
You can run the ASRA spooler from its install location in batched mode via the command line:
[EWA_HOME]\spooler\awatso.exe /nongui /f "<configuration file>"
where <configuration file> must be an absolute path pointing to a configuration file. The configuration file may look like this - an example for one single spoolout package with the name "MyFirstSetOfFiles" in Japanese, UTF8 encoding:
[general]

# Root_Path for spool files and the log file
# Note: Use your EWA net installation directory unless you really need to spool into a different location.
Root_Path=C:\Program Files\EWA net\downloads\spooler\asra

[set_MyFirstSetOfFiles]
# Spool out in uppercase (1) or not (0)
Uppercase=0

# Language for which to create the spool outs:
# 0 = German
# 2 = English
# 3 = French
# 4 = Spanish
# 6 = Italian
# 7 = Dutch
# 8 = Danish
# 9 = Swedish
# 10 = Finnish
# 12 = Greek
# 15 = Norwegian
# 17 = Turkish
# 20 = Japanese
# 22 = Russian
# 25 = Polish
# 81 = Slovenian
SpoolSprache=20

# Allowed file format (encoding) values are ASCII, UTF8 and UCS2
Format=UTF8

# Timemode to be used: "foreign" (= hours) or "domestic" (=AW, only for Germany)
Timemode=foreign

# Directory under which to create the spool files relative to the root path
Relative_Path=MyFirstSetOfFiles

# Define files which shall be spooled out as part of this set

#  326 Master data
326Stammdaten=0
326Filename=VZ002A
# Additional info for 326 Master data
# Want to spoolout job texts?
SatzartArbeitstexte=1
# Want to spoolout included texts?
SatzartUmfassttexte=1
# Want to spoolout flat rates?
SatzartArbeitswerte=1
# Want to spoolout note texts / additional text
SatzartHinweisZusatz=1

# 84 Table data
84Tabellendaten=0
84Filename=VZ004A

# 140 Model designations
140Baumuster=0
140Filename=VZ008A

# 80 Model designations
80Baumuster=0
80BMFilename=VZ046A

# 80 Flat Rate complete
80Awert=1
80AWFilename=VZ000A
Basically the file consists of two basic section types:
[General]
This section occurs only once at the top of a configuration file. Here you can specify the root path for the files that will be spooled out. This also determines where the log file will be written to. The logfile will always be written into the root directory which was specified.
[set_<Name of package>]
A section of this type beginning with "set_" defines a package of files with specific attributes which shall be spooled out. It will also be referred to as "configuration set". It may occur several times with individual names. These names will show up on the User Interface.
Basically you begin specifying in which format you want the files to be spooled out:
-
Uppercase:
"0" for normal case, "1" for uppercase texts ("1" can only be used with Format="ASCII" - see below)
-
SpoolSprache:
The Daimler language number for the language in which to spool out the data. See the file example above for all valid languages
-
Format:
This is basically the encoding of the file. Valid values are "ASCII" for ISO-8859-1 representation, "UTF8" and "UCS2" for double byte representation.
-
Timemode:
Specifies in what unit for the time of operation items shall be used: "foreign" for countries other than Germany (resulting in hour-based values) or "domestic" for Germany (resulting in AW-based values).
Next is to specify where the files shall be spooled on the file system and what files shall be written at all:
-
Relative_Path:
This is the directory which will created below the directory specified in the Root_Path property and will contain all the selected files of this package. Typically the name of the package will also be used as a directory name.
- The rest of the package definition is the statement, which files of the 5 different file types you want to be created (indicated by a "1") and which name you would like to be used for that individual file.
326Stammdaten: 0 to omit "326 Master Data", 1 to create it.
326Filename: Filename for "326 Master Data"
SatzartArbeitstexte: 0 to omit Job Texts of "326 Master Data", 1 to include them.
SatzartUmfassttexte: to omit Included Texts of "326 Master Data", 1 to include them.
SatzartArbeitswerte: to omit Flat Rates of "326 Master Data", 1 to include them.
SatzartHinweisZusatz: to omit Note Texts/Additional Texts of "326 Master Data", 1 to include them.
84Tabellendaten: 0 to omit "84 Table Data", 1 to create it.
84Filename: Filename for "84 Table Data"
140Baumuster: 0 to omit "140 Model designations", 1 to create it.
140Filename: Filename for "140 Model designations"
80Baumuster: 0 to omit "80 Model designations", 1 to create it.
80BMFilename: Filename for "80 Model designations"
80Awert: 0 to omit "80 Flat Rate complete", 1 to create it.
80AWFilename: Filename for "80 Flat Rate complete"
14.1.4.1.1 Sample spoolout
The following sample of a configuration file will show the effect for the download page as a sample:
[general]

# Root_Path for spool files and the log file
# Note: Use your EWA net installation directory unless you really need to spool into a different location.
Root_Path=C:\Program Files\EWA net\downloads\spooler\asra

# Default Name of the logfile. The file-extension ".log" will
# be added automatically
#Logfile_Name=ASRA_Spoolout

[set_Japanese_Files]
# Spool out in uppercase (1) or not (0)
Uppercase=0

# Language for which to create the spool outs:
# 20 = Japanese
SpoolSprache=20

# Allowed file format (encoding) values are ASCII, UTF8 and UCS2
Format=UTF8

# Timemode to be used: "foreign" (= hours) or "domestic" (=AW, only for Germany)
Timemode=foreign

# Directory under which to create the spool files relative to the root path
Relative_Path=Japanese_Files

# Define files which shall be spooled out as part of this set

#  326 Master data
326Stammdaten=0
326Filename=VZ002A
# Additional info for 326 Master data
# Want to spoolout job texts?
SatzartArbeitstexte=1
# Want to spoolout included texts?
SatzartUmfassttexte=1
# Want to spoolout flat rates?
SatzartArbeitswerte=1
# Want to spoolout note texts / additional text
SatzartHinweisZusatz=1

# 84 Table data
84Tabellendaten=0
84Filename=VZ004A

# 140 Model designations
140Baumuster=0
140Filename=VZ008A

# 80 Model designations
80Baumuster=0
80BMFilename=VZ046A

# 80 Flat Rate complete
80Awert=1
80AWFilename=VZ000A

[set_German_Files]
# Spool out in uppercase (1) or not (0)
Uppercase=1

# Language for which to create the spool outs:
# 0 = German
SpoolSprache=0

# Allowed file format (encoding) values are ASCII, UTF8 and UCS2
Format=ASCII

# Timemode to be used: "foreign" (= hours) or "domestic" (=AW, only for Germany)
Timemode=domestic

# Directory under which to create the spool files relative to the root path
Relative_Path=German_Files

# Define files which shall be spooled out as part of this set

#  326 Master data
326Stammdaten=1
326Filename=VZ002A
# Additional info for 326 Master data
# Want to spoolout job texts?
SatzartArbeitstexte=1
# Want to spoolout included texts?
SatzartUmfassttexte=1
# Want to spoolout flat rates?
SatzartArbeitswerte=1
# Want to spoolout note texts / additional text
SatzartHinweisZusatz=1

# 84 Table data
84Tabellendaten=0
84Filename=VZ004A

# 140 Model designations
140Baumuster=0
140Filename=VZ008A

# 80 Model designations
80Baumuster=0
80BMFilename=VZ046A

# 80 Flat Rate complete
80Awert=1
80AWFilename=VZ000A
You can see that both packages are shown on the screen. Each package is provided as a complete ZIP download package or as individual files along with their description.
14.1.4.2 Damagecode spooler
Batch runs of the damagecode spooler run basically the same as for the ASRA spooler (see above). There are only slight differences in the configuration file over the file that the ASRA spooler uses.
[EWA_HOME]\spooler\sslso.exe /nongui /f "<configuration file>"
where <configuration file> must be an absolute path pointing to a configuration file. The configuration file may look like this - an example for one single spoolout package with the name "MyFirstSetOfFiles" in Japanese, UTF8 encoding:
[general]

# Root_Path for spool files and the log file
# Note: Use your EWA net installation directory unless you really need to spool into a different location.
Root_Path=C:\Program Files\EWA net\downloads\spooler\damagecode

[set_MyFirstSetOfFiles]
# Spool out in uppercase (1) or not (0)
Uppercase=0

# Language for which to create the spool outs:
# 1 = German
# 2 = English
# 3 = French
# 4 = Spanish
# 5 = Portuguese
# 6 = Italian
# 7 = Dutch
# 8 = Danish
# 9 = Swedish
# 10 = Finnish
# 13 = American-English
# 17 = Turkish
# 20 = Japanese
SpoolSprache=20

# Allowed file format (encoding) values are ASCII, UTF8 and UCS2
Format=UTF8

# Directory under which to create the spool files relative to the root path
Relative_Path=MyFirstSetOfFiles

# Define files which shall be spooled out as part of this set

# The DamageCode Rules file
SSRegel=0
RegelFilename=XZD25A.Z.SSLREGIE

# The DamageCode Part Naming
SSTeil=1
TeilFilename=XZD25A.Z.SSLTEIL

# The Damage Types
SSArt=1
ArtFilename=XZD25A.Z.SSLART

# The Function Groups
SSFGR=1
FGRFilename=XZD25A.Z.SSLFGR

# The plausibilities for IDIS/DAVIS
SSPlausi=0
PlausiFilename=XZD25A.Z.SSLPLAUSI
Basically the file consists of two basic section types:
[General]
This section occurs only once at the top of a configuration file. Here you can specify the root path for the files that will be spooled out. This also determines where the log file will be written to. The logfile will always be written into the root directory which was specified.
[set_<Name of package>]
A section of this type beginning with "set_" defines a package of files with specific attributes which shall be spooled out. It will also be referred to as "configuration set". It may occur several times with individual names. These names will show up on the User Interface.
Basically you begin specifying in which format you want the files to be spooled out:
-
Uppercase:
"0" for normal case, "1" for uppercase texts ("1" can only be used with Format="ASCII" - see below)
-
SpoolSprache:
The Daimler language number for the language in which to spool out the data. See the file example above for all valid languages
-
Format:
This is basically the encoding of the file. Valid values are "ASCII" for ISO-8859-1 representation, "UTF8" and "UCS2" for double byte representation.
Next is to specify where the files shall be spooled on the file system and what files shall be written at all:
-
Relative_Path:
This is the directory which will created below the directory specified in the Root_Path property and will contain all the selected files of this package. Typically the name of the package will also be used as a directory name.
- The rest of the package definition is the statement, which files of the 5 different file types you want to be created (indicated by a "1") and which name you would like to be used for that individual file.
SSRegel: 0 to omit "Damage Code Rules", 1 to create it.
RegelFilename: Filename for "Damage Code Rules"
SSTeil: 0 to omit "Damage Code Part Naming", 1 to create it.
TeilFilename: Filename for "Damage Code Part Naming"
SSArt: 0 to omit "Damage Types", 1 to create it.
ArtFilename: Filename for "Damage Types"
SSFGR: 0 to omit "Function Groups", 1 to create it.
FGRFilename: Filename for "Function Groups"
SSPlausi: 0 to omit "IDIS/DAVIS Plausibility", 1 to create it.
PlausiFilename: Filename for "IDIS/DAVIS Plausibility"
14.1.4.2.1 Sample spoolout
The following sample of a configuration file will show the effect for the download page as a sample:
[general]

# Root_Path for spool files and the log file
# Note: Use your EWA net installation directory unless you really need to spool into a different location.
Root_Path=C:\Program Files\EWA net\downloads\spooler\damagecode

[set_Japanese_Files]
# Spool out in uppercase (1) or not (0)
Uppercase=0

# Language for which to create the spool outs:
# 20 = Japanese
SpoolSprache=20

# Allowed file format (encoding) values are ASCII, UTF8 and UCS2
Format=UTF8

# Directory under which to create the spool files relative to the root path
Relative_Path=Japanese_Files

# Define files which shall be spooled out as part of this set

# The DamageCode Rules file
SSRegel=0
RegelFilename=XZD25A.Z.SSLREGIE

# The DamageCode Part Naming
SSTeil=1
TeilFilename=XZD25A.Z.SSLTEIL

# The Damage Types
SSArt=1
ArtFilename=XZD25A.Z.SSLART

# The Function Groups
SSFGR=0
FGRFilename=XZD25A.Z.SSLFGR

# The plausibilities for IDIS/DAVIS
SSPlausi=0
PlausiFilename=XZD25A.Z.SSLPLAUSI


[set_German_Files]
# Spool out in uppercase (1) or not (0)
Uppercase=1

# Language for which to create the spool outs:
# 1 = German
SpoolSprache=1

# Allowed file format (encoding) values are ASCII, UTF8 and UCS2
Format=ASCII

# Directory under which to create the spool files relative to the root path
Relative_Path=German_Files

# Define files which shall be spooled out as part of this set

# The DamageCode Rules file
SSRegel=0
RegelFilename=XZD25A.Z.SSLREGIE

# The DamageCode Part Naming
SSTeil=1
TeilFilename=XZD25A.Z.SSLTEIL

# The Damage Types
SSArt=1
ArtFilename=XZD25A.Z.SSLART

# The Function Groups
SSFGR=1
FGRFilename=XZD25A.Z.SSLFGR

# The plausibilities for IDIS/DAVIS
SSPlausi=0
PlausiFilename=XZD25A.Z.SSLPLAUSI
You can see that both packages are shown on the screen. Each package is provided as a complete ZIP download package or as individual files along with their description.
15 Client software installation
15.1 Java Runtime Environment
Before users can start working with the EWA net clients (EWANAPI installer, EPC net, WIS net), you should ensure that the client systems are well prepared. If you have an officially supported Java Runtime already installed on all the client machines, you are well prepared. Going to the Download Area of the User Management in your browser you will notice that the Web Application automatically tries to determine whether your clients are capable of executing EWA net.
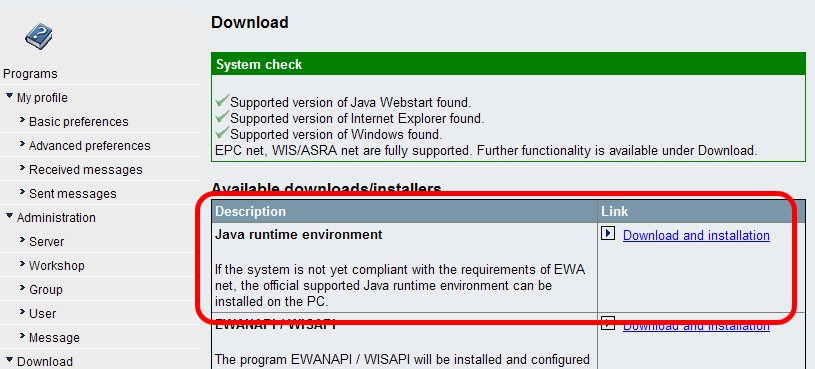
If you need to install a Java Runtime Environment, you can make use of the one provided in the downloads section. Simply click on "Download and Install" which will download the appropriate Java Installer.
After successful installation of a new Java Runtime Environment you may have to log off and on again to update the System check display as it cashes the settings per session to avoid nasty dialogs.
15.2 EWANAPI (External API to call EWA net clients for DMS calls and/or Xentry integration) (ewanapi.exe / wisapi.exe)
EWA net provides an external application called EWANAPI.exe which allows external programs to communicate with the AccessGateway, the WIS net client and/or the EPC net client.
This application was implemented with downwards compatibility in mind. Its command line arguments are compatible with the “classic” WISAPI.exe from the former WIS environment. It has been extended to support authentication at the AccessGateway and Shoppinglist calls to EPC net.
To indicate the downwards compatibility there is still a “clone” of the EWANAPI.exe called WISAPI.exe around that can be used in the same way as EWANAPI.exe
Note:
EWANAPI has matured from a simple DMS integration layer to an API which is heavily used by the Xentry applications like Xentry TIPS or Xentry Diagnostics. Therefore it is recommended to have EWANAPI installed in always the most current version on the client PCs. A so called "automatic deployment" supports to keep the clients up to date. Read more about this feature here.
15.2.1 Automatic Installation via the integrated EWANAPI Installer
EWA net provides a Java based installer which performs the necessary steps on each of the clients computers that otherwise would have to be executed manually.
The EWANAPI installer can easily be accessed from the Download section of EWA net. Simply click on the Download and Install button. You can also do this anytime you want to update your EWANAPI environment.
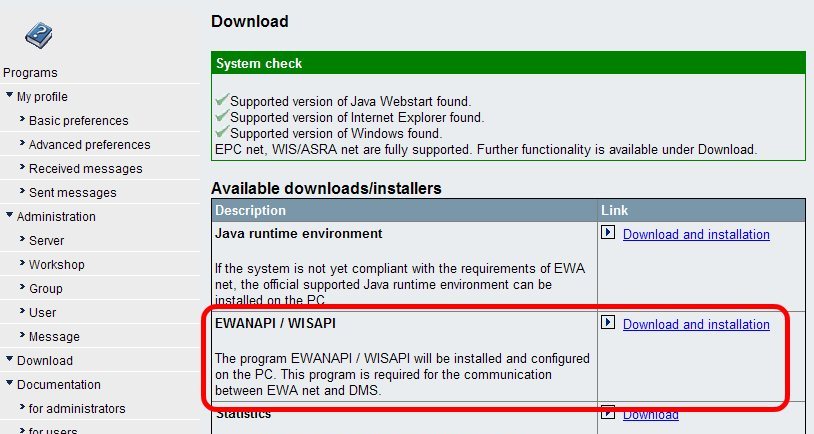
This step can only be performed once a correct version of Java has been installed on the client. If no Java has yet been installed, just install it via the appropriate Download and Install button just above the "EWANAPI/WISAPI" installer link.
15.2.1.1 Server side preparation (System administrators tasks):
The installer will always fetch the most recent EWANAPI installation files from the server installation directory [EWA-HOME]\clientapps\EWANAPI. The following files will be transferred to the clients by the installer:
-
ewanapi.exe
-
wisapi.exe
-
ewanapi.ini
-
hpwin32.dll
-
ewanapi.jar
The executables, the JAR and the DLL will be copied to the client during installation as they are (Note: ewanapi.exe will also be installed as wis.exe during installation on the client for WIS Classic backwards compatibility).
The installer will check the directory for an appropriate ewanapi.ini file to read the settings from in the following order:
- Check for an ewanapi.ini.<workshop_number>.
The idea behind it is to allow a per workshop default setting which allows especially hosters of large central environments a high level of flexibility.
Imagine a workshop still using Autoline 8.2. Let's assume this workshop has the workshop number "XG307". In this case you could copy the ewanapi.ini file with the name ewanapi.ini.XG307. Starting the installer from the download page will fetch the current users workshop information and try to read the workshop specific ewanapi.ini file and run the installation with settings provided there.
- If such a file cannot be found the installer tries to read the file ewanapi.ini.installer.
- If all those files could not be found the installer will fall back to the standard ewanapi.ini file and read its information for the installation from there.
The installer will take care about all these files and will migrate your existing settings during a software update on the server side.
The steps that now will be performed by the installer are
- The installer will check whether there is already a valid installation of EWANAPI on the client. If yes, it will switch itself into the update mode in which it just overrides the current installation with the most recent program files.
- If there is no installation found it will default to the mode which allows you to install EWANAPI completely from scratch on the client. Depending on what has been configured as a default installation directory for the EWANAPI files has already been chosen. This is typically something like "C:\Program Files\EWANAPI" (the Windows default directory for program installation). If really needed a different directory can easily be chosen by use of the "Browse ..." button.
The user running the installer must have sufficient user rights to install files into the chosen directory. Depending on the policies of your local Operating System he may not even be allowed to install files or create directories within "C:\Program Files\EWANAPI". In this case a different directory must be chosen or the user may have to ask the local system administration.
- It creates the installation directory on the target machine inside the selected directory (i.e. the Windows default directory for program installation) as %ProgramFiles%\EWANAPI directory.
- It copies the necessary files from the EWA net server onto the client PC
- It automatically adjusts the configuration file for EWANAPI (if auto-configuration values have been set in the configuration files (see table below). By default these values are being used. The installer makes use of placeholders within the ewanapi.ini file on the server to be expanded during installation within the local ewanapi.ini. See below for more information about these values:
- It extends the Windows system path variable (only if the user executing the installer has sufficient rights to do so; if not: simply extend the user's path variable). This step is needed to allow all system programs to find the ewanapi.exe without the need to know where exactly it is installed (required i.e. for the DMS Autoline)
Now for the tasks that you as system administrator will want to perform to influence the installation on the client side in the best way. The central point is the ewanapi.ini file. It contains a high level of flexibility to influence the client installation.
15.2.1.1.1 Automatic property replacement within ewanapi.ini
The following table documents that placeholders you can make use of if you like some properties to be filled automatically according to the runtime settings.
| Placeholder | Replaced during installation with |
%EWA_HOST%
used for Server= property | Name of the EWA net server the client will connect to.
This must be the same name as the one you use when connecting to EWA net via the browser.
If you run your EWA net with a front end web server this will be the name of the Web server, it does not have to be the one of the EWA net application server which might not be reachable directly in this scenario. |
%EWA_PORT%
used for Port= property | Number of the EWA net TCP/IP port on which to connect to the EWA net server.
This must be the same port as the one you use when connecting to EWA net via the browser.
If you run your EWA net with a front end web server this will be the port of the Web server, it does not have to be the one of the EWA net application server which might not be reachable directly in this scenario. |
%EWA_SECURE%
used for Secure-HTTP= property | Indicates with "true" or "false" whether HTTPS shall be used |
%EWA_WEBSTART%
used for WebStart= property | Will be replaced by the absolute path of the active Java WebStart installation on the client machine. |
This allows high flexibility for the System Administrator. To allow the installer to derive the correct runtime settings from the server and automatically apply it to the EWANAPI installation on each of the clients, the pre-installed configuration file ewanapi.ini may directly be used.
But these values might also be overridden by static values.
Example:
If you specify:
Host=my.ewanet.com
the installer will leave this untouched.
But specifying
Host=%EWA_HOST%
indicates the installer it should replace this pattern by the server name that was used when accessing EWA net via the browser.
The administrator might even decide to let EWANAPI determine the WebStart Installation automatically during runtime. In this case the complete line
WebStart=....
can be omitted or simply commented (default now in the delivered ini-file).
15.2.1.1.2 Influence target installation directory on the client PC
By default the preconfigured ewanapi.ini file will make the client installer install the EWANAPI files into %ProgramFiles%\EWANAPI. This behavior is controlled by the property:
[Installer]
InstallDir=%ProgramFiles%\EWANAPI
If you know of policies that inhibit the normal users in your environment to install in this directory because of insufficient rights do not let them run into trouble. Of course they can select a new path in the client anyway, but be so kind and change the default location already to a path where they will be allowed to install in. A fallback that should always work is:
[Installer]
InstallDir=%USERPROFILE%
15.2.1.1.3 Prefer SSO authentication before provided credentials
[General]
SSOPreferred=true
For environments that make use of NTLM Authentication within EWA net it might be very helpful to enforce EWANAPI to try NTLM authentication first before making use of any credentials provided to EWANAPI. Thus the authentication consists of a maximum of 2 steps:
1) Try to authenticate via NTLM. If this does not succeed, perform step 2
2) Try to authenticate via credentials provided.
This setting might be useful especially within EWA net environments where the EWA net user database is not yet synchronized with the Dealer Directory of Daimler.
A good example is a call from TIPS to EWA net where TIPS expects a user to be setup in the local EWA net system. But if the userid does not exist (is not synchronized) within the local EWA net server, the call will fail.
If the local EWANAPI.ini contains the flag "SSOPreferred=true" and the EWA net server is configured for NTLM authentication then the applet tries to first authenticate via NTLM. TIPS in this case can make the call with userid which is currently known to the underlying Windows system and the local EWA net server.
15.2.1.1.4 Address Proxy settings / problems
Proxy settings will be handled automatically by WebStart in the same way like for all the EWA net clients. If the EWA net clients like WIS net or EPC net or even the EWANAPI Installer itself work fine in a given environment, EWANAPI will do so as well using exactly the same mechanisms in WebStart.
The proxy properties have gone from the EWANAPI.ini file. Adding them will not harm, but the information will not be used anymore by EWANAPI.
15.2.1.1.5 Preparation for Autoline 8.30 / 8.35 integration
Version of Autoline 8.3 and above provide an out of the box support of EWA net via EWANAPI. The tradeoff is that it currently expects some files to be located in the user profile. If those files are not present Autoline 8.3 will not enable the EPC or WIS/ASRA buttons. The best way to install EWANAPI on user's PCs is by use of the following settings - which have to be set on the EWA net server inside the file [EWA-HOME]\clientapps\ewanapi\ewanapi.ini:
[Installer]
InstallDir=%USERPROFILE%
Autoline_82_Enabled=false
Autoline_82_Allowed=false
Autoline_82_WISServer=
Autoline_82_EPCServer=
Modify the EWANAPI file on the server before you start installing EWANAPI on the clients! If you published EWANAPI to a client already before applying those changes on the server side, go ahead and deinstall EWANAPI on that client(s) and then install again after applying the changes on the server.
15.2.1.1.6 Preparation for Autoline 8.2 Emulation layer
For an Autoline 8.2 related installation the section for the Autoline 8.2 emulation layer must look like this - otherwise the user will not see the option for installation of the Autoline 8.2 emulation:
The user installing EWANAPI for an Autoline 8.2 integration must have administrative rights to be able to install distinct files and registry settings on the system for the Autoline 8.2 integration layer.
Once you installed EWANAPI with the Autoline 8.2 support enabled then any classic applications like WIS Classic and EPC FP will not work in an integrated way anymore. Leave the server side of these applications installed, but do not make use of the clients anymore.
A mixed environment is not supported and may lead to confusing situations.
[Installer]
InstallDir=%ProgramFiles%\EWANAPI
Autoline_82_Enabled=true
Autoline_82_Allowed=true
Autoline_82_WISServer=
Autoline_82_EPCServer=
Explanation:
-
InstallDir:
This property provides a recommended default for the user where on the client's PC the EWANAPI files will be installed. You can choose basically whatever directory the user has write access to. It is recommended to keep the given directory unless users run into problems when their PC's have highly restricted policies applied.
-
Autoline_82_Enabled:
Is the Autoline 8.2 emulation layer enabled by default? Should be set to "true". Will only be used if also Autoline_82_Allowed is set to "true".
-
Autoline_82_Allowed:
Is the emulation layer for Autoline 8.2 enabled at all? Must be set to "true" in this case..
-
Autoline_82_WISServer:
Provide the computer name of the server where the WIS server is installed and thus where the network shares for the JOBORDER directory are being accessed from. (\\<server>\JOBORDER)
-
Autoline_82_EPCServer:
Provide the computer name of the server where the EPC FP server is installed and thus where the network shares for the shopping list transfer files directory are being accessed from. (\\<server>\MBXX-mbxx)
EWA net supports a new feature called "AutoDeployment". This feature has been introduced with early Xentry releases as Xentry highly relies on EWANAPI as an integration layer.
The idea of automatic deployment is, that an EWA net user will not have to take care about a renewal of an EWANAPI release on his client. In former times of EWA net, deployment was implemented via a kind of a pull-mechanism, i.e. the user had to check for a new release on the server by himself. By use of automatic deployment, this can be switched now to a push-mechanism, i.e. the user will automatically be notified in case of a new release on the server.
The check of a new release is triggered during the start of the EWA net clients (WIS net or EPC net): after startup, the application will query the current version of EWANAPI on the server. Based on the check of the "Version" field a more recent file on the server can be detected. In such a case the user will be notified. He than can decide to directly install the new EWANAPI or to delay the installation.
Automatic deployment can be controlled by the following attributes as part of the [Installer] section within the ewanapi.ini file(s) on the server:
| Attribute Name | Setting | Behavior |
| Autodeployment | None | Autodeployment will be de-activated, i.e. no notification is given to the user and no automatic installation will be performed.
In order to update an EWANAPI on the client the user must still go into the download area and start the EWANAPI installer on his own.
In Citrix or Terminal Server environments, where the "client" side is also controlled by the server administrator, this feature is turned off. The server administrator is responsible to publish new EWA net versions each time a software update has been performed and should also install EWANAPI on the respective client machines.
The version can visually be compared by checking the Version field in the EWANAPI.ini file on the client against the one on the server inside
[EWA_HOME]\clientapps\EWANAPI.
Especially on environments where EWANAPI is starting up the clients it is highly recommended to switch automatic deployment off as in this case files that need upgrade might be locked. This can lead to confusion on the user's side.
|
| CheckUpdate | Autodeployment will be activated. A notification is given to the user, but only if EWANAPI is already installed on the client and this is older than the one on the server.
If no EWANAPI could be found on the client system, no notification is given at all. |
| CheckInstallAndUpdate | Autodeployment will be activated. As an addition to the setting "CheckUpdate" a notification will also be given if the client does not yet have an EWANAPI installation. If a missing EWANAPI has been detected the user will be asked to install it now. |
| TraceServerChanges | true | It will be checked, if the current EWA net server (as indicated by the URL in the browser) matches the EWA net server configuration in the currently installed EWANAPI.ini file on the client PC. If the servers do not match, the user will get a warning-message to avoid that server settings will be overridden accidently.
Server matching is done by checking server names. If the name check will fail, the IP-addresses will be compared as a fallback. |
| false | No checking will be done. |
| LeaveCookie | true | If set to true, the EWA net clients (EPC net and WIS net) will leave some information (named the EWANAPI "Cookie" within the user's temporary directory. This information can be helpful when i.e Xentry clients want to connect to a local EWA net server and cannot find an EWANAPI installation on the client. |
| | false | No information will be written at all during startup of the clients. |
| TimeoutStillLocked | integer number of seconds | The number of seconds after which a timeout will occur if the files which need to be overwritten during the install process are still locked. |
In addition to these attributes, the following principles will additionally control automatic deployment:
- Automatic deplyoment can be deactivated for performance-tests to avoid unnecessary server contacts and unexpected stops of automatic test flows. Therefore, you have to set attribute ewa.client.connectivity.performance to "true", i.e.
<property name="ewa.client.connectivity.performance" value="true"/>. This setting has to be done inside your jnlp launcher-file.
-
Automatic deployment will never start the installer on Star Diagnosis Systems.
-
The automatic deployment attributes as described above are read from the server in the following cascade (as mentioned already above):
try to find ewanapi.ini.<Workshop ID of user>, i.e ewanapi.ini.000001
if not available try to find ewanapi.ini.installer
if not available try default file ewanapi.ini
-
Automatic deployment will only give a notification, if the server's version of EWANAPI is more recent than the client version or if the client version does not indicate a version at all.
The following diagram shows the complete control of the automatic deployment:
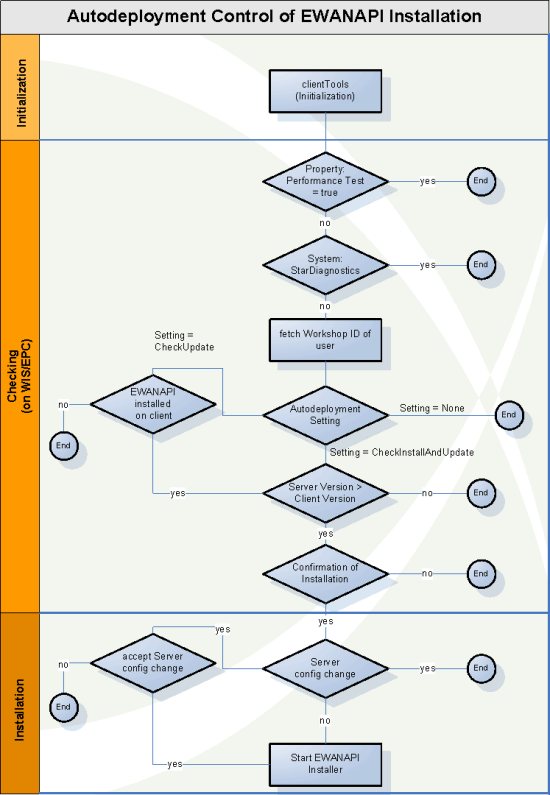
Autodeployment Control
15.2.3 Manual Installation
On the delivery media you will find the WISAPI/EWANAPI program along with the required components in the folder:
[DVD-DRIVE]:\ewa\Apps\ewanapi\application
You can also find it after installation within the server installation directory
[EWA_HOME]:\clientapps\ewanapi
If you want to use these components, installation is fairly simple:
- Copy the folder including all files anywhere you like on the client’s system, i.e.
C:\Program Files\EWANAPI
- Extend the system’s path variable by this folder.
This is needed to ensure that both the executable as well as the DLL can be found.
If you enter “ewanapi.exe” or “wisapi.exe” in a Console window now, you should see a usage information listing all parameter sets that are known to ewanapi.exe.
15.2.4 Configuration
Configuration has to be performed in the ewanapi.ini file. Adjust the values inside this file according to your needs.
- Adjust at least the property “Server” pointing to the application server of your specific application.
- If SSL is used, change “Port” to "8443" (or whatever you have set the secure port to) and set “Secure-HTTP” to "true".
- If you explicitly make use of the property WebStart to clearly tell EWANAPI which Java WebStart it should use, ensure that this property really points to the Java WebStart executable javaws.exe.
As this locations varies with each different version of a client java, you will have to check and possibly adapt it to your special environment.
If you are not sure about the path, just comment this property and let EWANAPI do the job itself. It will then dynamically find the current WebStart application from the Windows Registry. This is the recommended way.
- The variables %HOMEDRIVE% and %HOMEPATH% are Windows environment variables directing to the user's home directory. These do not need to be changed typically.
15.2.5 Proxy Server Configuration for EWANAPI
Proxy settings will be handled automatically by WebStart in the same way like for all the EWA net clients. If the EWA net clients like WIS net or EPC net or even the EWANAPI Installer itself work fine in a given environment, EWANAPI will do so as well using exactly the same mechanisms in WebStart.
The proxy properties that were part of the early configuration files of EWANAPI have gone from the EWANAPI.ini file. Adding them will not harm, but the information will not be used anymore by EWANAPI.
15.2.6 Example of an ewanapi.ini file
Following dump shows a sample ewanapi.ini file. Highlighted properties may be changed already on the server side's ini-file to preset valid values for the clients or may be set on the client side later on:
[HTTP-Config]
##################################
# ATTENTION!!!
##################################
# Some parameters are being set to
# %EWA_xxx%
# These will be replaced by the automatic installer for EWANAPI
# If you want to make those values explicit or do not distribute EWANAPI via the installer,
# please adjust the values on your own before distributing EWANAPI.
# EWANAPI will not work if it is being installed with those values during runtime.
##################################
#
#
# Name of the Server where the AccessGateway is installed
Server=%EWA_HOST%
# Server=localhost
#   if you want to state a server explicitly for all clients in advance
#
# Port on which the application is listening
# Typically this is 9000 for a normal HTTP connection, 8443 for a HTTPS connection
Port=%EWA_PORT%
# Port=9000
#   if you want to specify a port explicitly for all clients in advance
#
# Will you use HTTPS for a secure connection?
Secure-HTTP=%EWA_SECURE%
# Secure-HTTP=false
#

[Files]
# Where to store data files
# For future use maybe, not yet supported
WIS-Net_DATA=%HOMEDRIVE%%HOMEPATH%\data_wis.txt
WIS-Net_ERROR=%HOMEDRIVE%%HOMEPATH%\error_wis.txt
EPC-Net_DATA=%HOMEDRIVE%%HOMEPATH%\data_epc.txt
EPC-Net_ERROR=%HOMEDRIVE%%HOMEPATH%\error_epc.txt

[General]
Version=1.5.2.0
# Maximum seconds to wait until application has to respond on the channel
Timeout=60
# For STAR DIAGNOSIS and STANDALONE environments set this to "true"
Standalone=false
# Let the system find the file on its own
#WebStart=%EWA_WEBSTART%
# WebStart=%ProgramFiles%\Java\j2re1.4.2_05\javaws\javaws.exe
Extended_Parameters=
#WIS-Net_StarterApplication=%ProgramFiles%\Citrix\ICA Client\wfcrun32.exe "%ProgramFiles%\EWACTXCL\CTX-WIS.ica"
#EPC-Net_StarterApplication=%ProgramFiles%\Citrix\ICA Client\wfcrun32.exe "%ProgramFiles%\EWACTXCL\CTX-EPC.ica"
SSOPreferred=false

[Standalone]
WIS-Net_EXE=%WISNETEXE%
# Not yet supported as there is not yet a standalone EPC net
EPC-Net_EXE=%EPCNETEXE%

[Installer]
# For Autoline 8.3x support choose
# InstallDir=%USERPROFILE%
InstallDir=%ProgramFiles%\EWANAPI
Autoline_82_Enabled=false
Autoline_82_Allowed=false
Autoline_82_WISServer=
Autoline_82_EPCServer=
# How do we want to control the automatic publication of EWA net clients?
# Valid values are:
# None: No check will ever be performed by this client
# CheckUpdate: Checks for new versions will only be performed if there is already an EWANAPI locally installed on that client
# CheckInstallAndUpdate: Enforce updates and even new installations if there is not yet an EWANAPI locally installed on that client
Autodeployment=CheckInstallAndUpdate
# Do we want to trace whether we accidently moved to another EWA net server?
# true: it will be monitored whether the current connection contacts the same server as the one registered inside EWANAPI
# false: there is no monitoring active at all
TraceServerChanges=true
# Do we want to leave an EWANAPI cookie on the client ?
# true: the client will leave the information about: EWA net Server, HTTP-Port and HTTP(S) inside a small ".ewanapi_cookie" file in the user's home directory
# false: no cookie will be left
LeaveCookie=true
# The number of seconds after which a timeout will occur if the files which need to be overwritten during the install process are still locked.
TimeoutStillLocked=120
16.1 Introduction
When having the EWA net server installed the administrator needs to ensure that it will be up and running most of the time. EWA net therefore enables the administrator to monitor the installation as well as the running instances with a central interface.
The first approach for monitoring the state of the server is to check if it is reachable using the browser. If the server is not reachable a view to the log files will be the second step to check why the server is not available.
It is always recommended to modify the logging depending on your needs. further details regarding logging are described in the advanced configuration section for logging.
Besides the logging information and the browser checks, EWA net provides an additional interface to monitor the runtime state of the server. The requirement for this additional interface is, that the Java server is active. If enabled, runtime monitoring information of the application can be retrieved very detailed using a separate interface.
16.2 Management Interface Architecture
The management interface of EWA net is based on the Java Management Extensions (JMX) standard. EWA net as application integrates into the existing management frameworks on the given application server. Besides the documented features, the common JMX standards and features also apply on the EWA net implementation.
The JMX architecture is built according to a three-level model. This gives flexibility by allowing subsets of the specification to be used individually by different developer communities utilizing Java technology.
-
Instrumentation level - gives instant manageability to the objects of the application. The application components can expose different parts for management.
-
Agent level - provides management agents. JMX agents are containers that provide core management services which can be dynamically extended by adding JMX resources. EWA net ships per default using a HTTP adapter to allow management via Browser. However further adapters can be applied.
-
Manager level - provides management components that can operate as a manager or agent for distribution and consolidation of management services. This level is aimed at the management solutions development community and completes the management through Java technology provided by the Agent level. The manager level is not distributed within EWA net and needs to be build specific for every installation. This will be depended of the environment of the installation.
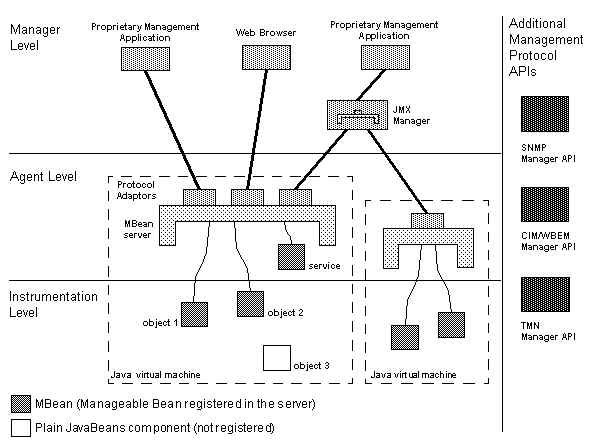
Further documentation of the JMX capabilities and limitations can be found on the JMX homepage http://java.sun.com/products/JavaManagement.
16.3 Management Configuration Options
The management service inside EWA net is disabled per default. To use the EWA net management features you need to enable the service in the configuration. When enabling the management service, please do not forget to also modify the other parameters as they are very important for the security.
All management service related parameters are contained in in [EWA_HOME]\config\core_cfg.xml. The following options are relevant for the management service interface:
Section Services / ManagementService:
All options in this section configure the management service in general.
| Parameter | Example Value | Description |
| managementEnabled | true / false | Set this to "true" or "false" if the Management Service is active. Per default this parameter will be false, so the management of EWA net will be disabled. |
Section Services / ManagementService / HttpAdapter:
Options in this section configure the behavior of the HTTP adapter which ships together with EWA net.
| Parameter | Example Value | Description |
| httpEnabled | true / false | Set this to "true" or "false" if the HTTP Management Adapter is active. When setting this to "true" it will be possible to monitor the server using the browser. If this option is set to "true" and the management service is enabled, EWA net will start the HTTP adapter at startup. |
| httpPort | 9030 | TCP port on which the HTTP adapter is listening for incoming connections. |
| httpHost | localhost | Remote host to which requests will be answered. Default is to use only "localhost". This will prevent management interface connections from remote hosts. "0.0.0.0" will open the interface to the local network. Enter a network subnet mask here to define from which hosts connections should be allowed. |
| authenticationMethod | none / basic / digest | Sets the authentication method. Valid values are "none", "basic", "digest". Defaults to "none". Since the HTTP adapter starts a separate web server, this configuration is independent of the other server configuration. |
| managementUser | admin | User name to run the management Web interface. Only applicable if authentication method is not "none" |
| managementPassword | admin | Password corresponding to the username above. Note: this password must be supplied using plain text. |
| stylesheetPath | webapps\EWA-net\xsl | Path where the XSL transformation style sheets for the HTML view are located. This defaults to: "webapps\EWA-net\xsl", relative paths are calculated based on the EWA root directory |
16.4 Management Interface Usage and Options
To use the management HTTP interface, log in as administrator on the EWA net server and navigate to "Server Management".
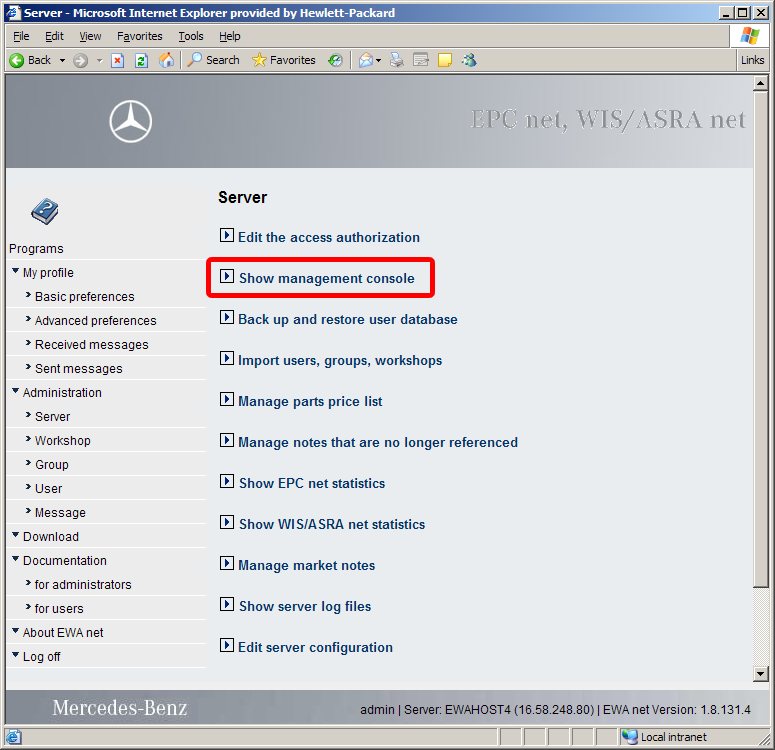
Then use the link presented at "Show Management Console" to run the HTTP adapter page.
When this link is disabled, please check the configuration.
If the page is displayed you will see an overview screen of the server state which allows to drill down to details.
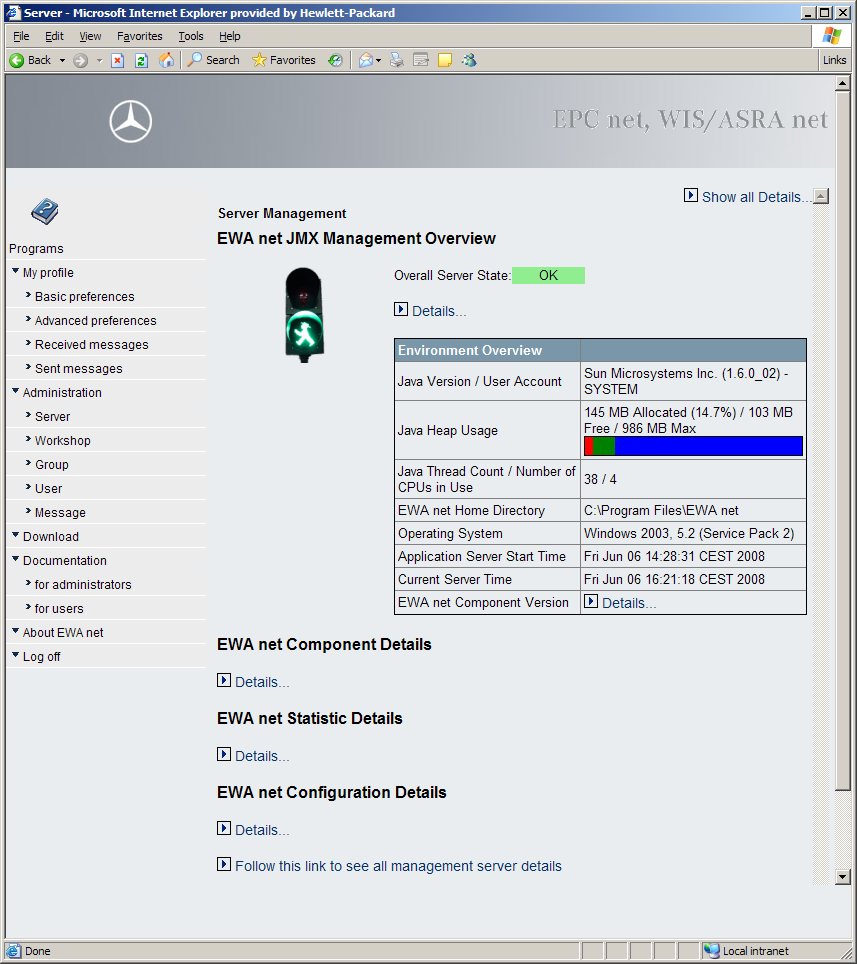
When clicking on the details links, details of components, configuration and statistics will be displayed.
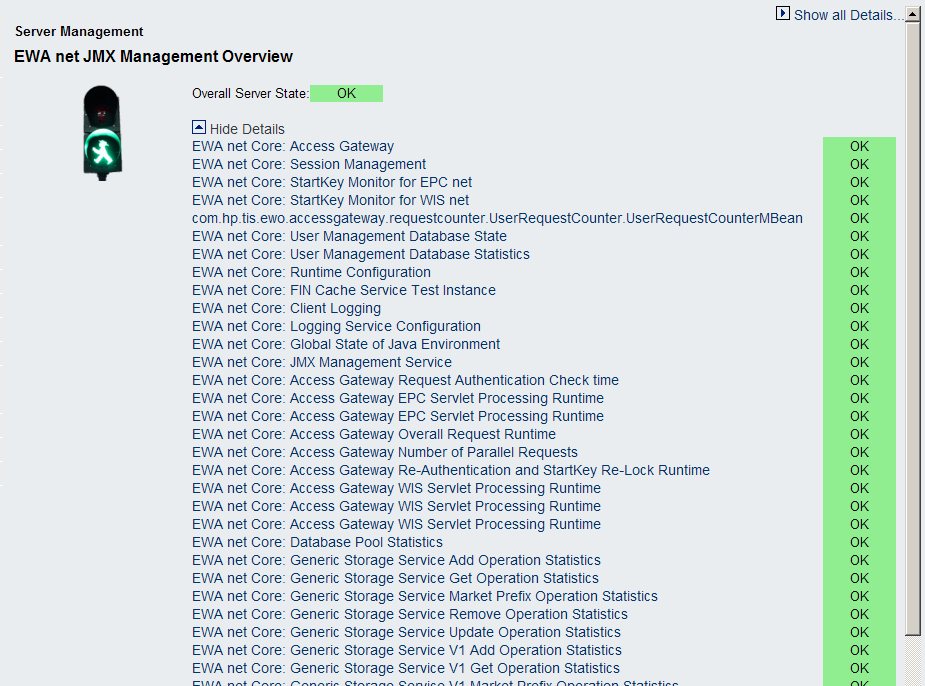
Using the link "Follow this link to see all management server details" will open up the regular JMX console and display all management object details.
16.4.1 Web Server Interface
The web server will expose all its internal management objects to the EWA net management service. All components which are listed beneath "Other Domains" in the overview page are exposed by the web server or the JMX implementation itself.
A detailed description of the possible options of the objects are described on the screen.
For further details, please refer to the documentation of Tomcat.
16.4.2 EWA net Core Components Interface
The EWA net core components are exposing with a name beginning with "EWA net Core: ". Several objects are included to view details of the server runtime and monitor the state as well as performance metrics. Some self test beans are available to run tests and verify that business logic is still working correctly.
The EWA net management information is separated into State, Statistic and Configuration sections. Please drill down into the management page to figure out which options apply. The statistics section for example provides an overview how long request processing for each application takes as average or how long authentication takes to process. If you experience performance options you can monitor the statistics numbers.
The State of the EWA net core components also provides information about access authorization usage.
16.4.3 EPC net Interface
DBStatus:
The link which is provided as "EWAnet.com.proquest.epc.entity.state.management.DBStatus:type=ewacomponent" shows details of the EPC database connection state
- "ConnectionCount": Shows the number of current database connections
- "ErrorCount":Shows the number of errors which have encountered since the server was restarted
- "LastErrorMessage": Displays the last error message which caused a database error. If no error had occurred yet, this message is empty.
LoggingLevel:
The link labeled with "EWAnet.com.proquest.epc.entity.state.management.LoggingLevel:type=ewacomponent" displays details of the management object which wraps the EPC logging interface. With this object it is possible to modify the logging behavior of EPC during runtime.
- "LoggingLevel": shows and sets new values to the logging filter of EPC
- "LoggingLevelDescriptions": displays all possible values for setting new logging levels
16.4.4 WIS net Interface
WisAsraRequestStatistic:
Please follow the link of "EWAnet.dcx.wis_online.server.net.WisAsraRequestStatistic:type=ewacomponent" to see the WIS net request statistic.
This statistic object will contain all collected statistics of the WIS net application back end part.
- The attribute "DBPoolData" shows detail about the database connection pool.
- The attribute "ImageCacheData" shows details about the images which have been cached in the WiS net server.
- Click on the link in the line "StatisticData" to see the detailed runtimes of several operation details.
16.4.5 Retrieving Management Information
The Management information is available through 4 interfaces:
- Log on as administrator onto the administration page and use the menu "Administration" --> "Server Management" --> "Show Management Console". This will generate a basic interactive overview in your browser rendered as HTML. This is for use for simple checks and basic overview.
- Use the HTML management interface provided by the build in management server which is configured in core_cfg.xml. The URL is usually http://localhost:9030/ on the application server. This overview will basically list all components with the base data. All information is presented "as-is" without aligning into functionality groups. You can click on each entry to view details of attributes.
- Download XML information using the Administration interface of EWA net. For details about retrieving XML information see the following chapter
- Attach a JMX Adapter to the application server and connect this to your monitoring infrastructure.
16.4.6 Retrieving XML Information of Management Information
To retrieve Management information of the server, call the server with a URL like the following:
http://myewanet:9000/EWA-net/jmx?userid=admin&password=secret
This will generate output similar to the management overview page discussed in previous chapters. Besides the basic generation further options can be specified on the URL. Please see the following table about possible options:
| Option | Example | Description |
| userid | userid=admin | User account to use for authentication. The provided user account must be existing on the server and belong to the server administrators. Regular users have no access to management information! |
| password | password=secret | Plain text password of the administrative account. |
| template | template=identity | Name of the XSLT template to apply to the responded XML output. If this parameter is not provided, the default style sheet "xsl/jmxview.xsl" is attached to the XML content. If you specify "identity" as style sheet name, NO style sheet will be applied to the generated XML. |
| plain | plain=true | Omits generation of language resources into the XML file. If you download the XML just for automated processing it is recommended to provide this option to enhance response speed and minimize XML file size (which is usually around 250KB and takes around 500ms to generate). |
| filter | filter=EWAnet | restricts XML generation to all management beans of which name contains the given filter string. If you just want to monitor certain pieces of the server it is recommended to call several times using a filter to minimize XML generation impact on the machine and reduce overhead for XML parsing for results. Without specifying a filter the generated XML sizes around 250KB, |
17.1 Introduction
An important goal of the EWA net system is it to answer clients in a reasonable good time. The system has to do this under extreme circumstances. It may has to process a lot of requests from many clients in parallel. Sometimes it will be the only solution to add new hardware to deliver an acceptable good overall performance. Still, often the system performance can be improved drastically by tuning some configuration parameters, since most times standard parameters are not optimized for performance but for stability. Which settings are most effective without reducing system stability has to be figured out during stress tests at the hosting site. This guide will address some common performance issues, and it gives a solution approach for each identified issue. The guide does not claim to address all possible performance issues. Especially the optimization of the operating system and application server should be core competence of the individual hoster.
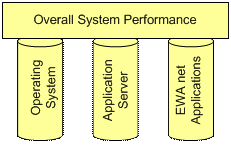
Figure: Pillars of Performance
The general approach is it to optimize performance in three different system “parts” (pillars) on the local machine (optimization besides the server itself or hardware optimization are out of the scope of this guide).
- The operating system has to be configured for a server system. E.g. the socket settings of the system need to be appropriate for a large number of parallel requests.
- The applications server needs to be configured for the specific scenario (e.g. number of requests per second, typical response time, …).
- The EWA net applications (including commonly shared components like the Access Gateway) need to be optimized for the specific system environment (e.g. depending on whether the User Management resides in the LAN or a WAN).
Each of these three areas needs to be optimized to get the best overall system performance. Tuning those can improve performance by much more than 100% in total. It also can help stabilizing the system by setting it up for the expected amount of concurrent requests. The following sections will address some of those performance issues. Still, all settings have to be verified for the specific hosting environment.
First step is to tune the operating system where the application server resides on.
17.2.1 Socket Timeout (Windows)
Description: The default timeout for tcp sockets is set to 240 seconds. That means a socket waits 240 seconds on its last usage until it closes. Due to the limited number of available sockets this effectively reduces the maximum number of connections.
Solution approach: If the registry value “TcpTimedWaitDelay” is not in the registry, create that value. Set the value to 30 (or any feasible low value).
System Key:[HKEY_LOCAL_MACHINE\System\CurrectControlSet\Services\Tcpip\Parameters]
Value Name: TcpTimedWaitDelay
Data Type: REG_DWORD (DWORD Value)
Value Data: 30 - 300 seconds (decimal)
For details refer to http://www.winguides.com/registry/display.php/878/
17.3.1 Memory consumption the application server Java Runtime
Description: The memory consumption and usage of the Java Runtime Environment can be optimized. Since the java virtual machine is the basis for the application server and the server side application modules this can have noticeable impact on overall system performance.
Solution: Virtual machine standard settings might be okay, but is typically very "defensive". So tuning the settings of the java virtual machine for memory usage and garbage collection will provide a good chance to improve performance.
E.g. configure the initial and maximal heap size for the java virtual machine, depending on the physical memory of the server machine and the memory usage of the running application server. VM Argument can be added. As a default the argument ‘-Xms32m’ is set. It defines the initial heap size of the virtual machine to 32 MB.
The maximum heap size should be increased to a meaningful value depending on your available physical server memory and the number of other memory requests from other applications running on the server. Java defaults to 64 MByte in the JRE 1.4 platform if this is not overridden by an explicit option. A good rule of thumb is to allow a maximum heap size of 1/4 of the available physical memory.
Example: 1GB of server memory -> add the option "-Xmx256m"
For Tomcat you will have to check the registry.
- Find the key "HKEY_LOCAL_MACHINE\SYSTEM\CurrentControlSet\Services\EWA net Server\Parameters"
- Find the value of the key "JVM Option Count".
- Check whether one of the keys "JVM Option Number <X>" already contains the "-Xmx<..>" or "-Xms<..>" parameters. If yes, just modify them to your needs.
- If they do not exist:
Add another "JVM Option Number <X+1>" and set as value "-Xmx256m" for 256 MByte of maximum heap.
Increase the value of "JVM Option Count" by 1 to ensure that this parameter will provided to the JVM.
As the general performance of modern machines is growing constantly more and more Users can connect to one server at the same time. The increased number of connections lead to an increased number of threads on the Tomcat Server. So servers under heavy load should increase the maxThreads value to 400 in the server.xml.
        <Connector port="8443"
                   protocol="HTTP/1.1"
                   maxHttpHeaderSize="8192"
                   acceptCount="300"
                   maxThreads="400"
                   minSpareThreads="25"
                   maxSpareThreads="75"
                   enableLookups="false"
                   scheme="https"
                   secure="true"
                   clientAuth="false"
                   connectionTimeout="60000"
                   disableUploadTimeout="false"
                   keystoreFile="[EWA_HOME]/certificates/ewanet.jks"
                   keystorePass="changeit"
                   sslProtocol="TLS" />
At some points the applications can be tuned for better performance.
17.5.1 Logging (AccessGateway)
Description: The AccessGateway and the HP Services feature a logging mechanism. The logging setup may eat up system performance, if many entries are written to the hard disk. Because this may interfere with local database access or other file operation.
Solution: In the HP configuration of the logging (log4j_config.xml) tune the settings for the logging. You can adjust the level (and in relation to that the amount of info) to be logged.
Example:
[...]
<root>
  <priority value="INFO"/>
  <appender-ref ref="HTML" />
  <appender-ref ref="STANDARD_FILE" />
  <appender-ref ref="DCMONFILE_ERROR" />
</root>
[...]
If you set this to “DEBUG” you will get a lot of information - too much for a typical runtime environment. Do this only in case that your system has trouble. Too much logging will end in a heavy server performance decrease.
17.6.1 Shared Memory Configuration for Transbase
Description: With the standard installation of Transbase (valid for all TransBase versions <= 5.3.1.47) the Multiplexer service will be installed to run under the local system account with the option “Allow service to interact with desktop” unchecked.
This setting will limit the amount of shared memory that can be used for TransBase connection processes. That way large installations might run into problems if a lot of connections are in use (there is no fixed limit – it varies from system to system).
Solution: There are two ways now to address this limitation:
1) Please set the property “Allow service to interact with desktop” for the TransBase services is set in the registry to "true".
2) Directly go to the registry with “regedit.exe”.
Go to the hive “HKEY_LOCAL_MACHINE\SYSTEM\CurrentControlSet\Services\”
and edit the entry “Type” in each of the hives
”EWA net DB Core”
”EWA net DB WIS net”
”EWA net DB EPC net”
Modify the initial HEX-Value from “0x10” to “0x110”
This will already be done by the installers for the TransBase versions used by the Core and by WIS net.
There is also a knowledge base entry from Microsoft regarding general memory limits of windows background services. See the knowledgebase entry at http://support.microsoft.com/default.aspx?scid=KB;EN-US;Q184802&
In short words you can use the registry editor and modify the value
HKEY_LOCAL_MACHINE\System\CurrentControlSet\Control\Session Manager\SubSystems\Window
Editing this value you will find a string part indicating something like
“... SharedSection=1024,3072,512 ...”
Modify the 3rd value to at least 1024. This will have an effect an all background services running on Windows.
17.6.2 Increasing WIS net Transbase Cache Settings
Description: The WIS net database is configured per default with very conservative caching settings. In Load tests an increase of the database cache sizes can increase the performance.
Solution: To discover the current settings for caching inside Transbase WIS database execute the following command:
[EWA_HOME]\database\TransBase WIS>tbadm32 -i wisnet
@(#) tbadm32
Version: V5.3.1.53 (Build 410) 2004/05/24 (Release)
License: 32966BFA-F9944C00-22F9F47F-F581F07D

U.S.-Patent Nr. 6,381,596 and 6,510,335

Copyright (c) 1987 - 2004 by Transaction Software, D 81737 Munich


Database Name       = wisnet@schefflerjens
Database Home       = C:\Data\026_EW~1\Install\database\DATABA~2\wisnet
Bfim/Log Path       =        ~\bfims
Scratch Path        =        ~\scratch
Accounting Path     =        ~\account\acctlog

Size(MB) Blob Diskfile Path
     976   No C:\Data\026_EW~1\Install\database\DATABA~2\wisnet\disks\tbdsk001

Database Romfile(s)
C:\DB\WIS\wisnet\012005~2\R0\rfile000                    on CD-ROM 'CD_1'
C:\DB\WIS\wisnet\012005~2\R1\rfile001                    on CD-ROM 'CD_2'
C:\DB\WIS\wisnet\012005~2\R2\rfile002                    on CD-ROM 'CD_3'
C:\DB\WIS\wisnet\012005~2\R3\rfile003                    on CD-ROM 'CD_4'
C:\DB\WIS\wisnet\012005~2\R4\rfile004                    on CD-ROM 'CD_5'
C:\DB\WIS\wisnet\012005~2\R5\rfile005                    on CD-ROM 'CD_6'
C:\DB\WIS\wisnet\012005~2\R6\rfile006                    on CD-ROM 'CD_7'

Page Size           = 2     KB          Rom Size            = 4687  MB
Data Cache          = 512   KB          Sorter Cache Size   = 512   KB
Number of Users     = 254               Dbident             = 211
DB Type             = CD_Retrieval      DB-Identification   = RETRIEVAL SYSTEM
min multiplexed     = 0                 max multiplexed     = 0
Locale setting      = German_Germany.125Codepage            = Propriet
Accountlog          = off (NONE)
Case Insensitivity  = off               Status              = booted
Encryption = no
When increasing the cache sizes, it is proposed to extend data and sorter cache sizes in an equal number. The configured amount of space will be allocated during startup of the database. The allocated memory will be shared within the database instance.
You need to ensure that for changes of the cache sizes enough system memory is available. The cache setting for all WIS net and EPC net databases needs to be suitable for the amount of memory available.
To change the cache values, execute the following commands:
Step 1: Stop EWA net Server
[EWA_HOME]\database\TransBase WIS>net stop "EWA net Server"
The EWA net Server service is stopping.
The EWA net Server service was stopped successfully.
Step 2: Stop EWA net WIS Database
[EWA_HOME]\database\TransBase WIS>net stop "EWA net DB WIS"
The EWA net DB WIS service is stopping.
The EWA net DB WIS service was stopped successfully.
Step 3: Modify the Cache Settings (This example: 2MB data + 2MB sorter cache)
General command line of this command is:
tbadm32 -af wisnet nc=<data cache> lc=<sorter cache>
The cache size is defined as Kilo-Bytes (KB). If more than 2MB should be used for data cache, you need to add a muliplier to define the number of cache pages, for example:
| Data Cache Size | Sorter Cache Size | Command Parameters |
| 512KB (default) | 512KB (default) | nc=512 lc=512 |
| 2MB | 512KB | nc=2048 lc=512 |
| 2MB | 2MB | nc=2048 lc=2048 |
| 8MB | 8MB | nc=4*2048 lc=8192 |
| 16MB | 16MB | nc=8*2048 lc=16384 |
[EWA_HOME]\database\TransBase WIS>tbadm32 -af wisnet nc=8*2048 lc=16384
@(#) tbadm32
Version: V5.3.1.53 (Build 410) 2004/05/24 (Release)
License: 32966BFA-F9944C00-22F9F47F-F581F07D

U.S.-Patent Nr. 6,381,596 and 6,510,335

Copyright (c) 1987 - 2004 by Transaction Software, D 81737 Munich


alter database wisnet: shutdown, entry altered, database booted
Step 4: Check the settings again
[EWA_HOME]\database\TransBase WIS>tbadm32 -i wisnet
@(#) tbadm32
Version: V5.3.1.53 (Build 410) 2004/05/24 (Release)
License: 32966BFA-F9944C00-22F9F47F-F581F07D

U.S.-Patent Nr. 6,381,596 and 6,510,335

Copyright (c) 1987 - 2004 by Transaction Software, D 81737 Munich


Database Name       = wisnet@schefflerjens
Database Home       = C:\Data\026_EW~1\Install\database\DATABA~2\wisnet
Bfim/Log Path       =        ~\bfims
Scratch Path        =        ~\scratch
Accounting Path     =        ~\account\acctlog

Size(MB) Blob Diskfile Path
     976   No C:\Data\026_EW~1\Install\database\DATABA~2\wisnet\disks\tbdsk001

Database Romfile(s)
C:\DB\WIS\wisnet\012005~2\R0\rfile000                    on CD-ROM 'CD_1'
C:\DB\WIS\wisnet\012005~2\R1\rfile001                    on CD-ROM 'CD_2'
C:\DB\WIS\wisnet\012005~2\R2\rfile002                    on CD-ROM 'CD_3'
C:\DB\WIS\wisnet\012005~2\R3\rfile003                    on CD-ROM 'CD_4'
C:\DB\WIS\wisnet\012005~2\R4\rfile004                    on CD-ROM 'CD_5'
C:\DB\WIS\wisnet\012005~2\R5\rfile005                    on CD-ROM 'CD_6'
C:\DB\WIS\wisnet\012005~2\R6\rfile006                    on CD-ROM 'CD_7'

Page Size           = 2     KB          Rom Size            = 4687  MB
Data Cache          = 16    MB          Sorter Cache Size   = 16384 KB
Number of Users     = 254               Dbident             = 211
DB Type             = CD_Retrieval      DB-Identification   = RETRIEVAL SYSTEM
min multiplexed     = 0                 max multiplexed     = 0
Locale setting      = German_Germany.125Codepage            = Propriet
Accountlog          = off (NONE)
Case Insensitivity  = off               Status              = booted
Encryption = no
Step 5: Start the WIS Database
[EWA_HOME]\database\TransBase WIS>net start "EWA net DB WIS"
The EWA net DB WIS service is starting.
The EWA net DB WIS service was started successfully.
Step 6: Start EWA net Server again
[EWA_HOME]\database\TransBase WIS>net start "EWA net Server"
The EWA net Server service is starting.
The EWA net Server service was started successfully.
Results from first performance tests showed that the database performance did not very much increase when setting cache sizes to very high numbers of ~100MB. Ideal tuning parameters are currently not available but the current assumption is that a small value is sufficient for most cases.
The cache sizing will be overwritten by AdminTool whenever the database is switched and/or updated. You need to take care that the configuration in re-applied after each data update!
17.6.3 Connection pool (WIS net)
Description: WIS net uses a connection pool mechanism to access the local WIS database via JDBC. This pool is based on the open source connection pooling implementation from the Apache Group. You can fine tune the maximum amount of open connections to your needs.
Solution: Optimizing the connection pool settings can reduce the database connection overhead (i.e. opening and closing connections). For higher load (and also productive environments) the rule of thumb is to set the connection pool size to the estimated number of concurrent user requests on the server. For Stress tests this would be the number of virtual users.
Example:
<SECTION name="pool">
  (...)
  <SECTION name="db">
    (...)
    <PARAMETER name="size">50</PARAMETER>
    (...)
</SECTION>
</SECTION>
Please refer to the WIS net configuation section for more details.
18 General Information
18.1 Filesystem structure
The following sections provides a short overview over the disc layout to give a better understanding of what to find in which directory.
|
Directory
|
Description/Example files
|
|
ewa\Apps\ewacore\
|
AccessGateway and UserManagement
|
|
application\
|
EWA-net.war
hp_services.jar
log4j-1.2.8.jar
tbjdbc.jar
|
|
config\
|
core_cfg.xml
license.xml
server.xml
um_batch_cfg.xml
um_cfg.xml
|
|
doc\
| |
|
resources\
|
|
|
properties\
|
coreClient_Res.properties
coreServer_Res.properties
...
|
|
tools\
|
qml.jar
tb_ewo.qml
|
|
ewa\Apps\wisnet\
|
WISnet components
|
|
application\
|
Application specific files.
|
|
config\
|
wis_cfg.xml (containing installer variables
%FULLDNSNAME%, %WEB_PORT%, …)
|
|
doc\
| |
|
resources\
|
|
|
properties\
|
Single files for the default message catalogues.
This file will be delivered in German.
wis-net_Res.properties
wis-net_Res_de.properties
|
|
online-help\
|
HTML- and other files within a zipped file (if online help is being delivered by danet at all).
|
|
ewa\Apps\epcnet\
|
EPC net components
|
|
application\
|
EPC-net.war
|
|
doc\
| |
|
resources\
|
|
|
online-help\
|
HTML- and other files within a zipped file (if online help is being delivered by ProQuest at all).
epc-net_Help.zip
|
|
properties\
| Fallback message catalogues. |
|
resources\
|
This folder is intended to be filled by Daimler after delivery from the system integrators. The installer program(s) will also look into this folder structure and by that allow that Daimler “overrides” i.e. message catalogue strings, adds new translations, replaces splash-screens, adds Online-Help,…
|
|
properties\
|
Files containing the localized message catalogues one per file. Daimler is free in copying and modifying the default catalogues as provided by the system integrators. Examples:
wis-net_Res.properties
wis-net_Res_en_US.properties
wis-net_Res_de_DE.properties
wis-net_Res_fr.properties
coreClient_Res_de.properties
coreClient_Res_fr.properties
coreServer_Res_de.properties
coreServer_Res_fr.properties
wis-net_installer_Res.properties
core_installer_Res.properties
|
|
images\
|
For future use
May allow Daimler to replace/add images that are being used by components
|
|
fonts\
|
For future use
May allow Daimler to replace/add fonts that are being used by components
|
|
online-help\
|
Repackaged by Daimler
wis-net_Help.zip
|
|
\Control
|
This folder is intended to be filled by Daimler after delivery from the system integrators. The installer program(s) will also look into this folder structure
|
|
\install
|
The ini-files which control the overall installation.
|
|
|
Possibily additional ini-file which allow Daimler to restrict the installation to specific systems. (In WIS-Classic there are ini-files which prohibit the programs from being installed on certain operating systems or service packs. This is essential to ensure good support.)
|
|
Apps\...
|
Other Third party applications.
Not described here. Part of the installer specification.
|
|
tools\...
|
This is a general purpose directory which can serve as a repository for any global tools which need to be delivered. For example, all installers require a tool for zipping/unzipping compressed files; this tool can be stored here, eliminating the need for multiple copies of this tool in the multiple subfolders which require it.
|
|
…
|
|
This section describes the target layout of the EWA net directory which you will do your modifications and adjustments in. Folders that remain untouched are being displayed with a grey background.
|
Directory
|
Description of content
|
|
[EWA_HOME]
|
Root directory of EWA net installation
|
|
\config
|
Contains the XML config files for EWA net
|
|
\database
|
Database folder.
|
|
\install
|
Installer directory
|
|
\logs
|
Will be used to write service specific log information
|
|
\webapps
|
Webapplications: Accessgateway, WIS net, EPC net
|
|
\server
|
Root directory of the application server installation
|
|
bin\
|
Standard application server directory for binaries.
You find the jvm.config file here, which has to be modified as described later.
|
|
common\lib\
|
Directory for overall application libraries
|
|
conf\
|
TomCat configuration files
|
The purpose of the Backup and Migration Tools is to help with the backup and the migration of workshops, groups and users. It is an command-line based tool which allows an easy integration into scripts. Because its dynamically configurable even big clusters can be backupped dynamically.
19.1.1
19.1.2 Configuration of the Backup and Migration Tool
The basic configuration is done with a configuration file. This File uses the standard Java-properties-syntax. This means that the different parameters are written like this:
parameter-value = value.
Comments have to be market with a # (=Hash sign).
This configuration-file contains the following types of parameters:
-
Task type
-
Data-Source
-
Data-Target
-
Filters
The task-type defines what kind of task should be performed. Data-Source and Data-Target contains information if the source or the target is a file or a database.
Filters specify if only specific datasets should be copied.
The following section describes the configuration-parameters which have to be listed in the configuration-File.
Currently there are the tasks Copy and Migrate where copy just copies the data from source to target while migrate is also deleting the data from the *source. Please note that just the Workshops, Groups, Users and the GeneralStorageService(GSS) is copied with this tasks. Fins and sessions are ignored. To copy the whole content use the Backup-Task. Note that that is just valid if you are copying an database to an file.
So a valid entry in the config-file would be: Task=Copy
*Here is an List with the possible configuration of tasktypes and tasks
|
Operation
|
Copy
|
Migrate
|
Backup
|
|
File 2 File
|
X
|
X
|
|
|
Database 2 File
|
X
|
X
|
X
|
|
File 2 Database
|
X
|
|
|
|
Database 2 Database
|
X
|
X
|
|
The description of source and target is achieved with the prefix Source or Target followed by the data provider. So a valid call for a source file would be Source.File=c:\\backup.xml.
Note that if your target is a file then there is the opportunity to add wildcards so that there is a timestamp and/or the hostname/ipaddress added to the name of the backup xml-file. This allows the user to run automated backups without overwriting the old backups and recognize the machine from where the backup came.
Note:
If you use the wildcard %hostname% then the hostname is extracted from the source-database-connection-string
To use the wildcard insert an %timestamp% and/or %hostname% in the filename. So an example-statement looks like this:
Target.File=c:\\%timestamp%_backup.xml
This will result in an file which will look somewhat like this: 2007.12.20-01-01-01_backup.xml. It will be located in c:\ .
Another sample would be:
Target.File=c:\\%hostname%_backup.xml
This will result in a file which will look somewhat like this: 16.57.51.133_backup.xml depending on the sources IP-Address.
Note:
To allow special character to appear in the configuration file, a backslash needs to be escaped.
The description of a database consists of four parameters.
Note:
The database driver must be in the same directory where the EWA BaM-tool resist.
The Database-drivers and connections-strings for the standard EWA net databases are listed below:
|
Database type
|
Driver class name
|
URL
|
Username
|
Password
|
|
Transbase
|
transbase.jdbc.Driver
|
jdbc:transbase://localhost:2044/ewacore
|
tbadmin
|
|
|
DB2
|
com.ibm.db2.jcc.DB2Driver
|
jdbc:db2://localhost:50000/EWO
|
EWO
|
ewo
|
|
SQL-Server
|
com.jnetdirect.jsql.JSQLDriver
|
jdbc:JSQLConnect://localhost:1433;databaseName=EWO
|
ewo
|
ewo
|
For example a valid database-description would look like:
Source.DBDriverClass=transbase.jdbc.Driver
Source.DBURL=jdbc:transbase://localhost:2044/ewacore
Source.Username=tbadmin
Source.Password=
There are several filters provided to copy just parts of the data. These are User, UserGroup and Workshop.
User copies a specific user including the related user group and workshop.
UserGroup copies all related users to listed Group as well as the related workshops.
Workshop copies all related groups und users for the listed workshop.
A Filter works always no matter if a copy or restore-process is started.
There is just one filter-type at once allowed.
Each ID of the desired Entity has to be listed on a new line with an unique number which is increased by one compared to its ancestor. The fist filter entity has to marked with a one .
So the content of a workshop-configuration-file could look like this:
Filter.Type=Workshop
Per default every administrator-user is sorted out while migrating the data. This is done to prevent previous administrators from local installations to overtake central hosted farms . To override this setting the following line has to be added to the configuration.
KeepAdministrator = true
#Backup the whole database
Task=Backup
Source.DBDriverClass=transbase.jdbc.Driver
Source.DBURL=jdbc:transbase://localhost:2044/ewacore
Source.Username=tbadmin
Source.Password=YourPasswordHere
Target.File=c:\\%timestamp%backup.xml
Integrate specific workshops from a backup
#Integrate two workshops
Task=Copy
Target.DBDriverClass=transbase.jdbc.Driver
Target.DBURL= jdbc:transbase://localhost:2044/ewacore
Target.Username=YourUsernameHere
Target.Password=YourPasswordHere
Source.File=c:\\backup.xml
There will be a log file stored in the folder from where the bam-tool is executed. It will contain information about the process-settings itself followed by information about the result of the copy-process.
The EWA BaM tool is started from the command line. For that the name of the configuration has be added. So a valid call would be:
If no or no valid config-file is found then there will be a warning displayed and the application is going to exit.
If the application is successfully exiting then there is the SystemCode 0 returned. The returncode -1 is returned in case of an error.
20 Single Sign On with EWA net
When it comes to web applications and portal solutions, one of the main annoyances that users have to deal with is having to enter their credential information again and again for many of those applications. Single Sign On (often referred to as SSO) is a mechanism to provide more comfort to the user while still keeping the security aspects in mind.
Single Sign On can be enabled transparently for EWA net, but as it has some requirements from the infrastructure side it cannot and will not be enabled and installed by default. If you decide to switch your EWA net environment to Single Sign On, please keep in mind that you still have to store all the relevant user information inside EWA net's User database. This is caused by the fact that EWA net still has to perform the authorization internally - although the authentication might have already been performed by Single Sign On.
Single Sign On feature will be automatically switched on in case your environment has been prepared according to the steps below. If a user cannot be authenticated via Single Sign On then EWA net automatically falls back to interactive login.
20.1.1 Windows NTLM Authentication
You will typically make use of Windows NTLM authentication if
- most or even all of the users who want to have access to EWA net are setup in a Windows ActiveDirectory structure and login to Windows into a domain
- a Web Server is already part of this domain or can be made part of this domain
Please ensure that you have setup all users with their respective MS Windows domain accounts inside of EWA net, i.e. not just "johndoe", but "EMEA\johndoe" in case the user "johndoe" is part of the "EMEA" domain. Forgetting this results in the fact that users cannot automatically be authenticated.
The passwords of the users inside the EWA net system do not have to be "real" passwords. Dummy passwords ensuring that the EWA net passwords policy are being matched will be sufficient.
20.1.1.1 Setting up SSO on Tomcat and Internet Information Server (IIS)
A quick overview over the necessary steps that are required to allow NTLM authentication with Tomcat and IIS:
After setting up Tomcat and IIS you must also perform the steps in the following sections:
The steps will be described in detail below. Don't worry, they are quite quickly and easily performed.
You may setup IIS on the same machine as your EWA net installation is running on, or you may install it on a separate machine. For smaller installations that will run in NTLM mode only it might be sufficient to setup the IIS on the same machine as the EWA net server is running on.
For large EWA net installations and/or installations that you want to run in mixed mode (users being part of a Windows domain and "other" users who would have to login to EWA net interactively) you will definitely have to setup separate instances of Web Servers - one with NTLM security switched on, one with anonymous security to allow interactive login to EWA net.
If you run a local version of EWA net (with a local access authorization) you will definitely have to setup the WebServer on the same machine as the EWA net Server is running on. If you do not follow this guideline, the EPC net and WIS net application will not start claiming that the cannot exchange a token with the server.
Installation, if not already done, can be performed via the Windows Control Panel in the "Add/Remove Software" control. Choose "Add/Remove Windows Components".
This description assumes that IIS can be used for the EWA net integration only. For hosting of several different applications with this single IIS instance you may encounter restrictions or problems.
After installing IIS you have a new directory structure below C:\InetPub
In order to allow a Web Server plugin to contact the EWA net application server we must enable the module allowing this. Open the file
[EWA_HOME]\server\conf\server.xml
Search for the word "AJP/1.3" which will guide you to the connector for the Web Server plugin. This is by default commented out, so remove the XML comments before and after the "Connector" section.
If the content in your standard XML file looked like this:
  <!--
      Define an AJP 1.3 Connector on port 8009
<Connector port="8009"
    backlog="200"
    maxThreads="200"
    enableLookups="false"
    redirectPort="8443"
    secure="false"
    protocol="AJP/1.3"
    tomcatAuthentication="false" />
 -->
Simply change it to this (see the marked characters):
  <!--
      Define an AJP 1.3 Connector on port 8009
  -->
<Connector port="8009"
    backlog="200"
    maxThreads="200"
    enableLookups="false"
    redirectPort="8443"
    secure="false"
    protocol="AJP/1.3"
    tomcatAuthentication="false" />
Now we have to tell EWA net that clients will contact the EWA net environment via the standard HTTP port 80 instead of the standard EWA net port 9000. In order to achieve this, please open the file
[EWA_HOME]\config\core_cfg.xml
in a text editor and change the following setting accordingly to port 80. Ensure you have SSL disabled
<SECTION name="AccessGateway">
    <SECTION name="ApplicationSettings">
    <!-- SSL within EWA net - do not forget to configure your server accordingly -->
     <PARAMETER name="sslEnabled">false</PARAMETER>
        <!-- currently SSL for Client apps is not supported. Future use.
        Needs further extension of SSL for Struts -->
        <PARAMETER name="sslForClientsEnabled">false</PARAMETER>
     <PARAMETER name="httpPort">80</PARAMETER>
SSL on the EWA net server will not be used. If you want to secure access to EWA net you may install a server certificate on the Web Server machine. Secured connection between the Web Server and the EWA net server is not needed.
Restart the EWA net server now. You will still be able to access the login page via port 9000 on the EWA net server itself, but you will not be able to start any EWA net client application anymore. This is okay.
- Create a new directory on your Web Server machine, i.e. C:\InetPub\wwwroot\ewa_sso. (this is the directory this documentation refers to in the subsequent sections)
- Open the ZIP file which contains the files needed for the integration from [DVD_DRIVE]\ewa\central\tools\iis_integration.zip
- Copy the following files from the ZIP into the directory mentioned above (C:\InetPub\wwwroot\ewa_sso)
isapi_redirect.dll
isapi_redirect.properties
uriworkermap.properties
workers.properties (if you also intend to setup a cluster you may choose to install workers.properties.cluster and rename it to workers.properties) into this directory:
- If you installed the files into the directory recommended above, you can skip this step.
If you decided to choose another location, please open the file isapi_redirect.properties in a text editor now and adjust the path information inside it according to the directory you have chosen to install the files in.
The file by default looks like this - you may change the settings marked bold:
# DO NOT TOUCH THE NEXT ENTRY
extension_uri=/jakarta/isapi_redirect.dll


# YOU MAY TOUCH THESE
# Modify this section to your needs.
log_file=C:\Inetpub\wwwroot\ewa_sso\iis_redirect.log
# MODIFY THIS VALUE TO error ONCE YOUR SYSTEM RUNS CORRECTLY. The logfile size will increase heavily in debug mode!
log_level=debug
worker_file=C:\Inetpub\wwwroot\ewa_sso\workers.properties
worker_mount_file=C:\Inetpub\wwwroot\ewa_sso\uriworkermap.properties
- Open the file workers.properties in a text editor and set the property for the hostname correctly. The standard is "localhost" for an installation where IIS and EWA net server run on the same machine. Replace "localhost" by the name or IP address of your EWA net server.
Example:
# workers.properties.minimal -
#
# This file provides minimal jk configuration properties needed to
# connect to Tomcat.
#
# The workers that jk should create and work with
#
worker.list=ewanet


#
# Defining a worker named ajp13w and of type ajp13
# Note that the name and the type do not have to match.
#
worker.ewanet.type=ajp13
worker.ewanet.host=localhost
worker.ewanet.port=8009
After you have all files installed you can start configuring the IIS. Open the Windows Management Console and open the hive of the "Internet Information Services".
Add the redirection handler which will forward all EWA net related request to the EWA net server. Select the "Default Web Site" hive and display its properties. Select the tab "ISAPI Filters" and add a new filter with name "jakarta" and pointing it to the isapi_redirect.dll file in the installation directory of your SSO files, i.e. C:\InetPub\wwwroot\ewa_sso\isapi_redirect.dll
Press "OK" and select the tab called "Directory Security". Click on "Edit" in the field named "Anonymous access and authentication control". Uncheck any current checkmark and set the checkmark "Integrated windows authentication". Ensure that only this checkmark is set.
Press "OK" to close this dialog and press "OK" again on the properties main dialog. You might be asked whether you want to apply the setting to some other components as well. Simply press "OK" here again and continue.
Now install an additional so called "Virtual Directory". Right-click the "Default Web Site" hive and select "New -> Virtual Directory". This will open a wizard. Please follow the following instructions exactly:
You will be asked for an alias. Please enter "jakarta".
The next screen will ask you for the directory which this virtual directory shall represent. Please enter "C:\InetPub\wwwroot\ewa_sso" or the directory you had chosen above.
The last screen will ask you for the permissions. Ensure you enable the checkmark "Execute (such as ISAPI applications or CGI)".
Finalize the wizard, right click the just created virtual directory "jakarta" and compare your settings with the following screen:
If you run Windows 2003 Server for your Web Server (only in this case) you will have to perform the following additional step which is not needed on Windows 2000 Server based systems:
Click on the "Web Service Extensions" hive and click on "Add a new Web Service extension". If you forget this step the integration will not work as by default unknown ISAPI filters will be forbidden to run. Fill out the appearing dialog as follows:
Okay, that's all for the configuration of the Web Server.
Go to the "Services" hive inside the Management console and restart the "IIS Admin Service" now.
Please review again all your settings.
You can now check whether your Web Server is correctly forwarding the requests to the EWA net server.
Open Internet Explorer on the Web Server machine and enter the URL:
http://localhost/EWA-net
The minimum you should see now is the login mask of EWA net. If you cannot see this, please review the steps above and perform each of the steps again. Typical pitfalls are misspelled directory names, a wrong hostname, etc.
If this check is correctly working, try to connect the Web Server from any other computer of the domain and see if that works as well. Complete your tests by also starting WIS net and EPC net to ensure that your environment is completely working.
If you are currently logged on to a Windows domain and this account has already been setup within EWA net's User Management then you should automatically be logged in - the interactive login page in this case will automatically be skipped and you will automatically see the "Programs" menu within EWA net.
SSO will automatically be used if you connect to the EWA net server via the URL
http://localhost/EWA-net
If you want your users to be forced to login interactively tell them to connect via the URL
http://localhost/EWA-net/Login/showLogonForm.do
If you perform tests on your Web Server on Windows 2003 directly, please check your Site settings within Internet Explorer to ensure that NTLM credentials will really be sent to the web server. The appropriate settings can be found in "Tools -> Internet Options -> Security". Please click on "Sites..." and ensure that "http://localhost" is part of that list. See below:
Example:
Let's assume you have been logged on to Windows as "EMEA\johndoe" where "johndoe" is the account name (user login) and "EMEA" the name of the Windows domain the user belongs to. You may setup a user (no matter which user role) now in EWA net with the fully qualified user login "EMEA\johndoe" (pattern <domain>\<userid>) instead of only his login name. This is the most important thing to be aware of. You will have to provide a password for him as EWA net , but this will not be used for SSO, of course, but it might be used as a fallback should the domain login not be possible.
Now that your Web Server integration successfully works, please do not forget to switch the logging level for the bridge down to "error". Open the file isapi_redirect.properties and change the line loglevel=debug to loglevel=error. Restart the IIS Admin service.
The Java Runtime has recently been improved by Sun to support NTLM authentication in the HTTP Connectivity Layer. This is an important step forward and allows also EWANAPI to be working with SSO enabled.
Thus ensure that at least Java Version 1.5.0_08 has been installed on all the client machines that want to make use of the SSO feature.
This step will only have to be performed if your installation makes use of the EWANAPI interface (i.e. for DMS interconnectivity,...). In order to ensure that EWANAPI can make use of the SSO feature, it needs the information to which Web Server it has to talk and on which port.
Therefore the users have to login to EWA net, run the EWANAPI Installer which will perform the updates.
After the update, you might simply issue a command like this in a command prompt:
EWANAPI.exe
See it? On Windows clients being part of the domain the user credentials will not have to be provided to EWANAPI anymore. The current user credentials of the logged on user will automatically be used. For users not being part of the domain it's still the old game - they will have to provide their credentials on the command line.
The call above should start the WIS net client with the user account of the user who is currently logged on against a domain on that client machine.
Congratulations! Working with EWA net has become even more comfortable for you and your users.
20.1.2 SiteMinder Authentication
The aim of this section is to describe how to integrate EWA net into a SiteMinder authentication environment. SiteMinder is a web based Single Sign On (SSO) solution from Computer Associates. Web application can be seamlessly integrated into SiteMinder SSO – this is achieved by configuring the application’s front end HTTP Server so that requests to the application can be intercepted and in case that the user is not yet authenticated, SiteMinder will redirect the user’s browser to the SiteMinder web based login form where the user can supply his username and password. After successfully authenticating SiteMinder issues an access token in the form of a browser cookie and the user’s browser is redirected back the original page which it attempted to open. Each and every request to the application server is intercepted by SiteMinder, if the request contains a valid access token (cookie) then the request is passed on the Web Application Server (e.g. tomcat via JK/AJP).
Special adaptation of EWA net was required as WIS net and EPC net applications are Java-Swing applications and not web based. These applications communicate with the backend server via HTTP to read or persist data. The “Client Communication Layer” is the component which has been extended to handle the SiteMinder authentication challenges, where possible transparent to the user. In a minor number of cases a Java-Swing dialog will be displayed to gather the user’s credentials required for SiteMinder authentication
20.1.2.1 Configuration of SiteMinder
The installation and base configuration of SiteMinder WebAgent component on the front end HTTP server is beyond the scope of this document please refer to the Computer Associates documentation. After installing the SiteMinder WebAgent on the front end HTTP server it is necessary to specify which URL’s will be secured and which will remain unprotected. Unprotected areas are required for the following reasons:
- EPC net & WIS net use Java WebStart to load the application components (jars etc) from the server. Java WebStart downloads these components from the Application Web Server, however Java WebStart is not capable of handling the SiteMinder authentication challenges.
- When help is started by clicking in one of the Java Swing applications a web browser is started. As this is a new browser instance SiteMinder would challenge the user for a username and password before displaying the help text.
- To allow communication with the server to retrieve SiteMinder settings before the user has logged on.
| URL | Security Setting |
| | |
| /WIS-net/ | Unprotected |
| /EPC-net/ | Unprotected |
| | |
| /EWA-net/ | Protected including all sub directories except the following |
| /EWA-net/download/ | Unprotected |
| /EWA-net/jnlp/ | Unprotected |
| /EWA-net/xmlparameter | Unprotected |
| /EWA-net/user | Unprotected |
It is necessary to configure the SiteMinder WebAgent not to Preserve Post Data. To do this add/set PreservePostData="NO" to the SiteMinder WebAgent LocalConfig.conf file.
SiteMinder installations protecting corporate sites are usually visually customized, thus a few parameters must be configured so that EWA net can function correctly. The following table lists the parameters which must be configured in the core_cfg.xml file which is in the [EWA_HOME]\config\ folder. The parameters are in the SiteMinder subsection of the AccessGateway section.
| Configuration | Default | Type | Description |
| siteMinderEnabled | false | Boolean as String (true | false) | Set to true if the EWA net server is protected by SiteMinder. |
| authURLPattern | n/a | Regular Expression String | The Java Regular Expression which matches positive for the SiteMinder URL to which a request is redirected when authentication is required. |
| form | -- Not set -- | String | The name attribute of the SiteMinder authentication HTML <form> element. If the value is not set then the first form will be assumed. |
| formUser | USER | String | The name attribute of the HTML <input> element where the Username must be entered. |
| formPassword | PASSWORD | String | The name attribute of the HTML <input> element where the Password must be entered. |
| formSubmit | -- Not set -- | String | The name attribute of the HTML <input> element used to submit the form. |
| formCredCookie | FROMCRED | String | The name of the Form Credentials Cookie set by SiteMinder in response to submitting user credentials to the Authentication screen. |
| formSession | SMSESSION | String | The name of the SiteMinder Session Cookie set by SiteMinder in response to submitting a request with a Form Credentials Cookie containing valid user credentials. |
20.1.2.2 Working with SiteMinder SSO integration activated
To finalize the installation restart the Web Application Server [Tomcat | WebSphere] and login to EWA net. You will also need to ensure the usernames in EWA net are the same as those user for logging onto SiteMinder (usually the Email address of the user). When starting EWA net in the browser the URL of the front end server, which has been configured for SiteMinder, will be used. The user will be initially redirected to the Corporate SiteMinder login page where he or she must login. After logging the SSO mechanism of EWA net will come into action and the EWA net application will be shown without the user needing to login again. EPC or WIS net can now be started.
In one use case it will be necessary to reenter his/her credentials. This happens if the SiteMinder session times out which happens if the SiteMinder integration has be configured to force users to re-authenticate after a defined period of time. This configuration is a setting of the SiteMinder plug-in which was installed on the front end Server). If the user is working with a web application then he/she will be redirected to the web based corporate logion screen. If however this happens which working with a non web based application (EPC net or WIS net) then the application will display a dialog requesting the user's credentials.
21 Clustering of an EWA net Server
This chapter is based on an evaluation performed for EWA net. Goal was to find existent possibilities to deliver EWA net in a clustered environment. The main motivation behind the effort is to provide in the future a high available, distributed, fault-tolerant and load-balanced environment.
A clustered EWA net should improve:
- Performance
- Fault-tolerance
- Overall user perception of the system
And reduce:
- application’s downtime potentially to zero[Cluster1]
- number of complains made by users
- time and money lost due to system’s downtime
Nonetheless this description does not inquire into:
- DNS Request Distribution
- Fault-Tolerant, Load Balancing between DNS Servers
- DNS strategies (like round-robin) to resolve domains behind clusters
- TCP NAT Request Distribution
- Distribution of requests across web servers.
- Commercial NAT products that could be used.
- Database/JDBC Request Distribution [Cluster2]
- Fault-tolerant, distributed requests through parallel database in-stances.
- Products offering solutions for database/jdbc clustering
Clustering EWA net local version depends on Apache and Jakarta Tomcat clustering features.
Basically this document assumes that an appropriate DNS and NAT solution for EWA net will be provided by Daimler or other responsible network administrators. On the other hand, this description provides the necessary steps and options to set up an EWA net application with multiple web-servers and JSP Servlet engines. How TCP/HTTP requests reach each of these clustered web-servers is not defined or described.
21.2 Clustering EWA net using Tomcat application server
EWA net local architecture uses Jakarta Tomcat as web server and servlet container. Since EWA net’s content is mostly dynamic, HP suggest keeping mainly Tomcat as web server for serving content. Additional front-end web servers can be used to distribute request amongst several cluster nodes in the EWA net server farm. Besides the request distribution (using a sticky session) the usage of a front-end HTTP server will not generate further performance benefits. The main part for clustering lies in clustering the application servers. HTTP front-end servers could be clustered to improve availability. The EWA net installation in this case should be complete and each application server node should contain the application server and the Transbase content databases. The User Management database should be located at a central location and have a high performance clustered server. The clustered architecture of EWA net should look like this:
Example Clustering setup in a EWA net Farm
21.2.1 NAT Request distributors / Load Balancers
NAT request distributors or Load Balancers can be used for load balancing, fault tolerance, or both. Usually the algorithm chosen to distribute requests depends on the NAT product installed. Most NAT request distributors also offer fault tolerance by detecting various kinds of web server faults, and then will stop distributing requests to any server that is down.
There are many NAT request distributor implementations available, both commercial and as open source software that runs on commodity computer hardware. However further investigation is not part of the scope of this description.
Besides regular NAT request distributor products also Build in Windows 2003 server functionality for load balancing (NLB) can be used for Distributing requests. Note that Windows 2003 NLB is a layer 3 distributor so is not able to detect session types or application server service failures!
21.2.2 Using mod2jk and Apache httpd for Load Balacing
When using Apache httpd as web server and Tomcat as servlet container, the communication connector offered by Tomcat (mod_jk) offers best load balancing and failover across several Tomcat instances. Each Apache with mod_jk in a cluster can perform:
-
Distribute requests to one or more Tomcat instances
-
Detect Tomcat instance failure
-
Detect when a Tomcat instance comes back after failing
-
Understand the Tomcat HTTP Sessions and provide a sticky affinity of the application's EWA net session
21.2.3 Distributed Java Servlet Containers
A distributed servlet container will generally deploy and run one instance of the application per servlet container, with each servlet container and web application in a separated JVM, and requests will be processed in parallel. Additionally, each Tomcat instance runs its own instance of the web application, and treats the application instance as if it is the only instance running.
21.2.3.1 Servlet Sessions
Defined by Java Servlet Specification 2.4 and chosen by Tomcat developers, all requests belonging to the same session from a single client must be processed by the same servlet container instance. This makes Session object replication an optional feature of distributed servlet containers. According to the specification, it is not mandatory for distributed servlet containers to implement session replication.
21.2.3.2 Session Affinity (or Sticky Sessions)
For web applications that are marked as distributable, all requests belonging to one HTTP session are served by one Tomcat instance. This is called session affinity. Session replication is not necessary for the application to function if session affinity is used. However, if the Tomcat instance or the server machine it runs on fails, the servlet session data is lost and the user may need to login again.
As the WIS net and EPC net applications support transparent session recovery, a failover may not be critical is most cases, so using sticky sessions will prevent the requirement for session replication.
If you are not able to run the installation with sticky sessions, you need to implement a session replication, so that the current session state is replicated to all cluster nodes.
21.2.3.3 Replicated Sessions
With replicated sessions, if one Tomcat instance crashes, the session state data is not lost because at least one other Tomcat instance has been sent a copy of that data. Some servlet session replication implementations replicate all sessions to all servlet container instances in the cluster, whereas other implementations replicate one servlet container instance’s sessions to only one or two “buddy” servlet container instances in the cluster.
If the request distribution mechanism between the servers use sticky sessions, session replication is not required (as the application automatically re-connect to server). However session replication can prevent some detailed use cases where problems may arise.
It is also required to mention that the implementation of session replication will generate a bit of network and CPU overhead compared to standalone installations.
21.2.3.3.1 Session Replication in Tomcat 5
Tomcat 5.5 has at least a couple of session replication implementations. This section investigates the open-source implementation which is integrated into Tomcat 5.5. This session replication works based on UDP multicast. Therefore it is necessary that the network adapter used supports multicasting. A unicast TCP implementation is provided for Tomcat 5 also.
Note:
The Windows systems required to run EWA net should already have the appropriate ServicePack installed to solve some issues related to multicasting like Q319627 (Multicast Fragmentation).
See here for more information: http://support.microsoft.com/default.aspx?scid=kb;en-us;319627
21.3 Steps to Cluster EWA net with Tomcat as Application Server
This section assumes you have successfully installed EWA net.
21.3.1 Installing Apache Web Server
Extract the Apache HTTPd installation EXE from EWA net delivery DVD, which is contained in \ewa\central\tools\apache_httpd.zip. (Alternatively you can download the release from http://httpd.apache.org/download.cgi and compile it on your own). Apache installation steps for Windows are simple. Make sure the following Windows services are stopped and configured for “Manual” start if you are using Windows 2000:
Install as many Apache Web servers as the cluster foresees. Usually each HTTP server is installed in a separated server.
This description describes the integration with Apache 2.2.3 - any other version may also be suitable - but has not been tested.
21.3.2 Install and Configure mod_jk Connector
This section describes how to install and use Tomcat 5.5 as a backend servlet container to the Apache HTTPd web server via a custom protocol connector module. The steps must be followed for each Apache and Tomcat instance running and the clustered architecture is assumed to be similar to the architecture figure shown earlier:
-
Before installing mod_jk2 connector, please make sure the Apache HTTPd server is running correctly.
-
Stop “EWA net Server” and Apache HTTPd windows services.
-
Extract the connector from EWA net installation media. The mod_jk is contained in \ewa\central\tools\apache_httpd.zip. Alternatively you can download the module sources from http://tomcat.apache.org/download-connectors.cgi the release 2.0.4 of mod_jk2 connector.
-
Unzip mod_jk.so file into [APACHE_HOME]\modules a file called mod_jk.so.
-
Edit the file [APACHE_HOME]\conf\httpd.conf and add the configuration entries as contained in \ewa\central\tools\apache_httpd.zip --> httpd.conf_entries_example. For further reference please visit http://tomcat.apache.org/connectors-doc/config/apache.html. Please do not forget to adjust the described path's in the file!
# Sample extension file which needs to be added to Apache HTTPD configuration file httpd.conf
# For further referece, please take a look to:
# http://tomcat.apache.org/connectors-doc/config/apache.html

# TODO: Please align path's to you installation
# TODO: After integration is completed and is working, set the logging switch to error
#Load the jk_mod
LoadModule jk_module modules/mod_jk.so
# The name of a worker file for the Tomcat servlet containers
JkWorkersFile "C:/Program Files/Apache Software Foundation/Apache2.2/conf/workers.properties"

# Full or server relative path to the Tomcat Connector module log file
JkLogFile "C:/Program Files/Apache Software Foundation/Apache2.2/logs/mod_jk.log"

# The Tomcat Connector module log level, can be debug, info, warn error or trace
# Note: Set to error if the integration is working!
JkLogLevel debug

# A mount point from a context to a Tomcat worker
JkMount /EWA-net ewanet
JkMount /EWA-net/* ewanet
JkMount /WIS-net/* ewanet
JkMount /EPC-net/* ewanet
-
Extract the file workers.properties from the archive \ewa\central\tools\apache_httpd.zip and modify it with a text editor (i.e. Windows Notepad) depending on your environment. Note that the name of each defined worker needs to match the defined jvmRoute in Tomcats server.xml!
# Configuration filr for mod_jk to connect to Tomcat
# For further reference, please take a look to:
# http://tomcat.apache.org/connectors-doc/config/workers.html

# Define the central EWA net worker
worker.list=ewanet

# Define the EWA net worker as a cluster to balance requests to three hosts
worker.ewanet.type=lb
worker.ewanet.balanced_workers=ewanode1,ewanode2,ewanode3
worker.ewanet.sticky_session=1
worker.ewanet.sticky_session_force=0

# Define EWA net working application host 1
worker.ewanode1.type=ajp13
worker.ewanode1.host=192.168.0.10
worker.ewanode1.port=8009
worker.ewanode1.lbfactor=1

# Define EWA net working application host 2
worker.ewanode2.type=ajp13
worker.ewanode2.host=192.168.0.11
worker.ewanode2.port=8009
worker.ewanode2.lbfactor=1

# Define EWA net working application host 3
worker.ewanode3.type=ajp13
worker.ewanode3.host=192.168.0.12
worker.ewanode3.port=8009
worker.ewanode3.lbfactor=1
21.3.2.1 Changes in all EWA net Servers
These changes should be applied to all EWA net servers in your cluster.
-
Open the file <EWA-net>\server\conf\server.xml and un-comment (enable) the following lines in the connectors section of the file:
<!--
    Define an AJP 1.3 Connector on port 8009
-->
<Connector port="8009"
           backlog="200"
           maxThreads="200"
           enableLookups="false"
           redirectPort="8443"
           secure="false"
           protocol="AJP/1.3" />
-
If you don’t want anymore the users to access EWA net directly through Tomcat, you can comment the connector declaration which uses port 9000 in the file server.xml mentioned before.
-
In the same file modify the Engine definition of Tomcat by modifying the jvmRoute attribute. Each EWA net server in the cluster must have a unique jvmRoute name (e.g. ewanode1, ewanode2, etc). Note that for sticky session the workers in mod_jk's workers.properties need to be named accodingly matching the jvmRoute's!
<!--
    Define the top level container in our container hierarchy
-->
<Engine name="EWA net Server Engine"
        defaultHost="localhost"
        jvmRoute="ewanode1">
21.3.2.2 Configuring Session Replication
Session replication for Tomcat 5.5 is implemented in the core version of the application server. No special extensions of software modules are required.
-
Stop all EWA net servers in your cluster.
-
Tomcat session replication makes use of multicast. Make sure all EWA net servers and used network interfaces support multicasting. Please check out your operating system manuals.
-
Open the file <EWA-net>\server\conf\server.xml and un-comment the following lines inside the EWA net Host section of the file:
<Cluster className="org.apache.catalina.cluster.tcp.SimpleTcpCluster"
         managerClassName="org.apache.catalina.cluster.session.DeltaManager"
         expireSessionsOnShutdown="false"
         useDirtyFlag="true"
         notifyListenersOnReplication="true">

    <Membership className="org.apache.catalina.cluster.mcast.McastService"
                mcastAddr="228.0.0.4"
                mcastPort="45564"
                mcastFrequency="500"
                mcastDropTime="3000"/>

    <Receiver className="org.apache.catalina.cluster.tcp.ReplicationListener"
              tcpListenAddress="auto"
              tcpListenPort="4001"
              tcpSelectorTimeout="100"
              tcpThreadCount="6"/>

    <Sender className="org.apache.catalina.cluster.tcp.ReplicationTransmitter"
            replicationMode="pooled"
            ackTimeout="15000"
            waitForAck="true"/>

    <Valve className="org.apache.catalina.cluster.tcp.ReplicationValve"
           filter=".*\.gif;.*\.js;.*\.jpg;.*\.png;.*\.htm;.*\.html;.*\.css;.*\.txt;"/>

    <ClusterListener className="org.apache.catalina.cluster.session.ClusterSessionListener"/>
</Cluster>
-
Restart Tomcat and Apache.
[Cluster1] A non-stop service is theoretically possible but in practice depends on the clustering choices made regarding overall application architecture, hardware platforms. Training the system’s administrators is also an effective way to reduce downtime.
This chapter tries to answer known typical questions that are known to be occurred during work with EWA net.
22.1 ASRA Panel not available
Question:
When WIS/ASRA net is launched, the ASRA panel is either not active or does not contain content.
Answer:
WIS/ASRA net has problems when using Java 6 as Runtime on client. Please disable Java 6 for usage with Java WebStart. Open Control Panel -> Java. Then the Java Control Panel will show up. Select Tab Java -> Java Application Runtime Settings -> View... and uncheck the boxes in column Enabled in rows where Platform is 1.6.
22.2 Slow working EWA net applications
Question:
Why are WIS net and EPC net working slow while all EWA net web pages are shown fast?
Answer:
Java has several issues when resolving proxy configuration. Per default Java tries to copy the proxy configuration from Internet Explorer. The following issues are known with this behavior:
-
If Internet Explorer uses the option "bypass proxy server for local addresses", Java will still use a proxy for local servers. Java is not capable of re-using this option. Please either disable the proxy completely or configure a manual exception for the EWA net server.
-
If an automatic proxy script (PAC file) is used which contains syntax errors, Java will display errors while Internet Explorer suppresses these errors. Please correct you proxy script if you see problems / error messages during EWA net startup.
-
If you use a plain IP address as proxy hostname which is not able to be reverse looked up, each HTTP call to the EWA net server will be slow. This issue is showing because Java tries to resolve the proxy host for each call and after a period of time will time out. After this timeout the HTTP call will be done. In those cases either correct your name server configuration, add a hosts file o set the proxy by DNS name instead of IP address.
22.3 WIS net and EPC net application are not starting when Single Sign On with NTLM is used
Question:
WIS net and EPC net application are not able to start. The installation uses a automatic login using NTLM.
Answer:
The Java runtime needs to use at least version 1.5.0_08 or newer to allow access to the server by the applications. Please update your Java installation.
22.4 Start of EWA net applications not possible when server is using HTTPS for authentication
Question:
EWANAPI calls to EWA net and TIPS calls where EWA net clients are not running will fail. This is happening on a server using HTTPS.
Answer:
Older Java runtimes have issues when starting applications through HTTPS. This is due to a bug in the HTTPS implementation where incorrect headers are being sent to server. This behavior is fixed in Java 1.5.0_08 and later. Please install either this updated Java runtime or disable header checking in your HTTP proxy server / HTTP firewall.
22.5 Corrupted JARs error message in Java WebStart
Question:
I always get the error message that a JAR was corrupt when trying to start WIS net or EPC net. But the server installation is okay, tested i.e. on the server itself.
Answer:
Check the proxy server settings of WebStart itself. Start WebStart, see the menu File/Preferences. Switch off any Proxy if not needed or adjust the settings to conform to the ones in your Internet Explorer. If you have different settings in WebStart than in InternetExplorer you might run into this problem.
A good approach to install a client Java Runtime Environment on the server itself and switch off the Proxy settings in Java WebStart. Then try to run the client(s) on the server machine to see if the problem can be solved that way. If WIS net and EPC net start on the server, you will succeed in starting the applications by correcting the WebStart settings on the clients as well.
22.6 WIS net does not show any documents
Question:
WIS net starts normally, but it does not display any document. It always says "No documents found."
Answer:
This is typically a problem of the server access authorization or the way a access authorization for a user is being calculated. So several things have to be checked:
- Is the server access authorization correct? Does it allow "Print Documents" in the "ASRA" section of the access authorizations?
- Does the Permission Group in which the user has been setup have appropriate rights?
Try with a user who is setup in a group which makes no restrictions on the server access authorization.
Especially important for StarTekInfo: keep in mind that StarTekInfo provides the restricted access authorization bits, so check them where you store these access authorization bit fields.
Most of the bits will be logically AND'ed to restrict the access authorization.
- Old versions of EWA net had a problem calculating the country code when the PermissionGroup had restrictions in the access authorization. Solution: do not further restrict the server access authorization in the groups.
22.7 WIS net starts with a blank screen
Question:
When starting WIS net, I get a blank screen, FS_W_TITLE is the only information in the windows title bar.
Answer:
This is typically a problem in the WIS net database connectivity
- Check for TransBase Database Services running (Windows Service “TransbaseService” must be running).
- Check that the TransBase kernel is listening on port 2054 and not on the “old” WIS port 2025. See tbwin.ini in the WIS net transbase directory
([EWA-HOME]\database\TransBase WIS)and check the ports for the entry:TRANSBASE_SERVICENAMES=2054:2055
- Check your wis_cfg.xml file for the correct JDBC-URLs. Valid example:
<PARAMETER name="driver">transbase.jdbc.Driver</PARAMETER>
<PARAMETER name="url">jdbc:transbase://localhost:2054/wisnet</PARAMETER>
<PARAMETER name="user">tbadmin</PARAMETER>
<PARAMETER name="password"></PARAMETER>
22.8 ArrayIndexOutOfBoundException on server start
Question:
Business logic throws ArrayIndexOutOfBoundsException in the server log.
(This has not been seen on recent installations anymore)
Answer:
You most probably have some files from an old installation. Please update to a new version.
22.9 EPC net icons will not be displayed
Question:
EPC net starts correctly, but icons will not displayed, the background image is also not displayed.
Answer:
You might have an incorrect setup of your proxy server within Java WebStart or your Internet Explorer. Try to access the application from a client PC without need of a proxy server (typically the server machine itself) and assure that everything works fine there. Then adjust the internet settings on the client PCs correctly. Be sure that DNS is correctly setup.
22.10 SSL secured pages don’t show up
Question:
I’ve activated SSL but it doesn’t work. I get an error in the Internet Explorer when I try to access the login web-page.
Answer:
There are several possibilities, why this could happen:
- If there is a pop-up of the Internet Explorer warning about an unknown certificate, you haven’t installed a trusted certificate at the server.
- If Internet Explorer doesn’t show a page at all, maybe the internet connection is (temporarily?) to slow. Try to open the page locally at the server, using the address “localhost” instead of the real name (ignore the not trusted certificate warning).
- If the web page doesn’t show up completely (e.g. images are missing), try to reload the page. There are problems with the network connection.
SSL uses more resources which might lead to timing problems.
22.11 SSL certificate not accepted
Question:
At startup the server hangs with the exception:
“javax.net.ssl.SSLException: No available certificate corresponds to the SSL cipher suites which are enabled.”
Answer:
The Java Cryptographic API doesn’t accept the certificate, which you added to your certificate store. Make sure a trusted certificate is in the keystore and the keystore itself is valid. E.g. take a look at
http://www.caucho.com/quercus/faq/question.xtp?question_id=1306
22.12 Manually remove illegal entries from the FINCache
A problem that came up several times in operation of the system was that EPC net was not able to operate on FINs/VINs that had been read into the FIN Cache. The only solution was to delete those entries or even all entries of the user.
There is an easy way to reset the FIN Cache if such problems should occur. There are 2 options:
- The user can reset his FIN Cache data himself via the UserManagement
- An administrator can reset the FIN Cache of each individual user.
See the Administration Guide documentation for more information about this feature.
22.13 Enter users with windows domain information
If you use EWA net within an environment which makes use of windows domain information, the UserManagement must be able to handle this domain information.
AccessGateway and UserManagement can handle this, if you provide the login name in the windows specific form of
<domainname>\<userid>
i.e.
accounting\smith
22.14 Reconfigure the time until a session timeout occurs
To change the session timeout for the Access Gateway, edit [EWA_HOME]\webapps\EWA-net\WEB-INF\web.xml which defines the session timeout.
The session timeout is defined inside the XML file with the Key web-app/session-config/session-timeout. The timeout value is specified in minutes of inactivity until the session is removed from the server.
If you have automatic reauthentication switched on (default) you should not have to worry about the session timer.
Do not increase this value too much or set it to values <=0. This will prevent access authorizations from being freed!
22.15 Add user interface languages for the Access Gateway User Interface
To add translations for the Access Gateway login and the user management interface you need to translate one property-file which contains all message resources.
This change should only be done by experienced web server administrators only to ensure that the package is re-packed correctly later again.
To translate the interface for the usermanagement, expand the file
[EWA_HOME]\webapps\EWA-net\WEB-INF\lib\coreServer_Res.jar
It at least contains the default message catalog which is named:
coreServer_Res.properties
To add e.g. a german translation you need to translate the content of the file entries to german and save it as “coreServer_Res_de.properties”, repack the file with a JAR or ZIP utility and add into the same directory. The server chooses the content of the file depending on the language of the browser - not of the country setting of your operating system.
The application uses a fallback mechanism to load the correct translation text, e.g. if your browser language is set to “en_US” the server first looks for a file called “coreServer_Res_en_US.properties”. If this is not available it looks for “coreServer_Res_en.properties”. If this is still not found it uses the general file “coreServer_Res.properties” as fallback.
The extensions to the file name are dependend on the ISO language code and defined within the Java platform.
22.16 Change the minimum Password and Username lengths?
The configuration for the minimum length of passwords and usernames is validated by the access gateway and the user management.
The current setting for these properties is:
- Login: at least one character
- Password: at least 5 characters
We do not encourage to change those settings, but - at your own risk - you might want to adjust the settings in the file
[EWA_HOME]\webapps\EWA-net\WEB-INF\validation.xml
This change should only be done by experienced web server administrators.
This change has to be performed after each and every update of the EWA net software as it is part of the software and not an external configuration entry.
This change does not adjust the internal validators beings used when i.e. importing users via EWA net's import feature.
The minimum lengths are configured by entities with the name "minlength".
22.17 How to Extract Accounting Information from WIS Usage
EWA net collects accounting information about the used document on the server in a anonymous log. This accounting information is stored inside the user management database and can be extracted to see how often documents are displayed.
When the server installation is running for a while, this log table also can grow and get quite large. So once this information is not needed anymore, it can be removed from the database.
To extract the accounting information from user management database, follow these steps:
- Open a command prompt in folder [EWA_HOME]\database\Transbase EWA.
- Type the command tbarc32 -w accounting_backup ewacore p=
This will generate a subfolder [EWA_HOME]\database\Transbase EWA\accounting_backup which contains all database content as text files.
- The text file [EWA_HOME]\database\Transbase EWA\accounting_backup\ACD_AC can now be opened in any text editor and contains the dump of the accounting information as Tab-Separated-File. Each line shows an accounting event with the opened document number, used language and a time stamp.
- All further files in folder [EWA_HOME]\database\Transbase EWA\accounting_backup can be erased.
To remove all accounting information from current database, process the following manual steps:
If an error occurs, the system is working very slowly or a component does not work, the following step might be useful to determine the fault.
- Identify the not functioning application or component (Database, Web masks, WIS net, EPC net, EWANAPI,…)
- Check the log files and find error messages and exception messages
- According to the message the component and the class can be verified
- Check the configuration settings for the component
Contact support with the gathered information.
[2]You will find the EWA net installation software on both WIS net and EPC net DVDs
